Special characters, symbols, and glyphs


Using the Glyphs inspector, you can find and insert special characters, symbols, and glyphs (variations of individual characters or character combinations) of OpenType fonts.

Filtering

All characters, symbols, and glyphs included in a font are displayed by default, but you can filter character subsets to display only the characters you want. For example, you can display only currency symbols or numbers, or you can display only Cyrillic characters and symbols.

Characters included in a font are organized in the following categories:

Common — includes arrows, currency, mathematical symbols, numbers, punctuation marks, and separators as well as CJK symbols and punctuation marks (used in Asian scripts)
Scripts — includes the scripts that the selected font supports, such as Latin, Greek, Cyrillic, Hiragana and Katakana, Han, Arabic, or Hebrew scripts
OpenType — includes the OpenType features provided by the selected font such as standard ligatures, discretionary ligatures, fraction, alternate annotation forms, and more. For more information about OpenType features, see OpenType features.

OpenType fonts

The Glyphs inspector is ideal for viewing and applying the OpenType features provided by OpenType fonts. The default view shows a list of characters in which the glyphs for individual characters appear grouped. Alternatively, you can display a longer list that shows available glyphs at a glance.

Viewing character position

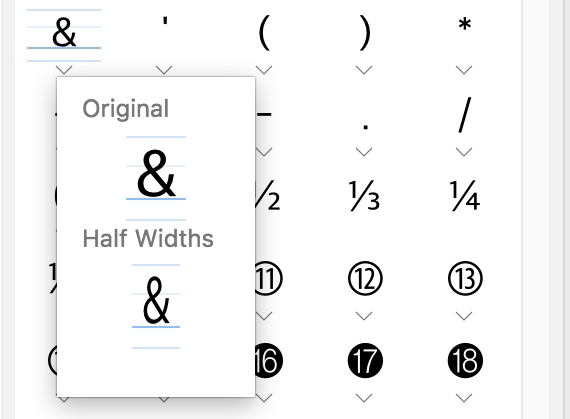
Each selected character appears against a set of blue lines that let you preview its position in relation to the text baseline.

1) Text baseline

3) Font x-height

2) Ascender line

4) Descender line

Most recently used special characters

You can use the list of most recently used special characters to copy characters that you use often. The list retains the font attributes of most recently used characters and any OpenType features that were applied. You can manage the list by removing characters that you no longer need.

Glyphs without Unicode numbers

Glyphs that have no Unicode mapping can be accessed only in specific circumstances and with specific sets of OpenType features. Such glyphs cannot be inserted by using keystrokes, but you can still add them to your document from the Glyphs inspector.

Glyphs without Unicode numbers are inserted as glyphs not characters; therefore, you cannot change their font. For example, if you change the font of text that contains a glyph without Unicode mapping from Gabriola to Impact, the glyph will remain a Gabriola glyph as shown in the following example.

Left: A glyph without a Unicode number. Top: Text that starts with this glyph. Bottom: The font is changed, but the glyph remains the same.

It is easy to tell glyphs without Unicode mapping apart from other glyphs because they are displayed against a gray background in the Glyphs inspector.

To add a special character, symbol, or glyph

Back to Top
1 Click Text Glyphs.
2 In the Glyphs inspector, choose a font from the Font list box.
3 Drag a character in the Character and glyph list to the drawing window.
If you cannot find the character you want, open the Character filter list box, and enable the Entire font check box.

You can also
Drag a character
Using the Pick tool , drag a character to the document window.
Copy a character
Click a character in the Character and glyph list, and click Copy.
View information about a selected character
Click the arrow button at the bottom of the Character and glyph list to view any of the following attributes that are applicable: character name, ID, Unicode number, keyboard shortcut for inserting the character, the OpenType feature name, and the language for glyphs that can be displayed properly only in a specific language.
Zoom in and out
Move the Zoom slider.
To zoom in and out in preset increments, click the zoom buttons to the right and left of the Zoom slider.

To filter special characters, symbols, and glyphs

Back to Top
1 Click Text Glyphs.
2 In the Glyphs inspector, choose a font from the Font list box.
3 Open the Character filter list box, and enable the check boxes for the character subsets that you want to display.
4 Click Close.

To view glyphs of OpenType features

Back to Top
1 Click Text Glyphs.
2 In the Glyphs inspector, choose an OpenType font from the Font list box.
3 Open the Character filter list box, and in the OpenType area, enable any of the check boxes for the available OpenType features.
4 Do one of the following:
To display a list that includes grouped glyphs, make sure that the Show all glyphs button does not appear pressed. To view all glyphs in a group, click a character, and then click the OpenType feature indicator. Click a glyph to display it in the Character and glyph list.
To display a list that includes all available glyphs, click the Show all glyphs button .

Left: The OpenType feature indicators below individual characters show that more glyphs are available. Right: When the Show all glyphs button (1) is pressed, you can see available glyphs at a glance.

Viewing grouped glyphs

*

The Show all glyphs button is not available for fonts that do not support OpenType features.

Some glyphs provided by OpenType features vary depending on the context in which they appear and cannot be shown in the Glyphs inspector. You can view and insert such glyphs in the document window by using the onscreen OpenType feature indicator. For more information, see To enable the onscreen OpenType feature indicator.

To use the list of most recently used special characters

Back to Top
1 Click Text Glyphs.
2 In the list of most recently used special characters (glyphs), perform a task from the following table.


To
Do the following
Copy a character from the list
Control-click the character, and click Copy.
Remove characters from the list
Control-click a character, and click Remove or Remove all.

Was this page helpful? Send feedback.


The features documented in the Help are available in the full version of CorelDRAW Graphics Suite 2021. Some features may not be available in this version of the product.