Draw in perspective
Using perspective drawing (Object ![]() Perspective
Perspective ![]() Draw in Perspective), you can draw complex sketches, patterns, and designs, creating the illusion of distance and depth.
Draw in Perspective), you can draw complex sketches, patterns, and designs, creating the illusion of distance and depth.
When you draw in perspective, CorelDRAW automatically creates a perspective field and lets you add lines and shapes that align with the perspective lines. The result is a perspective group comprising of the perspective field and the objects you added. A drawing can contain multiple perspective groups with unique perspective fields.
A perspective group consists of a perspective field and one or more objects.
The perspective field includes a grid of perspective lines that converge towards one, two or three vanishing points. The visible part of the perspective field is called viewport.
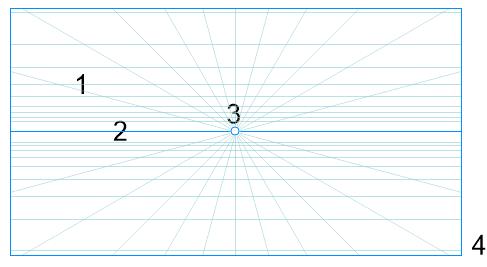
Elements of a perspective field: Perspective grid (1), horizon (2), vanishing point (3), viewport (4)
CorelDRAW provides presets for three types of perspective: one-point, two-point and three-point perspective.
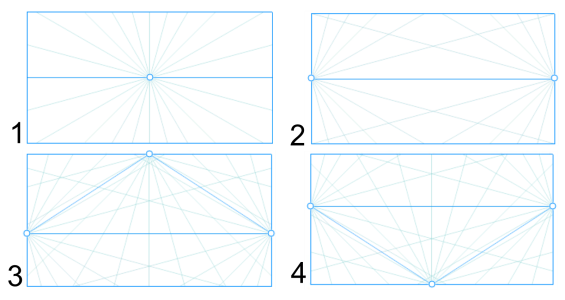
Perspective types: (1) one-point, (2) two-point, (3) three-point (worm’s-eye view), (4) three-point (bird’s-eye view)
Before you start drawing in the perspective field, you can choose the plane you want to draw on. You can choose to draw on an orthographic plane, which is a flat plane without perspective, on the top perspective plane or on one of the side perspective planes.
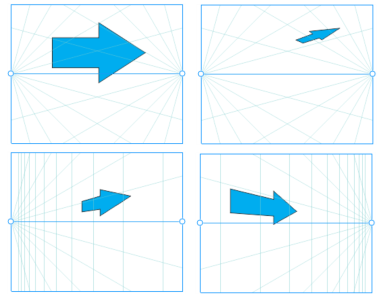
(left to right) The same object placed on four different planes: orthogonal, top, left, and right.
Perspective drawing assumes that the viewer or the camera is at a certain distance from objects. All objects are scaled relative to the viewer. In CorelDRAW, the position of the viewer is indicated by camera lines, which you can use as a drawing aide to place objects. Camera lines are linked to the active perspective plane and are hidden by default. After displaying a camera line, you can move it to increase or decrease the distance between the viewer and the depicted objects. Moving a camera line doesn’t change existing objects, but impacts how an object appears when it is moved to the active plane. If an object side aligns with the camera line, that side appears at 100% - it is not shortened or lengthened. Object sides or objects that appear at a distance from the camera line will appear smaller than their actual size.
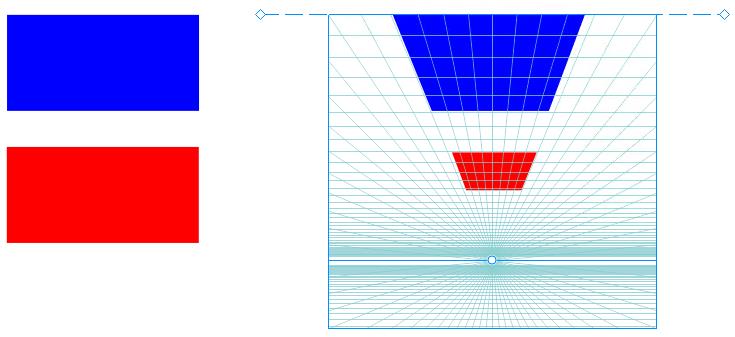
The red rectangle is further away from the camera line so it appears smaller than the blue rectangle.
You can customize the perspective drawing presets by adjusting the perspective field. For example, you can move vanishing points, horizon lines, and camera lines. You can also resize the viewport.
For information about how to edit perspective groups, see Edit perspective groups.
When you save a drawing that contains perspective groups to a CorelDRAW version earlier than 23.0 (2021), the perspective groups keep their appearance, but they are saved as regular groups of objects.
To draw in perspective
You can’t change the perspective type after drawing the perspective field.
The application prevents you from drawing in perspective in certain areas so that you don’t get unexpected results. For example, you can’t draw an object over a vanishing point on a perspective plane.
You cannot draw in perspective when in Focus mode. For more information about Focus mode, see Edit objects in Focus mode.
You can modify the appearance of the perspective field to suit your needs. For example, you can increase the number of the perspective lines for greater drawing precision. For information, see To modify the appearance of the perspective field.
You can also draw objects on the orthographic plane, without perspective, and then move (project) them to another plane. For more information, see Move an object to another plane.
You can also add an existing object to the perspective group. For more information, see Add an object to the perspective group.
To adjust the perspective field

For best results, adjust the perspective field before drawing or adding objects in perspective.
Each time you move a vanishing point, horizon line, or camera line, the perspective field is redrawn. Existing objects remain unchanged but each new object you draw reflects the new position of the vanishing point, horizon line or camera line.
If you can’t move a vanishing point, horizon line or camera line, click the Lock perspective field button ![]() on the floating toolbar to allow changes to the perspective field.
on the floating toolbar to allow changes to the perspective field.
To prevent accidental changes to the perspective field, click the Lock perspective field button ![]() again after you finish editing.
again after you finish editing.