Change bitmaps to duotones
To convert an image to a duotone, you change a bitmap to the grayscale color mode and enhance it using one to four additional colors, giving the image greater tonal depth.
The following four variations of the color mode correspond to the number of additional inks:
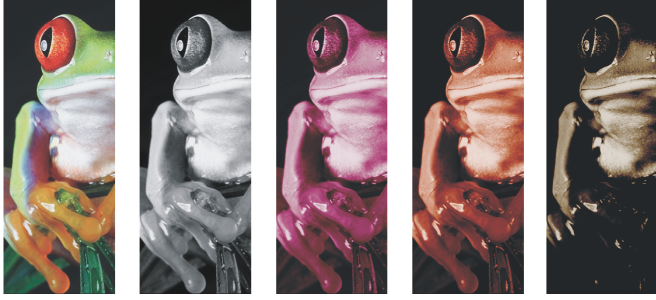
The four color mode variations. From left to right: the original image, monotone, duotone, tritone, and quadtone.
When you change an image to a duotone, a tone curve grid that represents the dynamic tone curves that are used throughout the conversion is displayed. The horizontal plane (x-axis) displays the 256 possible shades of gray in a grayscale image (0 is black; 255 is white). The vertical plane (y-axis) indicates the intensity of a color (from 0 to 100 percent) that is applied to the corresponding grayscale values. For example, a grayscale pixel with a color value of 25 is printed with a 25-percent tint of the color. By adjusting the tone curves, you can control the color and intensity of the tone that is added to an image.
You can save an adjusted duotone tone curve and ink settings and then load them for use with other bitmaps.
Specifying how overprint colors display
When you change an image to a duotone, you can specify the colors to overprint when you print an image. Overprint colors are used to preserve color integrity when inks overlap. When you display the image, each color is applied on the screen in sequence, creating a layered effect.
You can view all instances in which the colors you choose for the duotone conversion overlap. Associated with each instance is the color that is produced by the overlap. You can also choose new overprint colors to see how they overlap.
Duotones hold their color ink information when you save to Encapsulated PostScript (EPS), Portable Document Format (PDF) and CorelDRAW (CDR) file formats. Other file formats don’t support duotone images.
To change an image to a duotone
You can load preset ink colors by clicking Load, locating the file in which the ink settings are stored, and double-clicking the filename.
You can zoom in and out of the image by using the zoom tools above the preview window, and you can pan to a another area of the image by using the Pan tool.