Copy, duplicate, and delete objects
CorelDRAW provides you with several ways to copy objects. When you no longer need an object, you can delete it.
You can cut or copy an object to place it on the Clipboard and paste it into a drawing or another application. Cutting an object places it on the Clipboard and removes it from the drawing. Copying an object places it on the Clipboard but keeps the original in the drawing.
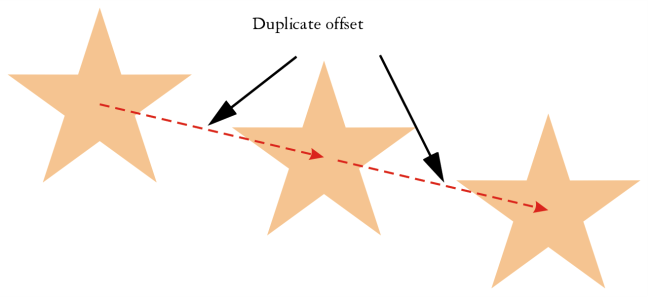
Duplicating an object places a copy directly in the drawing window and does not use the Clipboard. Duplicating is faster than copying and pasting. When an object is duplicated, there is a distance between the duplicate and the original object along the x and y axes. This distance, known as duplicate offset, can be changed in the Options dialog box.
You can apply a transformation, such as rotating, sizing, or skewing, to the duplicate of an object while keeping the original object intact. If you decide that you want to keep the original object, you can delete the duplicate.
You can create multiple copies of objects simultaneously, while specifying their position, without using the Clipboard. For example, you can distribute object copies horizontally, to the left or right of the original object; or you can distribute copies of objects vertically, below or above the original object. You can specify the spacing between copies of objects, or you can specify the offset at which copies of objects are created in relation to each other.
You can use other methods to create copies of objects quickly, without using the Clipboard. You can use the plus sign (+) on the numeric keypad to place a copy of an object on top of the original object, or you can create copies instantly by pressing the Spacebar or right-clicking while dragging an object.
To cut or copy an object
You can also cut or copy an object by right-clicking the object and clicking Cut or Copy.
To paste an object into a drawing
You can use this procedure to paste an object from another application.
To paste an object from an unsupported file format, or to specify options for the pasted object, click Edit ![]() Paste Special. For more information about pasting objects from other applications, see Link and embed objects.
Paste Special. For more information about pasting objects from other applications, see Link and embed objects.
To duplicate an object
Duplicating an object is useful for creating cuttable drop shadows for devices such as vinyl cutters and plotters.
You can also duplicate a selected object by pressing Ctrl + D.
To change the default duplicate offset, click Layout ![]() Document Options. On the General page, type values in the Horizontal and Vertical boxes.
Document Options. On the General page, type values in the Horizontal and Vertical boxes.
To create copies of an object at a specified position

Multiple copies of an object are offset by a specified distance.
You can access the Step and Repeat docker by pressing Ctrl + Shift + D.
To create copies of objects quickly
To transform the duplicate of an object
You can clear a transformation by selecting an object and clicking Object ![]() Clear Transformations.
Clear Transformations.
To delete an object
To retrieve a deleted object, you must use the Undo command. For more information, see Undo, redo, and repeat actions.
You can also delete an object by selecting it and pressing Delete.