PowerClip objects
Corel DESIGNER lets you place vector objects and bitmaps, such as photos, inside other objects, or frames. A frame can be any object, for example artistic text or a rectangle. When the object is larger than the frame, the object, called the contents, is cropped to fit the form of the frame. This creates a PowerClip object.

The rectangle is used as a frame, and the tree is placed inside to create a PowerClip object.
You can create more complex PowerClip objects by placing one PowerClip object inside another PowerClip object to produce a nested PowerClip object. You can also copy the contents of one PowerClip object to another PowerClip object.
You can create an empty PowerClip frame from an object, or convert a PowerClip frame back to an object. Creating empty PowerClip frames or text frames is useful when you want to define the layout of your document before adding the content. For more information about text frames, see Paragraph text. After you create an empty PowerClip frame, you can add contents to it. You can also add contents to a PowerClip frame that already contains another object.
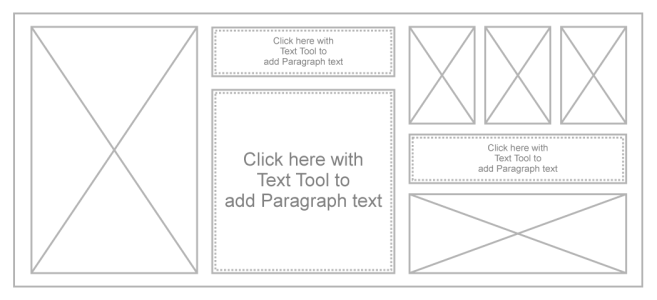
Creating empty PowerClip frames and text frames is useful when you want to visualize your page layout before adding the contents.
After you create a PowerClip object, you can select or edit its contents, or reposition the contents inside the frame. Whenever a PowerClip object is selected, a floating toolbar appears.

The PowerClip toolbar lets you edit, select, extract, lock, or reposition the contents inside the frame. The toolbar appears whenever a PowerClip object is selected.
You can lock the PowerClip contents, so that when you move the frame, the content moves with it. If you want to delete the contents of a PowerClip object or modify it without affecting the frame, you can extract the contents.
You can set the default behavior for dragging content to PowerClip frames, centering new content, and marking empty PowerClip frames.
To create a PowerClip object
You can also right-click an object or a group of objects, click PowerClip inside, and then click the object that you want to use as a container.
If the content is placed so that it falls outside the frame in its current position, it is automatically centered inside the frame to make it visible. To change this setting, click Tools ![]() Options
Options ![]() Corel DESIGNER, choose PowerClip in the left pane, and set the options you want in the Auto-center new content area.
Corel DESIGNER, choose PowerClip in the left pane, and set the options you want in the Auto-center new content area.
To create an empty PowerClip frame
You can also right-click the object, choose Frame type, and click Create empty PowerClip frame.
You can also click the PowerClip frame button on the Layout toolbar. To open the Layout toolbar, click View ![]() Toolbars
Toolbars ![]() Layout.
Layout.
To add content to a PowerClip frame
You can also drag content to the PowerClip frame directly from the Assets docker.
If the content is placed so that it falls outside the frame in its current position, it is automatically centered inside the frame to make it visible. To change this setting, click Tools ![]() Options
Options ![]() Corel DESIGNER, choose PowerClip in the left pane, and set the options you want in the Auto-center new content area.
Corel DESIGNER, choose PowerClip in the left pane, and set the options you want in the Auto-center new content area.
To convert a PowerClip frame back to an object
If the frame contains content, the content is deleted when the frame reverts to a regular object. To avoid losing the content, you can first extract it from the PowerClip object.
You can also click the No frame button on the Layout toolbar. To open the Layout toolbar, click View ![]() Toolbars
Toolbars ![]() Layout.
Layout.
To select the contents of a PowerClip object
To position the contents inside a PowerClip frame
The Fit Proportionally, Fill Proportionally, and the Stretch to Fill commands modify the PowerClip contents. The content remains modified even if you extract it from the frame.
You can also position the contents by clicking the arrow button on the PowerClip toolbar and clicking a command.
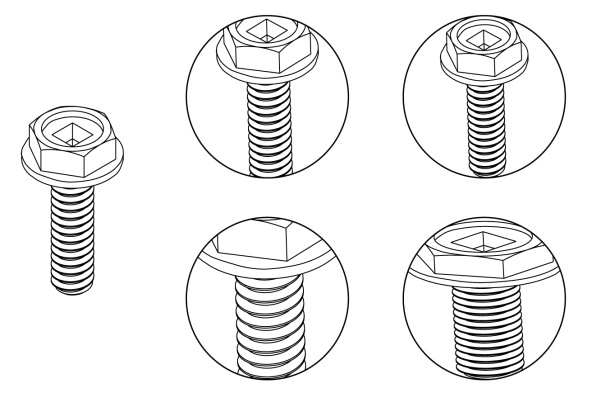
Examples of PowerClip contents positioned by using the following commands: Center contents (top left), Fit contents proportionally (top right), Fill frame proportionally (bottom left), and Stretch contents to fill frame (bottom right).
To copy the contents of a PowerClip object
To edit the contents of a PowerClip object
While you edit the contents, the frame appears in Wireframe mode and cannot be selected or edited.
You can also double-click the PowerClip object to enable it for editing, or select the PowerClip object and click the Edit button on the PowerClip toolbar. When you have finished editing the contents, click the Finish button.
To lock or unlock the contents of a PowerClip object
If you move the frame while the content is unlocked, the content remains stationary and is not visible until you move the frame over it.
You can also right-click a PowerClip object and click Lock Contents to PowerClip, or you can select the PowerClip object and click the Lock Contents button on the PowerClip toolbar.
To extract the contents of a PowerClip object
You must extract the contents of each level in a nested PowerClip separately.
You can also select the PowerClip object and click the Extract Contents button on the PowerClip toolbar.