Split objects
You can split vector objects, text, and bitmaps. You can split single objects or groups of objects along straight, freehand, or Bézier lines.
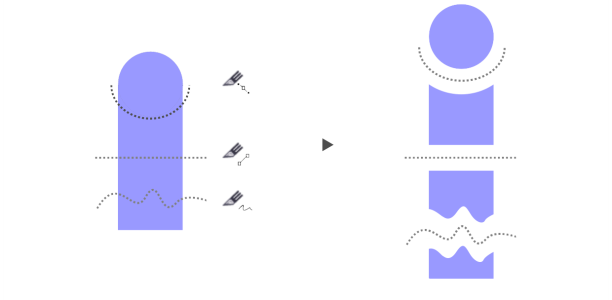
(From top to bottom) Three modes for splitting objects are available: Bézier, 2-Point Line, and Freehand.
In addition, you can create a gap between the new objects resulting from the splitting action, or you can make the new objects overlap.
When you split an object by using the Knife tool ![]() , Corel DESIGNER lets you choose whether to convert outlines to curve objects or keep them as outlines. By default, the application automatically chooses the option that best preserves outline appearance.
, Corel DESIGNER lets you choose whether to convert outlines to curve objects or keep them as outlines. By default, the application automatically chooses the option that best preserves outline appearance.
When splitting objects that have dashed lines, arrowheads or end caps, the Convert to objects option preserves the outline appearance better. When you choose the Automatic option for such objects, Corel DESIGNER converts the outlines to objects.
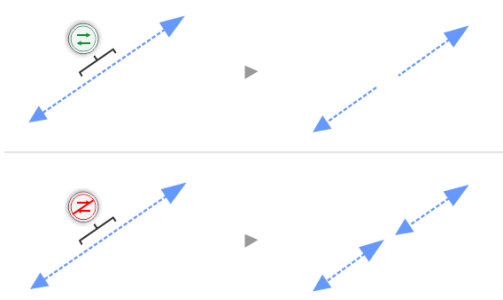
Top: The outline (a dashed line with arrowheads in this example) was converted to objects after the split, preserving the original appearance. Bottom: The Keep outlines option was used, resulting in two lines with start and end arrowheads.
You can split an object into equal segments by using the Object ![]() Shaping
Shaping ![]() Equal Divide command.
Equal Divide command.
To split an object
When you split an object by using the Knife tool, the new objects become curve objects.
To divide an object into equal segments
This feature creates a copy of the object and applies the divisions to the new object. If you do not delete the original object, you will have two objects one on top of the other, and the object will appear unchanged.
The resulting object inherits the original object’s edge and fill properties.
You can divide curves, arcs, rectangles, and polygons. To divide other objects, you must first convert them to curves. You cannot divide images.
You can select multiple objects to divide at one time. If you also enable the Group divisions check box, all the objects that you divide are grouped into a single group.