Correct perspective distortions
You can correct perspective distortions in photos that have straight lines and flat surfaces such as architectural photos and photos of buildings.
Perspective distortions usually occur when you take pictures of tall or wide objects, and the camera sensor is at an angle to the objects. As a result, the photographed objects may appear to be leaning or to be at an angle. Adjusting the vertical perspective helps straighten leaning objects; adjusting the horizontal perspective helps with angled objects. Often, you may need to adjust both the vertical and horizontal perspectives for best results.
You can correct perspective distortions by using the Straighten image dialog box or interactively by using the Perspective Correction tool.
Correcting perspective distortions
Correct perspective distortions interactively
The Perspective Correction tool lets you fix perspective distortions by positioning a bounding box over the distorted elements. You must drag the handles of the bounding box to the corners of the image element that appears to be leaning or at an angle. If you need greater precision, you can move the handles of the bounding box by specifying their x and y coordinates. In addition, you can display grid lines in the bounding box. You can reset the bounding box by clearing any previous adjustments, and you can toggle the grid view.
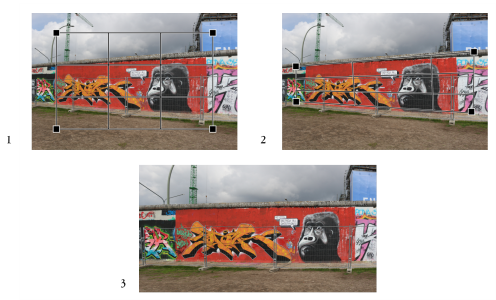
Correcting the perspective: 1. Show the bounding box by selecting the Perspective Correction tool. 2. Position the handles in the corners of the distorted image element. 3. Apply the perspective correction.
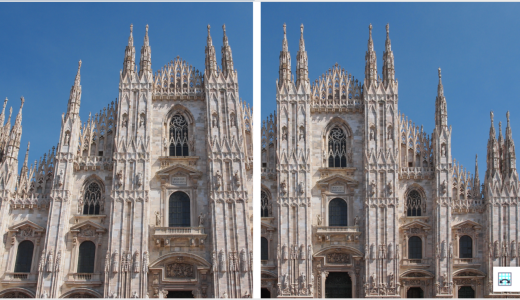
By default, the application automatically crops the image after correcting the perspective to remove the edges that appear at an angle. That is why the resulting image has a smaller size. You can choose not to crop the image but fill the edges of the image with the background color instead.
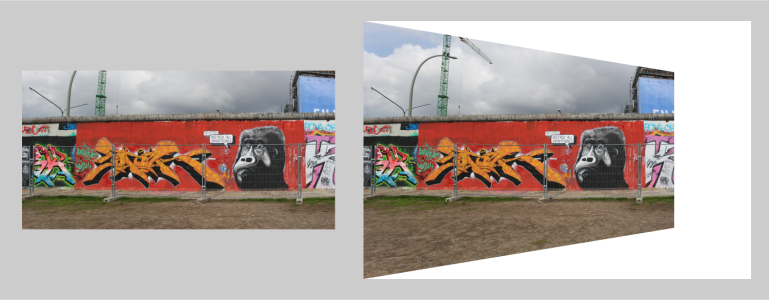
Final results with cropping enabled (left) and disabled (right).
To correct perspective distortions in photos
To correct perspective distortions interactively
The Perspective Correction tool cannot be used on 1-bit and 48-bit images.
You can select the Perspective Correction tool by pressing Shift+C.
You can also double-click the image to apply the perspective.