Guidelines
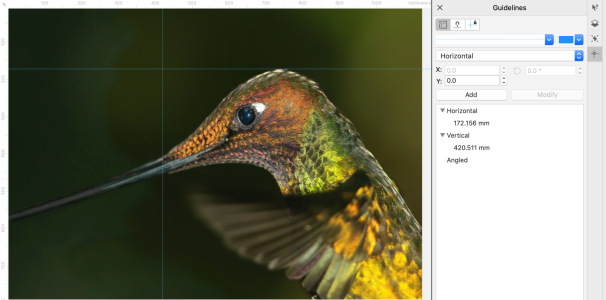
Guidelines are vertical or horizontal lines that you can add anywhere in the image window to help you measure, align, and position image components. The guidelines use the same units of measure as the rulers. When you save an image in the Corel PHOTO-PAINT application, the guidelines are saved too.
You can display or hide the guidelines. You can also add, remove, move, and lock guidelines in the image window. You can add angled guidelines and rotate existing guidelines.
You can have objects and editable areas snap to guidelines, so that when you move an object or editable area to a guideline, the object or editable area automatically aligns to that guideline. You can set the sensitivity of this feature so that the object or editable area snaps when you move within a specific number of pixels of a guideline.
You can change the color and line style of the guidelines to make them stand out against the image background. By default, when you select a guideline, it turns red. When you deselect a guideline, it turns blue.
To display or hide the guidelines
You can also display or hide the guidelines by clicking Window ![]() Dockers
Dockers ![]() Guidelines and clicking the Show guidelines button
Guidelines and clicking the Show guidelines button ![]() .
.
To add a horizontal or vertical guideline
You can also add a guideline by dragging from the horizontal or vertical ruler to the image window.
To add an angled guideline
To remove a guideline
You can also remove individual guidelines by dragging them off the image window.
To move a guideline
You can also move a guideline by nudging it.
To move a guideline by specifying x and y coordinates, click Window ![]() Dockers
Dockers ![]() Guidelines. Select the guideline, type values in the x and y boxes, and click Modify.
Guidelines. Select the guideline, type values in the x and y boxes, and click Modify.
To rotate a guideline
To lock or unlock the guidelines
You can also lock a guideline by clicking Window ![]() Dockers
Dockers ![]() Guidelines and clicking the Lock guideline button
Guidelines and clicking the Lock guideline button ![]() .
.
To have objects and editable areas snap to the guidelines
You can also set objects and editable areas to snap to a guideline by clicking Window ![]() Dockers
Dockers ![]() Guidelines and clicking the Snap to guideline button
Guidelines and clicking the Snap to guideline button ![]() .
.
To set the snap sensitivity of the guidelines
To set the line style and color of a guideline
Changing the line style or color affects all existing guidelines and any subsequent guidelines that you add.