Image dimensions and resolution
The size and resolution of an image affect its print quality. Choose dimensions and resolution that match the intended use of your artwork.
You can change the physical dimensions of an image by increasing or decreasing its height and width. When choosing a unit of measure, you may find the following tips helpful:
Resolution is the amount of detail that an image file contains, or that an input, output, or display device is capable of producing. Resolution is measured in dpi (dots per inch) or ppi (pixels per inch). Low resolutions can result in a grainy appearance; high resolutions can produce higher quality images but result in larger file sizes. Whether you are planning to print your artwork to your desktop printer or use it on the web, keep the following considerations in mind to ensure that the finished image appears as intended.
The size of an image onscreen depends on the pixel height and width of the image, on the zoom level, and on your monitor settings. As a result, the size of the image may appear different on your screen and in print.
Resampling is changing the amount of image detail as you change the resolution and pixel dimensions of an image.
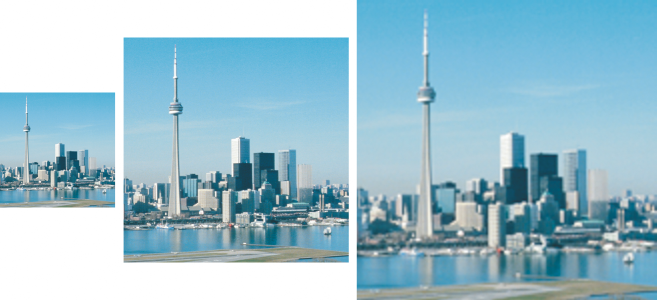
You can change the resolution and size of an image at the same time. Left to right: downsampled image, original image, upsampled image.
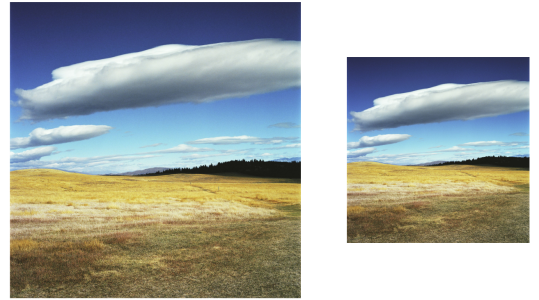
Downsampling decreases the total number of pixels in an image. Best results are usually achieved when downsampling is done after color and tone corrections but before sharpening.
Upsampling adds more pixels to an image. Corel PHOTO-PAINT lets you enlarge images without losing quality and detail. You can choose from several upsampling modes to suit your needs. The Bicubic method adds new pixels between existing pixels and interpolates them based on the colors of neighboring pixels. This method produces smooth tonal gradations. The Nearest neighbor method replaces every pixel with the nearest pixel in the upsampled image, which results in multiple pixels of the same color. This method preserves sharp details, however, it can also produce jagged edges instead of smooth lines and curves. In addition, the application uses advanced machine learning techniques to upscale images by preserving clean edges, sharpness, and fine details. Based on the analysis of a large number of artistic images and photographs, the two artificial intelligence methods, Illustration and Photorealistic, use neural network algorithms to reduce noise and pixelation and maintain color. With its low-level blurring and sharpening techniques that create cartoon-like effects, the Illustration method is great for images such as logos, drawings, illustrations, and paintings created in graphic design software. The Photorealistic method works well for resizing photos.
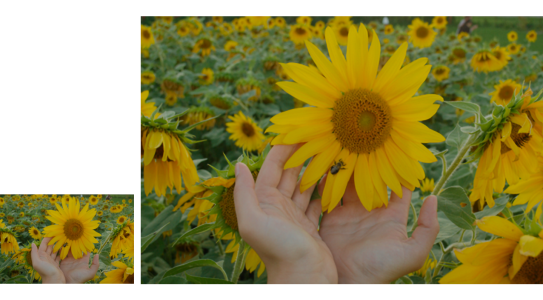
(left) Original photo; (right) The photo is scaled up three times of its original size.
Depending on your system hardware configuration, upsampling an image with the Illustration and Photorealistic methods can take from a couple of seconds to several minutes. When the estimated time to complete the operation exceeds 3 seconds, a progress bar appears to show the remaining time. You can cancel the upsampling process at any time.
Upsampling increases the file size of an image; downsampling decreases it. Resampling with fixed resolution lets you maintain the resolution of the image by adding or subtracting pixels while varying the file size. Resampling with variable resolution keeps the image size in inches, millimeters, or centimeters unchanged while changing the pixel size, resulting in lower or higher resolution than that of the original image.
To change the dimensions of an image
Based on the analysis of your system hardware and the processes that are running in the background when you initiate a Corel PHOTO-PAINT task, the estimated time does not take into account any processes or applications that you may start after launching Corel PHOTO-PAINT and that may affect performance.
By default, the graphics processing unit (GPU) of your computer is used to upsample images. However, if your system’s GPU does not support CUDA or OpenCL (1.2 or higher) and is incompatible with Corel PHOTO-PAINT, you can set the application to use the central processing unit (CPU) instead by clicking Tools ![]() Options
Options ![]() Global, clicking General, and disabling the Resampling option. For information about the Corel PHOTO-PAINT system requirements, see System requirements.
Global, clicking General, and disabling the Resampling option. For information about the Corel PHOTO-PAINT system requirements, see System requirements.
The Photorealistic and Illustration upsampling methods are supported only in the 64-bit version of CorelDRAW Graphics Suite.
When you change the dimensions of an image, you produce better results using width and height values that are factors of the original values. For example, reducing image size by 50% produces a better-looking image than reducing image size by 77%. When reducing an image by 50%, the application removes every other pixel; to reduce an image by 77%, the application must remove pixels irregularly.
To change the resolution of an image
If you resample an image using pixels as the unit of measure, the size of the image also changes.
The Identical values check box is grayed if the Maintain aspect ratio check box is enabled.