Levels (formerly known as Contrast Enhancement)


The Levels filter lets you adjust the tone, color, and contrast of an image while preserving shadow and highlight detail that is lost when you adjust the brightness, contrast, and intensity of an image. An interactive histogram lets you shift or compress brightness values to printable limits. The histogram can also be adjusted by sampling values from the image.

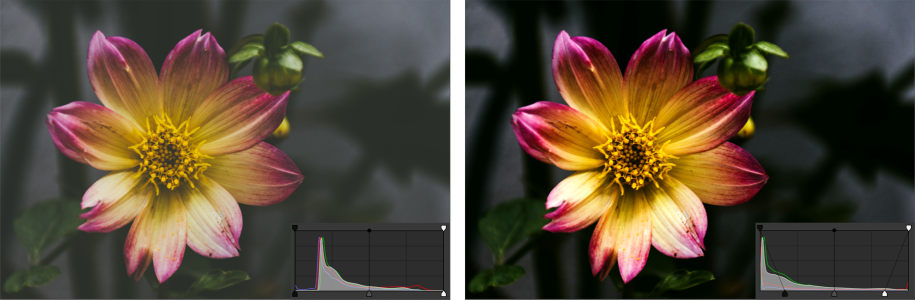
Original image (left); the image with Levels applied and expanded tonal range (right)

To use the Levels adjustment interactively by using a histogram

Back to Top
1 Click Window Dockers Adjustments.
2 Click the Add adjustment button , and click Levels.
3 Move the Output arrows, located above the histogram, to fine-tune the contrast.
To lighten dark areas, move the left arrow to the right.
To darken light areas, move the right arrow to the left.
4 Move the Input arrows, located below the histogram, to adjust shadows and highlights.
The arrow on the left lets you darken shadow areas. The new black point value is mapped to the Output value for shadows, which is 0 by default.
The arrow on the right lets you lighten highlight areas. The new white point is mapped to the Output value for highlights, which is 255 by default.
5 Move the Midtones arrow, located below the histogram, to adjust the midrange tones.


You can also
Adjust image color
Before adjusting the tone, choose a color channel from the Channel list box.
Automatically redistribute pixels across the tonal range
Click the Auto Levels button .
Set black point and white point by sampling pixels in the image
Click the Sample color from shadows button to sample shadow areas, or click the Sample color from highlights button to sample highlight areas.

*

You can also access the Levels adjustment from the Adjust menu.

Was this page helpful? Send feedback.


Some features documented in the Help are available exclusively to subscribers. For more information about CorelDRAW subscription, visit coreldraw.com.