Quick links to procedures on this page:
You can create the illusion of textured brushstrokes by applying the 3D Brushstrokes effect to an image. To use this effect, you need to clone the image, apply brushstrokes to the clone using cloners, and then apply the effect to the image. Corel Painter then uses the difference in luminance between the clone source and the image to produce the texture.

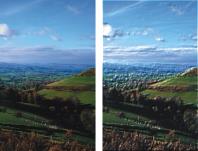
An example of an image before (left) the 3D Brushstrokes method is applied to the image (right).
If you use this method, the look of the brushstrokes on the clone determines how realistic the final 3D brushstrokes appear. So, you may want to set up a more complex brush before painting. For example, you can apply a paper texture to the stroke. Many of the brush variants reveal the paper texture automatically in their brushstrokes.

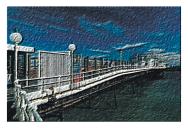
An example of 3D Brushstrokes with paper texture.
You can apply a paper texture when you first create an image, and then paint or draw over it to make a textured canvas for your brushstrokes. However, the texture is erasable, so you might not end up with the same texture across the document surface. As a rule, you add the paper texture as the last step in producing artwork.
You can also use advanced brush settings to make realistic brushstrokes. For example, you can use the Brush Loading option to move underlying colors as you make brushstrokes. For more information, see Using brush loading. You can also apply other settings, like Bleed, or adjust brush size to create complex brushstrokes. For more information, see Adjusting brushes with brush controls.

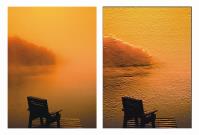
An example of 3D Brushstrokes with Brush Loading (left) and bleed (right) settings applied.
|
4
|
Choose Effects  Surface Control Surface Control  Apply Surface Texture. Apply Surface Texture. |
|
5
|
Choose 3D Brushstrokes from the Using list box. |
|
6
|
Adjust the Softness slider to control the amount of distortion created by the texture. |
|
7
|
In the Appearance of Depth area, adjust any of the following sliders: |
|
• |
Amount — controls how much surface texture is applied to the image. Moving the slider all the way to the right applies the maximum amount. |
|
• |
Picture — controls how much of the color from the original image is applied to the texture. At 100%, the full color of the picture shines through. Moving the slider to the left displays more black, leaving only the shine. |
|
• |
Shine — controls how much highlight appears on the surface of the texture. Higher Shine values make the texture look metallic. |
|
• |
Reflection — maps a clone source image or pattern onto the texture at a variable percentage |
|
8
|
In the Light Controls area, adjust any of the following sliders: |
|
• |
Exposure — adjusts the overall lighting amount from darkest to brightest |
Copyright 2013 Corel Corporation. All rights reserved.
