Quick links to procedures on this page:
You can use the currently selected image’s luminance, or lightness, to produce surface texture. Light parts of the image create dents; whereas darker parts create raised areas. The overall effect gives an embossed look to the image.
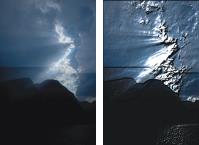
Before (left) and after (right) adding texture based on image luminance.
|
2
|
Choose Effects  Surface Control Apply Surface Texture. Surface Control Apply Surface Texture. |
|
3
|
Choose Image Luminance from the Using list box. |
|
4
|
Adjust the Softness slider to control the amount of distortion created by the texture. |
|
5
|
In the Appearance of Depth area, adjust any of the following sliders: |
|
• |
Amount — controls how much surface texture is applied to the image. Moving the slider all the way to the right applies the maximum amount. |
|
• |
Picture — controls how much of the color from the original image is applied to the texture. At 100%, the full color of the picture shines through. Moving the slider to the left displays more black, leaving only the shine. |
|
• |
Shine — controls how much highlight appears on the surface of the texture. Higher Shine values make the texture look metallic. |
|
• |
Reflection — maps a clone source image or pattern onto the texture at a variable percentage |
|
6
|
In the Light Controls area, adjust any of the following sliders: |
|
• |
Exposure — adjusts the overall lighting amount from darkest to brightest |
Copyright 2013 Corel Corporation. All rights reserved.