Creating discs
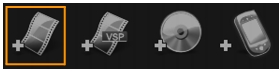
Corel VideoStudio Pro lets you burn your projects to a DVD, AVCHD, Blu-ray or BD-J.
| To output your project to a disc |
1 |
Click Create Disc in the Options Panel.
|
2 |
In the menu that appears, choose an output format.
|
A new window appears where you can customize the disc output. |

Even if you have not saved your VideoStudio Pro project as a *.vsp
file, it can be brought into the Create Disc dialog box for burning.
|
Imported videos are automatically adjusted to the correct aspect
ratio (as specified in the Disc Templates Manager dialog box), and
are letterboxed or pillarboxed to fit the correct aspect ratio.
|
Assembling files
You can import videos or VideoStudio Pro project files (*.vsp) that you want to include in your final movie.
| To add videos |
1 |
Click Add video files. Locate the folder where the videos are stored.
Select one or more video clips.
|
2 |
Click Open.
|
After a video clip is added to the Media Clip List, you may see a black thumbnail that may be caused by a black first frame of the video clip. To change it, click on the video clip and move the Jog Slider to the scene that you want. Right-click the thumbnail and choose Change Thumbnail. |
| To add VideoStudio Pro projects |
1 |
Click Add VideoStudio Pro project files. Locate the folder where the
projects are stored.
|
Select one or more video projects you want to add. |

2 |
Click Open.
|
You can also add videos from DVD/DVD-VR, AVCHD and BDMV
discs.
|
You can trim video clips and VideoStudio Pro project by using the
Jog Slider, mark-in/out, and navigation controls. Trimming a video
gives you the freedom to precisely edit the video length.
|
Adding and Editing chapters
This feature is available only when the Create menu option is selected. By adding chapters, you can create submenus linked to their associated video clip.
You can create up to 99 chapters for a video clip.
|
Represented as a video thumbnail in a submenu, each chapter is like a bookmark for a video clip. When viewers click a chapter, the playback of the video will start from the selected chapter.
If the Create menu option is not selected, you will be guided to the preview step immediately without creating any menus after clicking Next.
When you are creating a disc with only one VideoStudio Pro
project or one video clip, do not select Use first clip as introductory
video if you want to create menus.
|
| To create or edit chapters linked to a video clip |
1 |
Select a video in the Media Clip List.
|
2 |
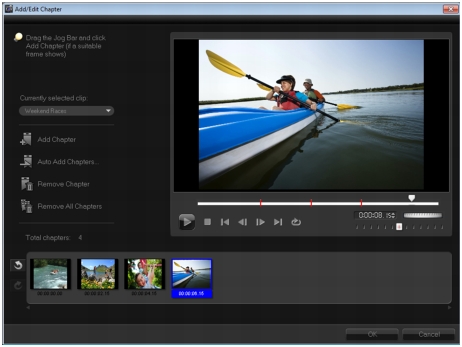
Click Add/Edit Chapter.
|
3 |
Drag the Jog Slider to move to a scene that you want to set as a
chapter point, and click Add Chapter. You can also click Auto Add
Chapters to let VideoStudio Pro automatically select chapters.
|
If you want to use Auto Add Chapters, your video must be at least one minute long or the video has scene change information. |
4 |
Repeat Step 3 to add more chapter points.
|
5 |
Click OK.
|
You can also use Remove Chapter or Remove All Chapters to
delete unwanted chapters.
|
If you click Auto Add Chapters and your video is a DV-formatted
AVI file, the program automatically detects scene changes and
add chapters accordingly. For MPEG-2 files, the program uses the
scene change information to automatically generate chapters.
|
Creating disc menus
Disc menus allow viewers to easily navigate through the contents of a disc and easily choose the specific parts of the video to watch.
In Corel VideoStudio Pro, you can create disc menus by applying menu templates and editing them to suit the requirements of your projects.
To edit a menu template, choose options in the Edit tab or click menu objects in the Preview Window. You can also add new texts, decorations and note menus. Customized templates can then be saved as new menu templates.
If you are authoring Blu-ray discs, you can create advanced menus that can be used without interrupting playback. This means that viewers can navigate the contents of your disc while watching the movie.
Advanced menu templates are made up of three separate layers for background settings, title menus, and chapter menus. You can edit menu objects in the currently selected layer.
The illustration below shows the structure of a disc menu.

In this example, Clip 1 has three chapters, so when you click the Clip 1 video thumbnail, it jumps to submenu #1. If you look at Clip 2, it has no chapters assigned to it, so when you click Clip 2, the video starts playing from the beginning.
| To apply a menu template |
1 |
Select Create menu in the 1 Add Media page and click Next. This
takes you to the 2 Menu & Preview page.
|
2 |
In the Gallery tab, click the menu template thumbnail to apply it.
|
| To add background music to menus |
1 |
Click the Set the background music button |
2 |
In the Open Audio File dialog box, choose the audio file to use.
|
Click the Set audio properties button |
| To add motion menus |
1 |
Select Motion menu in the Edit tab.
|
2 |
Adjust the duration of the video thumbnail by setting the number of
seconds in Duration.
|
Using motion menus increases the file size. Check the disc space usage indicator and the Required menu space value to make sure that the file size remains within the limits of your selected output. |
| To add background image or video to menus |
1 |
Click the Set the background button |
2 |
In the Open Image File or the Open Video File dialog box, choose the
image file or the video to use.
|
| To edit text style in menus |
1 |
Right-click a text object in the Preview Window and select Font
Attributes.
|
2 |
Modify text attributes in the Font dialog box.
|
Clicking Font Settings in the Edit tab also opens the Font dialog
box.
|
| To add menu filters and transition effects |
1 |
Click a menu object in the Preview Window.
|
2 |
Choose the filter or effects to apply in the Edit tab.
|
• |
Moving Path — Applies a predefined motion path to menu objects
such as titles, thumbnail buttons, and navigation buttons.
|
• |
Menu In/Menu Out — Opens a selection filters and transition
effects. If a menu template has a Menu In effect, its default
duration is 20 seconds.
|
![]()
Some template menus have sound effects for Menu In and Menu
Out transitions. These sound effects, however, cannot be
modified nor deleted.
|
The Menu Out transition effects are not supported in DVD+VR
projects.
|
| To resize, rotate, and distort menu objects |
• |
Click the menu object in the Preview Window and drag the handles
or nodes.
|
To revert objects to its previous state, right-click on the Preview
Window and select Set to 0 Degree Angle or Remove Object
Distortion
|
| To align a single menu object |
• |
Click the menu object in the Preview Window and drag it to the
desired position.
|
To use the grid lines as reference when dragging the menu
objects, right-click the Preview Window and select Show Grid Line.
To automatically align your object to the nearest grid line as you
drag it, select Snap to Grid Line.
|
Make sure that the objects are within the TV safe area (defined by
a border with dotted lines).
|
| To align multiple menu objects |
1 |
Select the objects in the Preview Window by pressing the Ctrl key.
|
2 |
Right-click, select Align, and choose from the following options:
|
• |
Left/Top/Right/Bottom — Moves all selected objects (except model
object) horizontally to align left/top/right/bottom side with the left/
top/right/bottom side of model object.
|
• |
Center Vertically — Moves all selected objects vertically to the
center of top/bottom most objects.
|
• |
Center Horizontally — Moves all selected objects horizontally to
the center of left/right most objects.
|
• |
Center Both — Moves all selected objects to the center of top/
bottom/left/right most objects.
|
• |
Space Evenly Vertically — Moves all selected objects (except top/
bottom most objects) vertically to even vertical space. This menu
item is only available when more than three objects are selected.
|
• |
Space Evenly Horizontally — Moves all selected objects (except left/
right most objects) horizontally to even horizontal space. This
menu item is only available when more than three objects are
selected.
|
• |
Equal Width/Height — Resizes all selected objects (except model
object) to the same width/height as model object.
|
• |
Equal Width and Height — Resizes all selected objects (except
model object) to the same width and height as model object.
|
| To arrange the Z-order of menu objects |
• |
Right-click the menu object in the Preview Window, select Align, and
choose from the following alignment options:
|
• |
Bring Forward — Brings selected object one layer forward.
|
• |
Send Backward — Sends selected object one layer backward.
|
• |
Bring to Front — Brings selected object to front.
|
• |
Send to Back — Sends selected object to the layer just above the
background object.
|
| To copy and paste shape menu object attributes |
• |
Right-click the menu object in the Preview Window and select Copy
Shape Attributes or Paste Shape Attributes.
|
You can copy and paste attributes such as width, height, rotation degree, distortion, transparency, shadows and highlights. Text boundary, however, cannot be copied. |
| To apply layout settings to other menu pages |
• |
Click Layout Settings in the Edit tab and select Apply to All Pages of
this Menu.
|
| To add a title menu |
• |
Click Advanced Settings in the Edit tab and select Add Title Menu.
|
| To add chapter menus |
• |
Click Advanced Settings in the Edit tab and select Create Chapter
Menu.
|
To show the menu thumbnail numbers
• |
Click Advanced Settings in the Edit tab and select Show Thumbnail
Number.
|
| To create a menu template: |
1 |
Click Customize in the Edit tab of the 2 Menu & Preview page. The
Customize Menu dialog box appears.
|
2 |
Choose from the following options:
|
• |
Set the background music — Lets you choose an audio file to be
used as background music.
|
• |
Set the background — Lets you choose an image or a video file to
be used as background image or video.
|
• |
Font Settings — Lets you apply text attributes.
|
• |
Pan & Zoom — Lets you apply pan and zoom effects.
|
• |
Motion Filter — Lets you apply motion effects.
|
• |
Menu In/Menu Out — Lets you apply menu motion effects.
|
3 |
In the drop down menu, select Frame, Navigation Button, or Layout
to display the associated preset thumbnails. Double-click a
thumbnail to apply it.
|
You can also resize, distort, rotate, and move menu objects in the Preview Window. |
4 |
Click Add to Menu Template to add the template to the Favorites
folder.
|
When working in the Customize Menu dialog box, use the Font dialog box to accurately resize text. The Font dialog box can also be launched by right-clicking the text and selecting Font Attributes. |
| To add button sounds for advanced menus |
• |
Click the Set the button sound button |
Previewing
Now, it's time to see how your movie looks before you burn it onto a disc. Simply move the mouse and click Play to watch your movie and test the menu on your computer. Use the navigation controls here as you would on a standard remote control of a standalone disc player.

Burning your project onto a disc
This is the final step in the disc creation process. You can burn your movie to a disc, save it to a folder on your hard drive, or create a disc image file so that you can burn the movie at a later time.

Burning options
• |
Disc burner — Specifies the settings for your burning device.
|
• |
Label — Enables you to enter a volume name for the Blu-ray Disc/
DVD. The label can contain a maximum of 32 characters.
|
• |
Drive — Selects the disc burner that you want to use to burn the
video file.
|
• |
Copies — Sets the number of disc copies to burn.
|
• |
Disc type — Displays the output disc format for the current project.
|
• |
Create to disc — Allows you to directly burn your video project onto
a disc.
|
• |
Recording format — Select DVD-Video format to use the DVD
industry standard. To quickly re-edit your disc without copying the
file to the hard drive, select DVD-Video (fast re-editable) which still
complies with the industry standard and has very high compatibility
when working with set-top home DVD players and computer DVD-
ROM. Select DVD+VR for DVD players supporting this format.
|
• |
Create DVD folders — This option is only enabled when the video file
being created is a DVD-Video. The files created are in preparation for
burning the video file to a DVD+VR, AVCHD, BD-J or Blu-ray Disc.
This also allows the user to view the finished disc folders on the
computer using a disc playback software like Corel WinDVD.
|
• |
Create disc image — Select this option if you plan to burn the video
disc several times. By selecting this option, you don't have to
generate the file again when you want to burn the same video disc.
This option is only available for DVD-Video and disabled for AVCHD,
BD-J and Blu-ray Disc projects.
|
• |
Normalize audio — Different video clips may have different audio
recording levels when created. When these video clips are put
together, the volume may vary greatly. To make volume levels
consistent between clips, the Normalize audio function evaluates
and adjusts the audio waveform of the whole project to ensure a
balanced audio level throughout the video.
|
• |
Erase — Deletes all the data on a rewritable disc.
|
• |
Burning Options — Adjusts the advanced output settings for
burning your project.
|
• |
Delete temp files — Removes all unnecessary files in your working
folder.
|
• |
Burn — Begins the recording process.
|
• |
Required space — Serves as a reference when you burn your
projects. These indicators help determine if you have sufficient space
to successfully burn your project onto the disc.
|
• |
Required/Available hard disk space — Displays the space needed by
the project and the available hard drive space.
|
• |
Required/Available disc space — Displays the space needed to fit the
video file on the disc and the space that is available for use.
|
| To burn your movie onto a disc |
1 |
Click Next after you preview your project.
|
2 |
Click Show more output options and enable one or more of the
following options:
|
• |
Create DVD folders — Creates DVD folders in a specified location.
|
• |
Create disc image — Creates an ISO image file of the DVD.
|
• |
Normalize audio — Evens out irregular audio levels during
playback.
|
Create disc image is disabled for AVCHD, BD-J and Blu-ray Disc projects. |
3 |
Click More settings for burning.
|
The Burning Options dialog box appears. Define additional burner and output settings and click OK. |
4 |
Click Burn to start the burning process.
|
Click OK when prompted that the task is done. |
5 |
Click Close to save your work automatically and return to the Corel
VideoStudio Pro Editor.
|
Copying a disc image file
A disc image file is a single file that has captured the entire contents and file structure of a disc. Creating a disc image file on your computer allows you to archive the source disc contents for backup or future burning. You will need sufficient space on your computer to store the disc image file.
| To copy a disc image file: |
1 |
Insert a blank disc into your disc burner.
|
2 |
Click Tools > Burn from Disc Image (ISO).
|
The disc copying dialog box is displayed. |

3 |
In Source disc image file, browse and select your source disc image
(*.iso) file.
|
4 |
Choose your burner drive in Destination.
|
5 |
Click Copy to start copying.
|
Click |
Creating disc labels
Create and print disc labels, case covers, and inserts in Corel VideoStudio Pro. You can add and edit images, texts, and icons to complete your layout.
| To launch the disc label creation dialog box |
• |
Click the Print disc label icon at the lower left part of the Create disc
dialog box.
|
General tab
The General tab allows you to select a disc label or disc cover template to start with. You can then customize the overall design of the disc label, disc cover, insert, or booklet. The actual dimensions of your media or label in relation to the selected paper size is displayed to serve as your guide.
Image tab
The Image tab allows you to adjust the properties of your images.
Text tab
The Text tab allows you to format and adjust the properties of your texts.
Disc label creation options
You can do any of the following tasks when designing a disc label.
• |
Files
|
• |
Load Disc Label — Opens a previously saved disc label project.
|
• |
Save Disc Label — Saves a disc label project.
|
• |
Add Image — Selects an image to add on the label.
|
• |
Add Text — Adds a text object to the label.
|
• |
Add Icon — Adds an icon to the label.
|
• |
Playlist — Opens the Add/Edit Playlist Information dialog box to
allow you to add information on the label such as the album title,
artist name, as well as date.
|
• |
Clear content — Removes all objects and background from the disc
layout. This is useful when starting over with your design.
|
Other options
• |
Show/Hide Disc — Shows/hides the outline of the disc for better
alignment of images or text.
|
• |
Show/Hide Grid — Shows/hides gridlines for laying out images and
text symmetrically.
|
Exporting to mobile device
A video file can be exported to file formats compatible to other external devices such as the iPad, iPhone, iPod touch, Sony PSP, mobile phones, and Windows-based mobile devices such as smartphones and Pocket PCs.
You can only export your project after you have created a video
file.
|
| To export to a mobile device |
1 |
Select a video clip from the Library.
|
2 |
Click the Export to Mobile Device button |
3 |
In the Save dialog box, type the file name and click the device where
to export your movie.
|
4 |
Click OK.
|
Project Playback
Project Playback is used to output your entire project or part of it to a DV camcorder. This also gives you an actual size preview of your movie using the entire screen of either a PC or TV monitor. You can only output your project on a DV camcorder if your project is using a DV AVI template. How your video is played back will depend on the Playback method option that you selected in Preferences.
| To play your project in actual size |
1 |
In the Share Step Options Panel, click the Project Playback button
|
2 |
In the Project Playback - Options dialog box, select Entire project or
Preview range, then click Finish to start viewing the project in full
screen.
|
3 |
To stop the play back, press [Esc].
|
If you only want to output the preview range of your project, select Preview range. |
Recording to a DV camcorder
After editing your project and creating a video file, Corel VideoStudio Pro allows you to record the video to your DV camcorder. You can only record a video that is using DV AVI format to your DV camcorder.
| To record a movie to your DV camcorder |
1 |
Turn your camcorder ON and set it to Play mode (or VTR / VCR
mode). See your camcorder's manual for specific instructions.
|
2 |
Select a compatible DV AVI file from the Library.
|
3 |
In the Share Step Options Panel, click the DV Recording button |
4 |
The DV Recording - Preview Window dialog box opens. You can
preview the video file here. After you are done previewing, click Next.
|
5 |
In the Project Playback - Record Window dialog box, use the
Navigation Panel to go to the section of the DV tape where to start
recording.
|
Click Transmit to device unit for preview to preview your project on the DV camcorder’s LCD monitor. |
6 |
Click Record. After you are done recording your project to the DV
camcorder, click Finish.
|
Before recording a video file back to your DV camcorder, make sure the video is saved with the correct codec. For example, the codec DV Video Encoder usually works well for most NTSC DV camcorders. You can select it from the Compression tab in the Video Save Options dialog box. |
Recording to an HDV camcorder
To record your finished project to an HDV/HD camcorder, you must first render it as HDV/HD-encoded MPEG-2 transport stream file.
| To record a movie to your HDV camcorder |
1 |
Turn your camcorder ON and set it to Play/Edit mode. See your
camcorder's manual for specific instructions.
|
2 |
In Share Step Options Panel, click the HDV Recording button |
The Create Video File dialog box appears. |
3 |
Enter a file name for your video file.
|
4 |
Corel VideoStudio Pro renders the project. When done, HDV
Recording - Preview Window dialog box opens. You can preview the
video file here.
|
5 |
Click Next to start recording.
|
6 |
In the Project Playback - Record Window dialog box, use the
Navigation Panel to go to the section of the DV tape where to start
recording.
|
Click Transmit to device unit for preview to preview your project on the HDV camcorder’s LCD monitor. |
7 |
Click Record. After recording your project to the HDV camcorder,
click Finish.
|
Uploading to the Web
Share your video projects online by uploading your videos to Vimeo, YouTube (in 2D and 3D formats), Facebook and Flickr. You can access your accounts from within Corel VideoStudio Pro.
Please make sure to abide by the terms of use regarding copyright
ownership of video and music as set by Vimeo, YouTube,
Facebook and Flickr.
|
| To upload your video to Vimeo |
1 |
Select a video file or clip from the Library.
|
2 |
In the Share Step, click the Upload to Web button |
3 |
If you have already saved your video file, click Browse for a file to
upload to locate the video from the file directory. If you have not
saved your video, choose from the list of video qualities. Your video
will be saved following the quality settings you selected.
|
4 |
Enter your e-mail address and password.
|
If you do not have an existing Vimeo account, click Join Vimeo to establish an account and follow the on-screen instructions. |
5 |
Click Log in. The authorization appears.
|
6 |
Fill in the necessary information such as your video title, description,
privacy settings and additional tags.
|
7 |
Click Upload to upload your video. The Upload Video Progress bar
shows the progress of your upload.
|
8 |
Click Done when uploading is completed. This launches the Vimeo
web page where you can check out the recently uploaded video file.
|
| To upload 2D and 3D videos to YouTube |
1 |
Select a video file or clip from the Library.
|
2 |
In the Share Step, click the Upload to Web button |
3 |
If you have already saved your video file, select Browse for a file to
upload to locate the video from the file directory. If you have not
saved your video, select from the list of video qualities. Your video
will be saved following the quality settings you selected.
|
To maximize 3D potentials in YouTube, make sure that the 3D video files is in Side-by-side format. |
4 |
Choose a video file or clip from the directory folder and click Open.
This will launch the Log-in YouTube window.
|
5 |
If you already have an account, enter username and password.
|
If you do not have an existing YouTube account, click Join YouTube to establish an account and follow the on-screen instructions. |
6 |
Click Next. The Copyright Disclaimer page will appear. Check the
agreement statement and click Next.
|
7 |
Fill in the necessary information about the video in the metadata
dialog box that appears.
|
8 |
Click Upload. The Upload Video Progress bar shows the progress of
your upload.
|
9 |
Click Done when the video has been successfully uploaded. This
launches the YouTube web page where you can check out the
recently uploaded video file.
|
| To upload your video to Facebook |
1 |
In the Share Step, click the Upload to Web button |
2 |
If you have already saved your video file, select Browse for a file to
upload to locate the video from the file directory. If you have not
saved your video, select from the list of video qualities. Your video
will be saved following the quality settings you selected.
|
3 |
Choose a video file or clip from the directory folder and click Open.
This will launch the Log in to Facebook window.
|
4 |
Enter your e-mail address and password for your Facebook account
and click Login.
|
If you do not have a Facebook account, you can create one by clicking the Sign up for Facebook link. |
You can also enable Keep me logged in to Corel VideoStudio Pro to allow the program to remember your account details to skip this step the next time you log in. |
5 |
Click Allow to permit the program to post the video in your profile.
|
6 |
Enter your Title and Description in the text boxes provided and
choose the Privacy settings for your video.
|
You can also click Log in as another user to use another Facebook account. |
7 |
Click Upload and monitor the upload progress.
|
8 |
Click Done and your default web browser will open to view the video
you uploaded in your Facebook profile.
|
| To upload your video to Flickr |
1 |
In the Share Step, click the Upload to Web button |
2 |
If you have already saved your video file, select Browse for a file to
upload to locate the video from the file directory. If you have not
saved your video, select from the list of video qualities. Your video
will be saved following the quality settings you selected.
|
3 |
Choose a video file or clip from the directory folder and click Open.
This will launch the Log in to Flickr window.
|
4 |
Enter your e-mail address and password for your Yahoo! Mail
account and click Sign in.
|
5 |
Enter your username for your Flickr account and click OK, I’LL
AUTHORIZE IT.
|
If you click NO THANKS, you will be taken to your Flickr home page and will not continue with the upload process. |
If you do not have an associated Flickr account, you will be automatically directed to sign up for Flickr. |
6 |
Enter your desired Title, Description and Tags in the text boxes
provided and choose the set where you want to add your video.
|
Choose your desired privacy settings in Set Privacy. |
7 |
Choose the safety level and content type for your video in Set safety
level and Set content types.
|
8 |
Click Upload and monitor the upload progress.
|
9 |
Click Done and your default web browser will open to view the video
you uploaded in your Flickr profile.
|
|
|
Was this page helpful? Send feedback. (Internet connection required.)
|
Copyright 2012 Corel Corporation. All rights reserved.