Enhancing clips
Corel VideoStudio Pro lets you improve the appearance of a video or image clip by adjusting its current properties such as its color settings in Color Correction.
Adjusting color and brightness
Adjust color and brightness settings of photos and video on the Timeline by clicking Color Correction in the Options Panel.
| To adjust color and brightness |
1 |
Select the video or image clip to enhance on the Timeline.
|
2 |
Drag the sliders to the right to intensify the Hue, Saturation,
Brightness, Contrast or Gamma of the clip.
|
3 |
Watch the Preview Window to see how the new settings are
affecting the image.
|
Double-click the appropriate slider to reset the original color setting of the clip. |
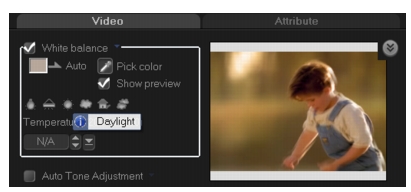
Adjusting white balance
White balance restores the natural color temperature of an image by removing unwanted color casts due to conflicting light sources and incorrect camera settings.
For example, an object illuminated with incandescent lights may turn out too reddish or yellowish in an image or video clip. To successfully achieve a natural look, you need to identify a reference point in your image which represents the color white. Corel VideoStudio Pro gives you different options in selecting the white point:
• |
Auto: Automatically chooses a white point that is well-matched with
the overall color of your image.
|
• |
Pick Color: Allows you to manually select the white point in the
image. Use the Eyedropper Tool to pick a reference area that should
be white or neutral gray.
|
• |
White balance presets: Automatically selects white point by
matching specific light conditions or scenarios.
|
• |
Temperature: Allows you to specify color temperature of light
sources in Kelvin (K). Lower values indicate Tungsten, Fluorescent and
Daylight scenarios while Cloudy, Shade and Overcast fall under high
color temperature.
|
| To adjust White balance |
1 |
Select an image or video clip on the Timeline or the Library.
|
2 |
In the Edit Step Options Panel - Video tab, click Color Correction.
|
3 |
Check the White balance option box.
|
4 |
Determine how you want to identify the white point. Choose among
the different options (Auto, Pick color, White balance presets or
Temperature).
|
5 |
If you have selected Pick color, choose Show preview to display a
preview area in the Options Panel.
|
6 |
When you drag your cursor to the Preview area, it will change to an
eyedropper icon.
|
7 |
Click to identify a reference point in your image which represents the
color white.
|
8 |
Watch the Preview Window to see how the new settings are
affecting the image.
|
Click the White balance drop-down arrow to display more color adjustments you can use. Select either Vivid Color or Normal Color for the color intensity. As for the level of sensitivity of White balance, you can choose any of the following options: Weaker, Normal and Stronger. |
Adjusting tones
To adjust the tone quality of your video or image clips, click Color Correction in the Edit Step Options Panel and select Auto Tone Adjustment. You can indicate if you want the clip as Brightest, Brighter, Normal, Darker or Darkest by clicking the Auto Tone Adjustment drop-down menu.
Applying pan and zoom effect
Pan & Zoom is applied to photos, and it emulates the pan and zoom movements of a video camera. This is known as the “Ken Burns effect”.
To apply pan and zoom effect to photos, right-click the photo in the Timeline and select Auto Pan and Zoom.
You can also apply pan and zoom to a photo by clicking Pan & Zoom in the Options Panel Photo tab.
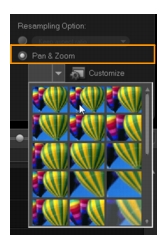
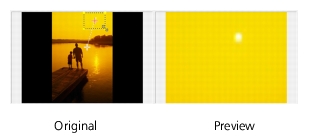
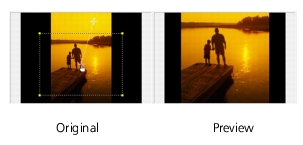
You can customize a pan and zoom effect. The procedure below shows an example of how to start zoomed in on a subject, then pan and zoom out to show the whole image.
| To customize pan and zoom effect |
1 |
In the Photo tab, select Customize under Pan & Zoom.
|
2 |
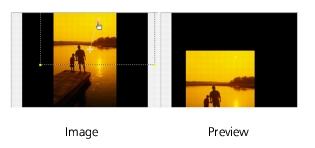
In the Pan and Zoom dialog box, the crosshairs |
3 |
Drag the Start key frame, represented by crosshairs in the Image
Window, to the area where you want to focus.
|
4 |
Zoom in on the area by minimizing the marquee box or by increasing
the Zoom ratio.
|
5 |
Drag crosshairs of the End key frame to your desired final point.
|
6 |
Click |
7 |
Click OK to apply the effect to the image.
|
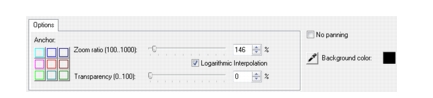
Additional options in the Pan and Zoom dialog box allow you to further customize this effect. Click the Anchor boxes to move the marquee box to fixed positions in the Original Window.
To zoom in or out of a fixed area without panning the image, select No panning.
To include a fade-in/out effect, increase the Transparency. The image will fade to the Background color. Click the color box to choose a background color, or click ![]() to select a color on the Image Window.
to select a color on the Image Window.
Resizing and distorting clips
| To resize or distort a clip |
1 |
Select a clip in the Video Track then click the Attribute tab in the
Options Panel.
|
2 |
Check the Distort clip option box. The yellow handles will appear. Do
the following steps:
|
• |
Drag yellow handles at the corners to resize the clip proportionally
(A).
|
• |
Drag yellow handles at the sides to resize without maintaining
proportions (B).
|
• |
Drag the green handles at the corners to skew the clip (C).
|