Working with Audio
Sounds are one of the elements that determine the success of your video production. Corel VideoStudio Pro allows you to add music, narration, and sound effects to your project.
The Audio feature in Corel VideoStudio Pro consists of four tracks: one Voice and three Music. You can insert narrations on the Voice Track and the background music or sound effects on the Music Track.
Adding audio files
You can add audio files to your project in any of the following ways.
• |
Add audio files to the Library from a local or network drive.
|
• |
Rip audio from CD
|
• |
Record a voice-over clip
|
• |
Use SmartSound
|
You can also extract audio from a video file. |
| To add an audio file to the Library |
• |
Click |
The Corel VideoStudio Pro DVD also comes with several audio clips
ready for your use. Click |
Adding voice-over narration
Documentaries, news and travel features often use narrations to help the audience understand what is going on in the video. Corel VideoStudio Pro allows you to record your own narration.
| To add voice-over narration |
1 |
Move the scrubber to the section of the video where you want to
insert your voice-over.
|
2 |
In Timeline view, click the Record/Capture Option button and select
Voice-over. The Adjust Volume dialog box appears.
|
You cannot record over an existing clip. When a clip is selected, recording is disabled. Make sure that a clip is not selected by clicking on an empty area on the Timeline. |
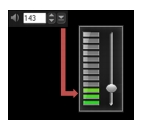
3 |
Speak into the microphone and check if the meter responds
accordingly. You can use the Windows audio mixer to adjust the level
of the microphone.
|
4 |
Click Start and begin speaking into the microphone.
|
5 |
Press [Esc] or click Stop to end recording.
|
The best way to record narrations is to do the recording in 10 to 15-second sessions. This makes it easier to remove a badly recorded narration and redo it. To remove, just select the clip on the Timeline and press [Delete]. |
Adding background music
Corel VideoStudio Pro can record and convert sound tracks from your CD into WAV files and then insert them onto the Timeline.
Corel VideoStudio Pro also supports WMA, AVI, and other popular audio file formats which you can directly insert onto the Music Track.
Importing music from an audio CD
You can import music tracks from an audio CD. Corel VideoStudio Pro copies the CDA audio file then saves it in your hard drive as a WAV file.
| To import music from an audio CD |
1 |
Click |
2 |
In the Music & Voice tab panel, click Import from Audio CD. This
opens the Rip CD Audio dialog box. To check if the disc is detected,
ensure that Audio drive is enabled.
|
3 |
Select the tracks to be imported in the Track List.
|
4 |
Click Browse and select the destination folder where the imported
files will be saved.
|
5 |
Click Rip to start importing the audio tracks.
|
SmartSound
The Auto Music Maker feature of Corel VideoStudio Pro lets you easily create high-quality sound tracks from royalty-free music and use them as background music in your project. You can have different tempos or musical instrument variations per music.
Auto Music Maker utilizes the patented SmartSound Quicktracks
technology in sound track creation and features a variety of
SmartSound royalty-free music.
|
With SmartSound, you can set the feel of your movie with the background music of your choice. Set Mood allows you to adjust parameters to change the mood or feel of a song. You can create several moods for a single song.
| To add third-party music |
1 |
Click |
2 |
Click the Auto Music tab.
|
3 |
Select how the program will search for music files in Scope.
|
4 |
Select the Library from where to import the music.
|
5 |
Select the music to use under Music.
|
6 |
Select a Variation of the selected music. Click Play Selected Music to
play back the music with the variation applied.
|
7 |
Set the Volume level then click Add to Timeline.
|
Select Auto trim to automatically trim the audio clip or cut down to the desired duration. |
Using the Clip Volume Control
You will find the volume control in the Music & Voice tab. Clip volume represents the percentage of the original recorded volume. Values range from 0 to 500%, where 0% completely silences the clip and 100% retains the original recorded volume.
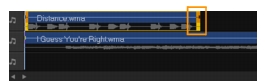
You can also trim or split audio clips from the Preview Window. Drag the Trim Markers to trim the audio clip. You can also move the Scrubber and use the Mark-in / Mark-out buttons to trim the clip or click ![]() to split the clip.
to split the clip.
Trimming and cutting audio clips
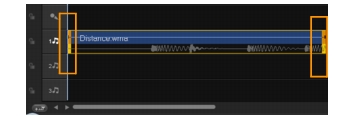
After recording voice and music, you can easily trim your audio clips in the Timeline. There are two ways to trim audio clips:
• |
In the Timeline, a selected audio clip has two handles that can be
used for trimming. Just grab a handle, either from the beginning or
end, and drag it to shorten a clip.
|
• |
Drag the Trim markers.
|

Stretching audio duration
The time stretch feature allows you to stretch an audio clip to match video duration without distorting its pitch. Normally, stretching audio clips to fit the project results in a distorted sound. The time stretch feature will make the audio clip sound like it is just played in a slower tempo.
When you stretch an audio clip by 50-150%, the sound will not
be distorted however, if stretched below or above that range the
sound may be distorted.
|
| To stretch the duration of an audio clip |
1 |
Click |
2 |
In the Music & Voice tab panel, click Playback Speed to open the
Playback Speed dialog box.
|
3 |
Enter a value in Speed or drag the slider to change the speed of the
audio clip. A slower speed makes the clip’s duration longer while a
faster speed makes it shorter.
|
You can specify how long the clip will play in Time stretch duration. The speed of the clip will automatically adjust to the specified duration. This feature will not trim the clip when you specify a shorter time. |
You can stretch the time of an audio clip on the Timeline by holding [Shift] then dragging the handles on the selected clip.
Fade-in/out
Background music that starts and ends gradually is commonly used to create smooth transitions. For each of your music clips, you can click ![]() and
and ![]() to fade-in and fade-out the volume at the start and end of the clip.
to fade-in and fade-out the volume at the start and end of the clip.
Audio view
The key to making narrations, background music, and existing audio of your video clips blend well together is to control the relative volume of your clips.
To blend the different audio tracks in your project, you can click ![]() in the toolbar. If you are in 5.1 mode, the Surround Sound Mixer is displayed. If in Stereo mode, the 2-Channel Mixer is displayed.
in the toolbar. If you are in 5.1 mode, the Surround Sound Mixer is displayed. If in Stereo mode, the 2-Channel Mixer is displayed.
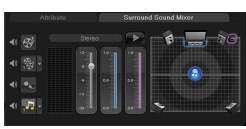
Using the Surround Sound Mixer
Unlike a stereo stream that carries only two audio channels, Surround Sound has five separate audio channels encoded into one file which is delivered to five speakers and one sub-woofer.
The Surround Sound Mixer has all the controls to position sounds around the listener, outputting audio through the 5.1 configuration of multiple speakers. You can also use this mixer to adjust the volume for stereo files, making it sound as if the audio moves from one speaker to another.
Adjusting stereo channels
In stereo files (two channels), a single waveform represents the left and right channels.
| To use stereo mode |
1 |
Go to Settings and disable or uncheck Enable 5.1 Surround in the
menu.
|
2 |
Click |
3 |
Click on the Music Track.
|
4 |
Click Play in the Options Panel.
|
5 |
Click the music note symbol in the center of the Surround Sound
Mixer. Drag it to either right or left, depending on your preferred
sound position.
|
Moving the note symbol will affect the sound coming from your preferred direction. |
6 |
Drag Volume to adjust the volume level of the audio.
|
Mixing Surround Sound
All audio channels in Surround Sound have a set of similar controls that you will find in the stereo configuration of this panel, plus a few more specific controls.
• |
Six-channel VU Meter: Front Left, Front Right, Center, Sub-woofer,
Surround Left, Surround Right.
|
• |
Center: Controls the amount of output sound from the center
speaker.
|
• |
Sub-woofer: Controls the amount of low-frequency sound output.
|
| To use Surround Sound mode |
1 |
Go to Settings and enable or check Enable 5.1 Surround in the
menu.
|
2 |
Click |
3 |
Click the music note symbol in the center of the Surround Sound
Mixer. This time, drag it to any of the six channels depending on your
sound position preference. Repeat steps 1 and 2 in using stereo
mode.
|
4 |
Drag the Volume, Center and Sub-woofer to adjust sound controls
of your audio
|
You can also adjust the sound position preference of your tracks in Video, Overlay and Voice. To do this, click your preferred track button and repeat steps 2 to 3. |
Duplicating an audio channel
Audio files sometimes separate the vocal sound from the background audio and put them in different channels. Duplicating an audio channel allows you to mute the other channel.

To duplicate an audio channel, click ![]() in the toolbar. Click the Attribute tab and select Duplicate audio channel. Choose which audio channel to duplicate this may be Left or Right.
in the toolbar. Click the Attribute tab and select Duplicate audio channel. Choose which audio channel to duplicate this may be Left or Right.
Applying audio filters
Corel VideoStudio Pro allows you to apply filters to your audio clips in the Music and Voice Tracks. Click ![]() in the Library Panel and open the Options Panel to display the Music & Voice tab. Click Audio Filter in the Options Panel to apply audio filters. Ensure that you are in the Timeline View.
in the Library Panel and open the Options Panel to display the Music & Voice tab. Click Audio Filter in the Options Panel to apply audio filters. Ensure that you are in the Timeline View.
| To apply audio filters |
1 |
Click |
2 |
Select the audio clip on which to apply an audio filter.
|
3 |
In the Music & Voice tab. click Audio Filter. This opens the Audio
Filter dialog box.
|
4 |
In the Available filters list, select the desired audio filters and click
Add.
|

An audio filter can be customized if the Options button is enabled. Click Options to open a dialog box where you can define the settings for the particular audio filter. |
5 |
Click OK.
|