Working with clips
Clips whether audio, video, or photos are the foundation of your project and manipulating them is the most important skill you can master.
Adding video clips
There are several ways of inserting video clips to the Timeline:
• |
Select a clip in the Library and drag and drop it to the Video Track or
Overlay Track. Multiple clips can be selected by pressing [Shift] or
[Ctrl].
|
• |
Right-click a clip in the Library then select Insert To: Video Track or
Insert To: Overlay Track.
|
• |
Select one or more video files in Windows Explorer then drag and
drop to the Video Track or Overlay Track.
|
• |
To insert a clip from a file folder directly to the Video Track or Overlay
Track, right-click the Timeline, select Insert Video and locate the
video to use.
|
Aside from video files, you can also add video from DVD or DVD-
VR formatted discs.
|
Adding photos
Photo clips are added to the Video Track the same way as video clips. Before you start adding photos to your project, determine first the photo size that you want for all your photos. By default, Corel VideoStudio Pro adjusts the size to keep the photo’s aspect ratio.
| To make the size of all inserted photos the same as your project’s frame size |
1 |
Select Settings: Preferences - Edit.
|
2 |
Change the Image resampling option default to Fit to project size.
|
Color
Color clips are usually added as backgrounds and are useful for titles. Adding of color clips on the Video Track follows the same procedure as that of video and image clips. For more information about adding color clips, see Adding Color Clips under Library in Edit Step.
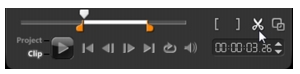
Playback speed
You can modify the playback speed of your videos. Set your video in slow motion to emphasize a movement, or set it to play at lightning speed and give your movie a comical air.
| To adjust the speed attributes for your video clip |
1 |
Click Playback Speed in the Options Panel of the Edit Step.
|
2 |
Drag the slider according to your preferences (i.e., slow, normal or
fast), or enter a value. The higher the value you set, the faster the
playback of your clip. (Values range from 10-1000%). You can also
specify a set duration for the clip in Time stretch.
|
3 |
Click Preview to view the results of your settings then click OK when
finished.
|
Hold [Shift] then drag the end of the clip on the Timeline to
change the playback speed.
|
The black arrow means you are trimming or extending the clip,
while the white arrow means that you are changing the playback
speed.
|
Reversing video playback
Reverse the playback of the video by selecting Reverse video in the Options Panel.
Replacing a clip
Media clips in the Timeline can be replaced in its current position. When you replace a clip, the attributes of the original clip are applied to new clip. To replace a clip, drag the video to the Timeline and hold the [Ctrl] key.
| To replace a clip |
1 |
Right-click a media clip in the Timeline that you want to replace.
|
2 |
Choose Replace clip from the right-click menu and the Replace/relink
clip dialog box appears.
|
3 |
Browse for the media clip you want in place of the clip in the
Timeline and click Open. The clip in the Timeline will automatically
be replaced with the one you chose.
|
In replacing clips, the new clip must be longer than the clip to be replaced in the Timeline. |
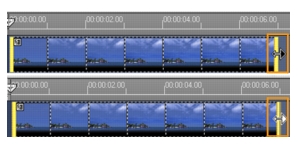
Trimming a clip
The best part of editing your movie on your computer is the ease with which you can split and trim your clips with frame accuracy.
| To split a clip into two |
1 |
In Storyboard View or Timeline View, select the clip you want to split.
|
2 |
Drag the Scrubber to the point where you want to split the clip.
|
Click |
3 |
Click |
| To trim a clip with the Trim markers using Single Clip Trimmer |
1 |
Double-click a video clip in the Library or right-click on a video clip
and choose Single Clip Trim to launch the Single Clip Trim dialog box.
|
2 |
Click and drag the Trim markers to set the Mark-in/Mark-out points
on the clip.
|
3 |
For more precise trimming, click on a Trim marker, hold it, and use
the left or right arrow keys on your keyboard to trim one frame at a
time. The Mark-in/Mark-out points can also be set by pressing [F3]
and [F4], respectively.
|
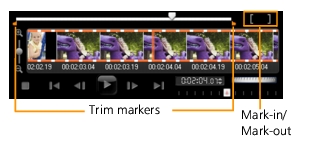
4 |
To preview the trimmed clip only, press [Shift + Space] or hold [Shift]
and click the Play button.
|
You can also use Zoom controls to display each frame of your video on the Timeline and trim one frame at a time. The Scroll Bar makes navigating through your project quicker and easier. A wheel mouse can also be used to scroll, and to zoom by pressing [Ctrl]. |
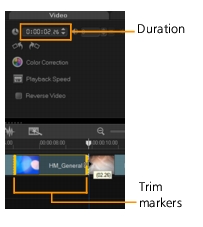
| To trim a clip directly on the Timeline |
1 |
Click a clip on the Timeline to select it.
|
2 |
Drag the Trim markers on either side of the clip to change its length.
The Preview Window reflects the position of the Trim marker in the
clip.
|
Instant timecode tip is a feature of Corel VideoStudio Pro that allows you to add clips with a specific timecode. It appears while trimming and inserting overlapping clips on the Timeline, enabling you to make adjustments based on the timecode shown. For example, the instant timecode tip appears with the format 00:00:00.00 (00 - 04.25). 00:00:00.00 indicates the current timecode where the selected clip is located. The (00 - 04.25) start-end range represents the duration of one overlapping clip with the previous clip and another overlapping with the next clip. |

| To trim a clip using the Duration box |
1 |
Click a clip on the Timeline to select it.
|
2 |
Click the timecode in the Duration box in the Options Panel and
enter the desired clip length.
|
Changes made in the video Duration box only affect the Mark-out point. The Mark-in point remains unchanged. |
Split by Scene
Use the Split by Scene feature in the Edit Step to detect different scenes in a video file and automatically break it down into several clip files.
The way Corel VideoStudio Pro detects scenes depends on the type of video file. In a captured DV AVI file, scenes can be detected in two ways:
• |
DV Recording Time Scan detects scenes according to their shooting
date and time.
|
• |
Frame Content detects content changes, such as motion change,
camera shifting, brightness change, etc., and splits them into
separate files.
|
In an MPEG-1 or MPEG-2 file, scenes can only be detected based on content changes (i.e., by Frame Content).
| To use Split by Scene on a DV AVI or MPEG file |
1 |
Go to the Edit Step and select a captured DV AVI file or an MPEG file
on the Timeline.
|
2 |
Click |
3 |
Choose your preferred scan method (DV Recording Time Scan or
Frame Content).
|
4 |
Click Options. In the Scene Scanning Sensitivity dialog box, drag the
slider to set the Sensitivity level. A higher value means more precision
in the scene detection.
|
5 |
Click OK.
|
6 |
Click Scan. Corel VideoStudio Pro then scans through the video file
and lists all the detected scenes.
|
You may merge some of the detected scenes into a single clip. Simply select all the scenes that you want to join together then click Join. The plus sign (+) and a number indicates how many scenes are merged into that particular clip. Click Split to undo any Join actions that you have done. |
7 |
Click OK to split the video.
|
| Multi-trimming your video |
The Multi-trim Video feature is another method for breaking down a clip into multiple segments. While Split by Scene is automatically done by the program, Multi-trim Video gives you complete control over the clips you wish to extract, making it even easier to include only the scenes you want.
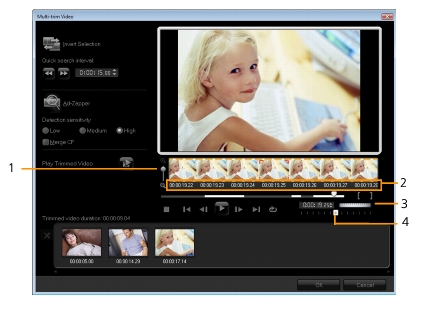
• |
1 - Timeline zoom
|
Drag up and down to sub-divide a video clip into frames per second. |
• |
2 - AccuCut Timeline
|
Scan a video clip frame by frame for accurate mark-in and mark-out positions. |
• |
3 - Jog Wheel
|
Use to scroll to different parts of the clip. |
• |
4 - AccuCut Timeline
|
Preview the clip at different playback speeds. |
| To trim a video file into multiple clips |
1 |
Go to the Edit Step and select the clip that you want to trim.
|
2 |
Double click the clip to open the Options Panel.
|
3 |
Click Multi-trim Video in the Options Panel.
|
4 |
View the whole clip first by clicking Play to determine how you want
to mark segments in the Multi-trim Video dialog box.
|
5 |
Choose the number of frames to display by dragging the Timeline
zoom. You can choose to display the smallest subdivision of one
frame per second.
|
6 |
Drag the Scrubber until you get to the part of the video that you
want to use as the beginning frame of the first segment. Click |
7 |
Drag the Scrubber again, this time, to the point where you want the
segment to end. Click |
8 |
Do steps 4 and 5 repeatedly until you have marked all the segments
you want keep or remove.
|
To mark segments in and out, you can press [F3] and [F4] while playing the video. |
Click |
Quick search interval allows you to set a fixed interval between frames and browse through the movie using the set value. |
9 |
Click OK when finished. The video segments that you kept are then
inserted onto the Timeline.
|

Saving trimmed clips
Frequently, when you make changes (i.e., after auto-splitting clips using Split by Scene, extracting clips using Multi-trim Video, or manually trimming clips), you may wish to make a permanent change to the clip and save the edited file. Corel VideoStudio Pro gives you a margin of safety since it saves the trimmed video to a new file and does not alter the original file.
To save, select a trimmed clip in the Storyboard View, Timeline View or the Library and select File: Save Trimmed Video.