The Color tab in the Tools panel lets you access tools focused on color control. The controls are organized into five sections: Curves, Color Correction, Color Balance, White Balance, and Color Management.
Curves
The Curves section is an intelligent combination of standard Curves and Levels tools found in many image editing programs.
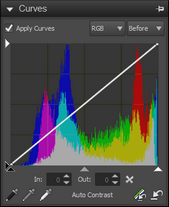
The Curves section includes the following controls:
| • | Apply Curves — enables or disables Curves. |
| • | RGB drop-down — allows selecting of individual color channels, or the combined RGB mode. |
| • | Before/After drop-down — switches the display from showing the histogram before curve adjustments are applied and after adjustments are applied |
| • | Left White Arrow — sets the input 255 (white) point. Dragging this arrow down shifts the histogram left, making the image darker. |
| • | Bottom White Arrow — sets the output 255 (white) point. Dragging this arrow to the left brightens your image, but it can clip highlight details. |
| • | Left Black Arrow — sets the input 0 (black) point. Dragging this arrow down shifts the histogram to the left, making the image darker. |
| • | Bottom Black Arrow — sets the output 0 (black) point. Dragging this arrow to the right deepens the shadows, and can clip shadow detail. |
| • | Bottom Grey Arrow — sets the output 128 (gray) point. Dragging this arrow to the right shifts the midtones to higher values, brightening the image; dragging the arrow to the left darkens the image. |
| • | Click inside the Curve tool — click inside the curve tool itself to set or adjust the curve. You can set multiple points and drag to fine-tune your tone control. |
| • | AutoContrast — click this button to set the output white and black points based on image content. It uses the AutoLevel values (highlight and shadow) to perform a one-time adjustment to increase contrast. The main difference between this tool and AutoLevel is that the output white and black values can be more easily adjusted than the AutoLevel values. |
| • | Black Point tool  , Gray Point tool , Gray Point tool  , White Point tool , White Point tool  — click a tool, then click the image in the Preview panel to set the black, gray, or white point to the values of the pixel that you click. — click a tool, then click the image in the Preview panel to set the black, gray, or white point to the values of the pixel that you click. |
| • | Reset All  and Reset Current and Reset Current  — Reset All restores the curve values to a flat curve. Reset Current resets the current RGB channel only. — Reset All restores the curve values to a flat curve. Reset Current resets the current RGB channel only. |
Color Correction
The Color Correction section of the Color page in the Tools panel lets you adjust your image selectively based on colors that you sample from your image or colors that you set in the Color Picker. The colors you select are stored in color wells. The first six color wells (top row) are preset to the primary and secondary colors. The second set of color wells (bottom row) can be set to any color you choose.
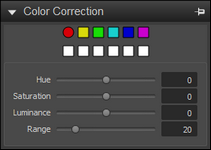
To pick a color as the starting point for a color correction
| 1. | In the Tools panel, click the Color tab, and open the Color Correction section. |
| 2. | Click any adjustable Color Well  that isn't assigned a color (white wells in the second row). that isn't assigned a color (white wells in the second row). |
| 3. | Click the Color Picker  that appears next to the Hue slider and click anywhere within your photo to select a color that will be used for color adjustment. that appears next to the Hue slider and click anywhere within your photo to select a color that will be used for color adjustment. |
After your starting color is selected, you can adjust the Hue, Saturation, or Luminance of that color within your image.
| 4. | Adjust Range to control the color tolerance. A small range adjusts only colors very close to your selected color; a higher range adjusts a larger color range in your image. |
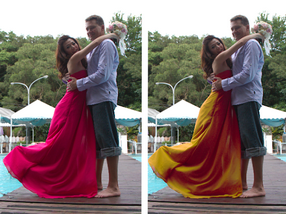
In this example, Selective Color was used to sample the dress. The Hue was adjusted to change the color of the dress.
Tip: You can also assign a new color to a color well by clicking the color well  that displays to the left of the Color Picker . This opens a color selector window where you can pick a color as your adjustment color.
Color Balance
This section in the Tools panel lets you precisely balance the colors in your image. You can use the following controls:
| • | Cyan/Red, Magenta/Green and Yellow/Blue — shifts the color along the color axis. |
| • | Saturation — aadjusts the intensity of the colors in the image. High saturation settings boost colors and provide rich, vivid color. Low saturation settings produce pastel and more muted colors. |
| • | Vibrance — applies a gentle version of Saturation that avoids the oversaturation of skin colors and image areas that are already richly saturated. |
| • | Hue — changes the colors in an image, rotating the color wheel by the amount indicated on the slider. For example, if the Hue slider is set to 60, this value is added to the original hues in your image, so greens become cyan, blues become magenta, and reds become yellow. |
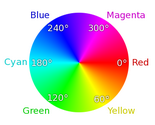
| • | HSL/HSV — choose between correcting images in HSL (Hue / Saturation / Luminance) and HSV (Hue / Saturation / Value) color spaces. |
White Balance
White Balance provides several preset white balance settings, such as As Shot, Click White, and Custom Kelvin.
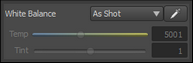
Different light sources have different characteristics or warmth that effects how objects appear to you camera. White Balance lets you adjust the overall color in the image, ensuring that colors are accurately reproduced in your photos. You can select a White Balance preset, such as Sunny, Shady, Tungsten, or Flash, or you can use Click White to select a neutral colored object in your image (something that should appear as a neutral gray) which adjusts all the colors in your image to make the point that you clicked neutrally colored.
To set white balance with the Click White tool
| 1. | In the White Balance section of the Basic Adjustments page, click the Enable the Click-White tool button or press I. |
| 2. | In the Preview panel, experiment by clicking a neutral area of your photo. The ideal place to click is on a neutral grey that is not overexposed (pure white) or underexposed (pure black) on the image you want to adjust. Clicking different spots will result in different corrections. |
| 3. | To fine-tune the white balance, adjust the Temp slider. |
Color Management
This tool controls the color management mode applied to the .
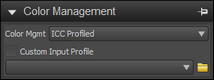
| • | Color Mgmt — enables color management when set to an ICC profile. Switching this to None-Linear still applies color management, but leaves the image in a linear color space. |
| • | Custom Input Profile — advanced users can choose to create an input profile from the linear data associated with a camera profile. |
For more information, see About color management.
© 2013 Corel Corporation


