|
Standard tools |
  
|
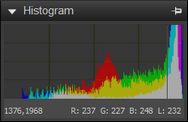
When you click the Standard tab on the Tools panel, you can access some of the most commonly used image editing tools. Grouping these frequently used adjustments together in one place means that you can perform basic edits quickly without switching between tabs. The controls are divided into three sections: Histogram, Basic Adjustments, and Presets.
A histogram is a visual representation of the data that makes up your image. The left side represents the darker areas in your image, the right side represents the highlights, and the height of the colored curves shows you how many pixels of a given value are found in your image.

Basic Adjustments
This section holds the most commonly used image adjustment controls. Many photographers will likely find most of the controls they need in this section.
AutoLevel examines the tonal range of your image and sets the black and white points to be at points such that a fixed percent of the image will be pure black and pure white. There are two edit boxes in AutoLevel: the left box sets the percentage of the image to be set to pure black and the right box sets the percentage to be set to pure white.
Perfectly Clear, powered by Athentech Technologies Inc., is a simple way to quickly optimize your images. Perfectly Clear is award-winning technology that automatically optimizes the lighting for each and every pixel while maintaining true color and zero clipping. Perfectly Clear also removes abnormal tint and restores faded photos. It also uses medical imaging technology to improve contrast and sharpen.
There are three settings within Perfectly Clear that control how much tint adjustment is performed when Perfectly Clear is enabled:
| • | Tint Max — applies the full range of tint correction |
| • | Tint Min — limits the tint correction, allowing some tint change to occur, but preserving some of the original tint |
| • | Tint Off — tint correction is turned off. All other aspects of Perfectly Clear are still applied. Use this setting to preserve the color of your original image. |
For RAW images, you can select among several preset white balance settings, such as As Shot, Click White, and Custom Kelvin.
Different light sources have different characteristics or warmth that affects how your camera captures images. White Balance lets you adjust the overall color in the image, ensuring that colors are accurately reproduced in your photos. You can select a White Balance preset, such as Sunny, Shady, Tungsten, or Flash, or you can use the Click White tool (on RAW, JPEG, or TIFF files) to select a neutral colored object in your image (something that should appear as a neutral gray) which will adjust all the colors in your image to make the point that you clicked neutrally colored.
To set white balance with the Click White tool
| 1. | In the White Balance section of the Basic Adjustments page, click the Enable the Click White tool button |
| 2. | In the Preview panel, experiment by clicking a neutral area of your photo. The ideal place to click is on a neutral grey that is not overexposed (pure white) or underexposed (pure black) on the image you want to adjust. Clicking different spots will result in different corrections. |
| 3. | To fine-tune the white balance, adjust this with the Temp slider. |
Straighten rotates your image to level a horizon or otherwise straighten your image. For more information, see Straightening.
Exposure performs an overall exposure correction, either brightening or darkening all portions of your image.
Recovers detail from apparently overexposed portions of the image.
Fill Light brightens shadows and the darker portions of the image without overexposing highlights, and with minimal effect on midtones.
Blacks controls the black point in the image. Values lower than zero remove black from the image; values higher than zero darken the image. The Histogram section displays the changes in the image.
Saturation adjusts the intensity of the colors in the image. High saturation settings boost colors and provide rich, vivid color. Low saturation settings produce pastel and more muted colors. Setting Saturation to zero produces a pure monochrome, black-and-white image.
Vibrance is a version of saturation that performs a more gentle correction to skin and other image areas that are already richly saturated.
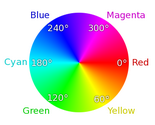
Hue changes the colors in an image, rotating the "color circle" by the amount indicated by the slider. For example, if the Hue slider is set to 60, then 60 is added to the original hues in your image, so greens become cyan, blues become magenta, and reds become yellow.

Increasing Contrast makes the dark areas in the image darker, and the bright areas brighter.
Sharpening an image makes the high detail portions of the image stand out more by making the edge details more pronounced.
Note: Fine detail control tools like Sharpening should be applied and evaluated while looking at a 100% Zoom of the image, either in the Preview panel or by using the Magnifier.
RAW Noise
RAW Noise reduces noise in RAW files only.
The bottom of the Basic Adjustments section includes a Keywords area that shows the keywords for all selected versions. When you have multiple versions selected, the following color coding is used:
| • | red — the keywords apply only to some of the selected versions |
| • | green — the keywords apply only to the active version |
| • | no color — the keywords apply to all selected versions |
Presets are a great way to help speed up your workflow. You can save your favorite adjustments to presets, create keyword presets, or combine a wide range of photo editing in a preset that can be applied with one click.
For more information, see Adjustment Presets.
© 2013 Corel Corporation