Quick links to procedures on this page:
• |
• |
• |
• |
• |
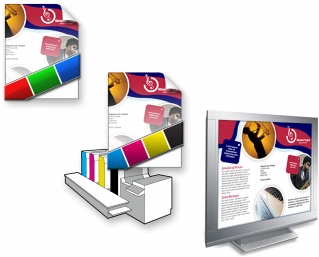
Soft proofing provides an on-screen preview of a document as it will appear when it is reproduced by a specific printer or displayed on a specific monitor. Unlike the “hard-proofing” technique that is used in a traditional printing workflow, soft proofing lets you look at the final result without committing ink to paper. You can verify whether the color profile of the document is suitable for a specific printer or monitor and avoid unwanted results.
Top left: An RGB color profile is assigned to the document. Middle and right: Assigning a specific CMYK profile allows an on-screen simulation of the printed output.
To simulate the output colors that are produced by a device, you need to choose the color profile of the device. Because the color spaces of the document and device are different, some document colors may not have matches in the gamut of the device color space. You can enable the gamut warning, which lets you preview the on-screen colors that cannot be reproduced accurately by the device. When the gamut warning is enabled, an overlay highlights all the out-of-gamut colors for the device that you are simulating. You can change the color of the out-of-gamut overlay, and you can also make it more transparent to see the underlying colors.

The gamut warning highlights colors that a printer or monitor cannot reproduce accurately.
You can change how out-of-gamut colors are brought into the gamut of the proof profile by changing the rendering intent. For more information, see What is a rendering intent?.
You can preserve the RGB, CMYK, or grayscale color values of the document when soft-proofing. For example, if you are soft-proofing a document to be printed to a printing press, you can keep the original document CMYK color values in the soft proof. In this case, all colors will be updated on-screen, but only the RGB and grayscale color values of the document will be changed in the soft proof. Preserving the CMYK color values can help you prevent unwanted color conversions in the final output.
If you often need to soft-proof documents for a specific output, you can create and save custom proof presets. You can delete the presets that you no longer need at any time.
You can save soft proofs by exporting them to the JPEG, TIFF, Adobe Portable Document Format (PDF), or Corel PHOTO-PAINT (CPT) file format. You can also print proofs.
By default, soft proofing is disabled when you start a new document or when you open a document. However, you can make sure that soft proofing is turned on by default at all times.
| To turn soft proofing on or off |
• |
Click Tools |
When you turn soft proofing on, colors in the document window, color
palettes, and preview windows of dialog boxes appear different.
|
Simulating printer output may cause on-screen colors to appear dull because
all colors are brought into a CMYK color space, which has a smaller gamut
than an RGB color space.
|
You can also enable or disable soft proofing by clicking the Proof colors
button |
| To specify soft-proof settings |
1 |
Click Tools |
2 |
Perform any of the following tasks.
|
The accuracy of the simulation depends on factors such as the quality of your
monitor, the color profile of the monitor and the output device, and the
ambient lighting in your work area.
|
| To export a soft proof |
1 |
Click Tools |
2 |
In the Color proof settings docker, click the Export soft proof button.
|
3 |
Type a filename in the File name box.
|
4 |
From the Save as type list box, choose one of the following options:
|
• |
JPG - JPEG Bitmaps
|
• |
PDF - Adobe Portable Document Format
|
• |
TIF - TIFF Bitmap
|
• |
CPT - Corel PHOTO-PAINT image
|
5 |
Choose any settings in the dialog box that appears.
|
| To print a proof |
1 |
Click Tools |
2 |
In the Color proof settings docker, click the Print proof button.
|
| To turn soft proofing on by default |
1 |
Click Tools |
2 |
In the Workspace list of categories, click Display.
|
3 |
Enable the Proof colors by default check box.
|
|
|
Copyright 2010 Corel Corporation. All rights reserved.