Quick links to procedures on this page:
• |
You can adjust the color and tone of an image by using the following settings.
Color depth refers to the number of colors an image can contain. One of the advantages of using RAW camera files is that they can contain more colors than photos saved as JPEG or TIFF files. This greater number of colors makes it easier to reproduce colors accurately, reveal detail in shadows, and adjust brightness levels.
The Camera RAW Lab lets you process the RAW camera files as 48-bit or 24-bit images. 48-bit images offer more accurate color representation and prevent loss of image quality during retouching. Note that some of the special effects available in CorelDRAW cannot be applied to 48-bit images.
White balance is the process of removing unnatural color casts from images so that image colors appear as they do in real life. White balance takes into consideration the lighting conditions in which a photo was taken and sets the color balance to produce realistic image colors.
By default, when a RAW camera file is brought into CorelDRAW, it reflects the camera setting for white balance. This setting appears as the preset As shot in the White balance list box. If you are not satisfied with this setting, you can have the white balance adjusted automatically by choosing the preset Auto. You can also apply any of the following presets: Daylight, Cloudy, Shade, Tungsten, Fluorescent, or Flash. These presets let you simulate different lighting conditions.
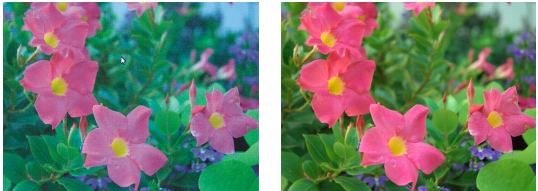
RAW camera image with incorrect white balance (left); the same image with adjusted white balance (right)
In addition, you can use the Eyedropper tool to automatically adjust the contrast in an image according to the white or gray point that you sample in the preview window.
If the White balance options do not produce the results you want, you can use the following controls to remove color casts:
• |
Temperature slider — lets you correct color casts by adjusting the color
temperature of an image to compensate for the lighting conditions at the time the
photo was taken. For example, to correct a yellow color cast caused by taking a
photo indoors in dim incandescent lighting, you can move the slider to the left.
Conversely, to correct a blue color cast caused by intense lighting conditions, you
can move the slider to the right.
|
• |
Tint slider — lets you correct color casts by adjusting the green or magenta in an
image. You can add green by moving the slider to the right; you can add magenta
by moving the slider to the left. Moving the Tint slider after using the
Temperature slider lets you fine-tune an image.
|
You can use the following controls to adjust the tone of RAW camera files.
• |
Saturation slider — lets you adjust the vividness of colors. For example, by moving
the slider to the right, you can increase the vividness of a blue sky in an image. By
moving the slider to the left, you can reduce the vividness of colors.
|
• |
Exposure slider — lets you compensate for the lighting conditions at the time the
photo was taken. Exposure is the amount of light allowed to fall on the image
sensor of a digital camera. High exposure values result in areas that are completely
white (no detail); low values result in increased shadows. Exposure values (EV)
range from -3.0 to + 3.0.
|
• |
Brightness slider — lets you brighten or darken an entire image. If you want to
darken only the darkest areas of an image, you must use the Shadow slider.
|
• |
Shadow slider — lets you adjust the brightness in the darkest areas of an image
without affecting the lighter areas. For example, a bright light behind a photo
subject (backlighting) at the time a photo is taken can cause the subject to appear
in shadow. You can correct the photo by moving the Shadow slider to the right to
lighten dark areas and reveal more detail.
|
While you are making adjustments, you can view the tonal range of the image on the histogram to check for any clipping of shadow or highlight areas. Clipping is the shifting of image pixels to white (highlight clipping) or black (shadow clipping). Clipped highlight areas appear completely white and contain no detail; clipped shadow areas appear completely black and contain no detail.
The button on the left side of the histogram displays a warning if the image contains shadow clipping. The button on the right side of the histogram displays a warning if the image contains highlight clipping. You can also choose to apply shading to the clipped areas in the preview window.
| To adjust the color and tone of a RAW camera file |
1. |
Click File |
2. |
Select the RAW camera file or files that you want to import, and click Import.
|
3. |
From the Color depth list box, choose one of the following options:
|
• |
48-bit (16 bits/channel)
|
• |
24-bit (8 bits/channel)
|
4. |
To remove a color cast, select the Auto option from the White balance list box.
|
If you are not satisfied with the results, you can set the white point more precisely by using the Eyedropper tool
|
5. |
Perform one or more tasks from the following table.
|
You can capture the current version of your image by clicking Create
snapshot. Thumbnails of the snapshots appear in a window below your image.
Each snapshot is numbered sequentially and can be deleted by clicking the
close button in the upper right corner of the snapshot title bar.
|
To change a color or tone setting one increment at a time, you can click in the
box to the right of a slider, and press the Up or Down arrow keys.
|
You can undo or redo the last correction you made by clicking Undo or Redo.
To undo all corrections, click Reset to original.
|
|
|
Copyright 2012 Corel Corporation. All rights reserved.