Quick links to procedures on this page:
• |
• |
• |
• |
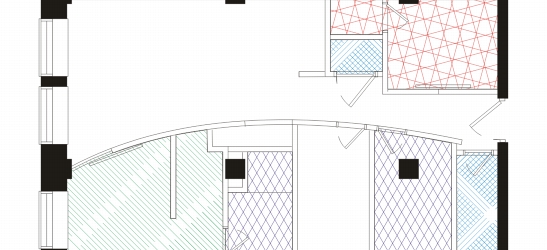
You can fill objects with hatch patterns to clearly distinguish materials or object relationships in a drawing. For example, a drawing of a floor plan may use hatching to indicate different flooring materials, or to indicate where two floors overlap.
Hatch fills can be used to indicate different materials.
Hatch fills are composed of vector-based lines. You can use preset hatch fills or edit fills by setting different line patterns and colors for the foreground, or by changing the color of the background. When you edit hatch fills in the Hatch fill dialog box, the changes apply only to the currently selected object. You can also create new hatch fills and add them to a library.
When you create new hatch fills, the currently selected fill is used as a starting point. If no fill is selected, the default fill is used. You can add new lines, specify line style attributes, set the position and angle for the lines, and control the spacing and offset for each instance of a line.
You can use hatch fills on projected objects to create the illusion of a three-dimensional image. Hatch fills use the active drawing plane.
Hatch fills can retain their properties independently of changes made to the object, or they can be transformed and scaled with the object. If you choose to transform the hatch fill with the object, only the transformations you apply from that point forward are applied — previous object transformations are not applied to the hatch fill.
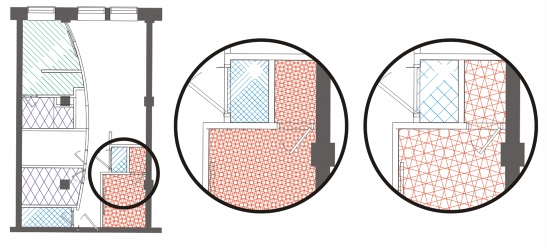
The original hatch fill (left) isn’t scaled with the object in the first example (center) and is scaled with the object in the second example (right).
When you apply the same hatch fill to more than one object, you can retain the fill alignment for the individual objects, or you can align the fills.

The hatch fills are aligned in the drawing on the right.
| To apply a hatch fill |
1. |
Select an object for which you want to apply or edit a hatch fill.
|
2. |
Click Edit |
3. |
In the Property manager docker, click the Hatch fill button
|
4. |
Click the Hatch fill properties button.
|
5. |
In the Hatch fill dialog box, choose a hatch fill library from the Library list box.
|
6. |
Choose a hatch fill from the Fill picker located below the Library list box.
|
If a hatch fill is already applied to the selected object, it appears in the Fill picker. |
7. |
Specify the attributes you want.
|
If you want to preview the fill on the object, click Preview. |
When you edit a hatch fill in the Hatch fill dialog box, the changes are applied
only to the object selected in the drawing window. Only custom hatch fills
created in the New hatch from selected dialog box can be added to a library.
|
You can also apply a hatch fill by clicking the Interactive fill tools button in
the toolbox, clicking the Fountain fill tool
|
| To create a custom hatch fill |
1. |
Click Window |
2. |
In the Property manager docker, click the Hatch fill button
|
3. |
Click the Hatch fill properties button.
|
4. |
In the Hatch fill dialog box, click New hatch.
|
The new hatch fill is based on the current fill. |
5. |
In the New hatch from selected dialog box, click a line to edit from the Hatch
lines list.
|
The selected line is displayed in red in the Hatch preview window. Unselected lines are displayed in their applied color. |
6. |
In the Line style area, specify the attributes you want.
|
7. |
In the Line origin area, specify the following:
|
• |
y-Origin — lets you set the y-origin for the line. This setting is important if you
have more than one line in the hatch fill. The y-Origin value can be used to set
the spacing between different lines. For example, to ensure that a new line isn’t
positioned directly over an existing line, type a new value in the y-Origin box.
|
• |
x-Origin — lets you set the x-origin for the line. This setting is effective when
you have more than one dashed line and you want to offset the patterns of the
different lines. It has no visible effect on standard solid lines.
|
8. |
In the Line angle box, type a value to set the angle of the line.
|
9. |
In the Shift box, type a value to offset each instance of a line.
|
This setting is effective when you have one dashed line and you want to stagger the pattern. It has no visible effect on standard solid lines. |
10. |
Type a value in the Spacing box to set the distance between two instances of the
line.
|
The distance between lines is set from the path for the line, not the edge of the outline. If the Outline width value is high and the Spacing value is low, the lines might overlap. |
11. |
Repeat steps 5 through 10 for each line you want to edit.
|
12. |
Click OK to return to the Hatch fill dialog box, choose a library from the Library
list box, and click Add to library.
|
| To scale or transform a hatch fill with an object |
1. |
Select an object.
|
2. |
Click Edit |
3. |
In the Property manager docker, click the Hatch fill button
|
4. |
Click the Hatch fill properties button.
|
5. |
In the Hatch fill dialog box, enable the following options:
|
• |
Transform fill with object — automatically transforms the hatch fill to reflect
all future transformations applied to the object
|
• |
Scale line width with object — automatically scales hatch lines when the
object is resized
|
| To align hatch fills across multiple objects |
1. |
Select two or more objects that have the same hatch fill.
|
2. |
On the property bar, click the Fill button
|
3. |
Enable the Use world coordinates option.
|
|
|
Copyright 2013 Corel Corporation. All rights reserved.