Quick links to procedures on this page:
Exporting bitmaps for the Web
Corel DESIGNER lets you export the following Web-compatible file formats: GIF, PNG, and JPEG.
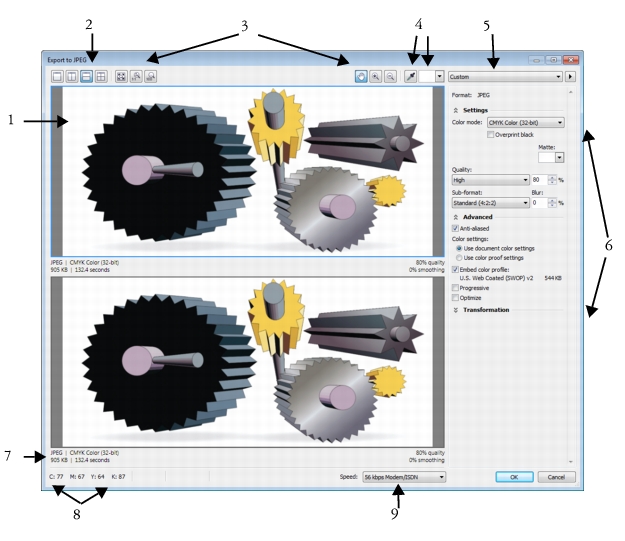
While specifying exporting options, you can preview an image with up to four different configurations of settings. You can compare file formats, preset settings, download speeds, compression, file size, image quality, and color range. You can also examine previews by zooming and panning within the preview windows.
|
Component
|
Description
|
|
1. Preview window
|
Displays a preview of the document.
|
|
2. Preview modes
|
Lets you preview the adjustments in a single or split frame.
|
|
3. Zooming and panning tools
|
Lets you zoom in and out of a document displayed in the preview window, pan an image displayed at zoom level higher than 100%, and fit an image in the preview window.
|
|
4. Eyedropper tool and sampled color swatch
|
Lets you sample a color and display the sampled color.
|
|
5. Preset list box
|
Lets you choose preset settings for a file format.
|
|
6. Export settings
|
Lets you customize export setting, such as color, display options, and size.
|
|
7. Format information
|
Lets you view file-format information, which is available for each preview frame.
|
|
8. Color information
|
Displays the color values for a selected color.
|
|
9. Speed list box
|
Lets you choose an Internet speed for saving the file.
|
You can export Web-compatible files using preset settings. This allows you to optimize the file, without the need to modify individual settings. You can also customize the settings to produce a specific result. For example, you can adjust its color, display quality, and file size.
Choosing a Web-compatible file format
This table is a quick reference for choosing a Web-compatible file format.
|
File format
|
Ideal for
|
|
GIF
|
Line drawings, text, images with few colors, or images with sharp edges, such as scanned black-and-white images or logos.
GIF offers several advanced graphic options, including transparent backgrounds, interlaced images, and animation. It also lets you create custom palettes for the image.
|
|
PNG
|
Various image types, including photos and line drawings.
The PNG file format (unlike the GIF and JPEG formats) supports the alpha channel. This allows you to save transparent images with superior results.
|
|
JPEG
|
Photos and scanned images.
JPEG files use file compression to store an approximation of an image, which results in some loss of image data, but does not compromise the quality of most photographs. You can choose the image quality when you save an image — the higher the image quality, the larger the file size.
|
Exporting palette-based documents
Palette-based documents, such as paletted GIF and 8-bit PNG, allow individual pixels to retain their exact color value. This lets you control the display of colors in the file when exporting. Palette-based documents also allow you to introduce transparency to a file by choosing a color in the image and making it transparent. For information, see Exporting objects with transparent colors and backgrounds.
| To adjust the object-export preview |
 |
1. |
|
Click File  Export for Web Export for Web.
|
2. |
|
Perform one or more tasks from the following table.
|
|
To
|
Do the following
|
|
View the bitmap in a single preview frame
|
Click the Full preview button
 on the View toolbar.
|
|
View two versions of the bitmap in side-by-side frames
|
Click the Two vertical previews button
 .
|
|
View the two versions of the bitmap with one frame placed above the other
|
Click the Two horizontal previews button
 .
|
|
View four versions of the bitmap in separate frames
|
Click the Four previews button
 .
|
|
Fit a bitmap in the preview window
|
Click the Zoom to fit button
 .
|
|
Display each pixel in the image data to a single pixel on-screen
|
Click the Zoom 1:1 pixel button
 .
|
|
Display a bitmap at its actual size
|
Click the Zoom to actual size button
 .
|
|
Pan to another area of the bitmap
|
Using the Pan tool
 , drag the image until the area you want to see is visible.
|
|
Zoom in and out
|
Using the Zoom in tool
 or Zoom out tool
 , click in the preview window.
|
|
Change the display options for the object in a preview frame
|
Click a frame, then choose different export settings from the export settings area.
|
| To export a Web-compatible bitmap |
|
1. |
|
Click File Export for Web.
|
2. |
|
In the Export for Web dialog box, choose preset settings from the Preset list box
in the upper-right corner of the dialog box.
|
|
If you want modify the preset settings, you can change the exporting options in the dialog box. |
4. |
|
Choose the drive and folder where you want to save the file.
|
5. |
|
Type a name in the File name box.
|
|
You can also
|
|
|
Choose a color mode
|
In the Settings area, choose a color mode from the Color mode list box.
This option is unavailable for the GIF file format.
|
|
Embed the color profile
|
In the Advanced area, enable the Embed color profile check box.
|
You can also export to a Web-compatible format by clicking File Export,
and choosing a file format from the Save as type list box.
|
You can choose an Internet connection speed from the Speed list box at the
bottom of the dialog box.
|
| To resize an object when exporting a Web-compatible bitmap |
|
• |
|
From the Export for Web dialog box, perform one or more tasks from the
following table.
|
|
To
|
Do the following
|
|
Choose a unit of measurement for the bitmap
|
In the Transformation area, choose a unit of measurement from the Units list box.
|
|
Specify the bitmap dimensions
|
In the Transformation area, type values in the Width and Height boxes.
|
|
Resize the bitmap to a percentage of its original size
|
In the Transformation area, type values in the Width % and Height % boxes.
|
|
Avoid distortion by maintaining the width-to-height ratio of the bitmap
|
In the Transformation area, enable the Maintain aspect ratio check box.
|
|
Specify the bitmap resolution
|
In the Transformation area, type a value in the Resolution box.
|
|
Maintain the size of the file on your hard disk when you change the resolution of the bitmap
|
In the Transformation area, enable the Maintain size check box.
|
| To customize options for exporting a JPEG bitmap |
|
1. |
|
From the Export for Web dialog box, choose JPEG from the Format list box.
|
2. |
|
Perform one or more tasks from the following table.
|
|
To
|
Do the following
|
|
Control document quality
|
In the Settings area, choose a quality option from the Quality list box, or type a percentage value.
|
|
Choose an encoding setting
|
In the Settings area, choose an option from the Sub-format list box.
|
|
Blur the transition between adjacent pixels of different colors
|
In the Settings area, type a value in the Blur box.
|
|
Load the JPEG file gradually in certain Web browsers to display only portions of the image before it finishes loading
|
In the Advanced area, enable the Progressive check box.
|
|
Use the optimal encoding method to produce the smallest JPEG file size
|
In the Advanced area, enable the Optimize check box.
|
|
You can also
|
|
|
Apply the document-color settings
|
In the Advanced area, enable the Use document color settings option.
|
|
Apply the color-proof settings to the document
|
In the Advanced area, enable the Use color proof settings option.
|
|
Enable the overprinting of black when exporting to CMYK
|
In the Settings area, enable the Overprint black check box.
|
|
Apply a matte color to the object’s background to help blend the edges of anti-aliased objects
|
In the Settings area, open the Matte color picker, and click a color.
|
| To specify display-quality options for exporting Web-compatible bitmaps |
|
• |
|
From the Export for Web dialog box, perform one or more tasks from the
following table.
|
|
To
|
Do the following
|
|
Apply a matte color to the object’s background to help blend the edges of anti-aliased objects
|
In the Settings area, open the Matte color picker, and click a color.
|
|
Smooth the edges of the object
|
In the Advanced area, enable the Anti-aliased check box.
|
|
Load the file gradually in certain Web browsers to display only portions of the image before it finishes loading
|
In the Advanced area, enable the Interlaced check box.
|
| To specify color settings for exporting palette-based Web-compatible bitmap |
|
• |
|
From the Export for Web dialog box, perform one or more tasks from the
following table.
|
|
To
|
Do the following
|
|
Choose a color mode
|
In the Settings area, choose a color mode from the Color mode list box.
This option is unavailable for the GIF file format.
|
|
Choose a color palette
|
In the Settings area, choose a palette from the Color palette list box.
|
|
Specify a dithering setting and amount
|
In the Settings area, choose a dithering option from the Dithering list box, and type a value in the box.
|
|
Embed the color profile
|
In the Advanced area, enable the Embed color profile check box.
|
|
You can also
|
|
|
Load a color palette
|
In the Settings area, click the arrow next to Color palette list box, and click Load palette.
|
|
Sample a color and add it to a color palette
|
Click the Eyedropper on the toolbar, and then click in the drawing window to choose a color. In the Settings area, click the Add the sampled color to palette button
 .
|
|
Add or modify colors
|
Double-click a color swatch on the color palette.
|
|
Choose the number of colors that you want to display
|
In the Settings area, choose a value from the Number of colors list box.
|
|
Delete a color from the color palette
|
In the Settings area, click a color on the color palette, and then click the Delete the selected color button.
|
Copyright 2013 Corel Corporation. All rights reserved.