Quick links to procedures on this page:
• |
The Straighten image dialog box lets you straighten bitmap images quickly. This feature is useful for straightening photos that were taken or scanned at an angle.
Straighten image dialog box
|
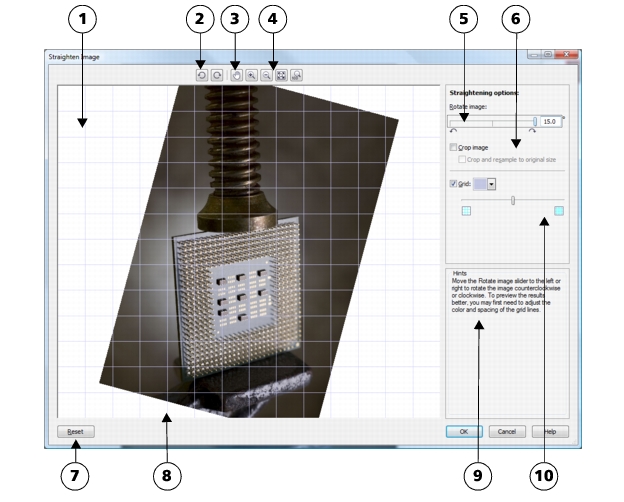
1. Preview window
|
6. Options for cropping and resampling
|
|
2. Rotation tools
|
7. Reset button
|
|
3. Pan tool
|
8. Grid
|
|
4. Zoom tools
|
9. Hint for active control
|
|
5. Rotate Image controls
|
10. Grid control
|
You can access the Straighten image dialog box by clicking Bitmaps ![]() Straighten image.
Straighten image.
The Straighten image dialog box lets you rotate an image by moving a slider, typing a rotation angle, or using the arrow keys. You can specify a custom rotation angle from -15 to 15 degrees.
You can use the preview window to dynamically preview the adjustments that you are making. If you want to change the orientation of the image before straightening it, you can start by rotating the image 90 degrees clockwise and 90 degrees counterclockwise.
A grid is displayed in the preview window to help you straighten the image. You can make more precise adjustments by controlling the cell size of the grid. To heighten the contrast of the grid against the colors of the image, you can change the grid’s color. You can also hide the grid if you want to preview the final result without the gridlines. In addition, you can zoom in and out, and pan the image in the preview window to evaluate the results.
By default, the straightened image is cropped to the cropping area that is displayed in the preview window. The final image has the same aspect ratio as the original image, but it has smaller dimensions. However, you can preserve the original width and height of the image by cropping and resampling the image.
You can also produce an image at an angle by disabling cropping and then using the Crop tool to crop the image in the drawing window.
| To straighten an image |
1. |
Select an image.
|
2. |
Click Bitmaps |
3. |
Move the Rotate image slider, or type a value between 15 and -15 in the Rotate
image box.
|
4. |
If necessary, move the Grid slider to adjust the size of the grid cells.
|
5. |
To crop and straighten the image, enable the Crop image check box.
|
The image is cropped to preserve the aspect ratio of the original image, which means that the final image is smaller than the original image. |
If you want to preserve the width and height of the original image, enable the Crop and resample to original size check box. The final image is resampled. |
|
|
Copyright 2013 Corel Corporation. All rights reserved.