Quick links to procedures on this page:
You can crop, split, and erase portions of objects.
Cropping objects
Cropping lets you quickly remove unwanted areas in objects and imported graphics, eliminating the need to ungroup objects, break linked groups apart, or convert objects to curves. You can crop vector objects and bitmaps.
Cropping objects
When cropping objects, you define a rectangular area (cropping area) that you want to keep. Object portions outside the cropping area are removed. You can specify the exact position and size of the cropping area, and you can rotate and resize it. You can also remove the cropping area.
You can crop only selected objects without affecting other objects in a drawing, or you can crop all objects on the drawing page. In either case, the affected text and shape objects are automatically converted to curves.
Splitting objects
Using the Knife tool, you can split a bitmap or vector object in two and reshape it by redrawing its path. You can split a closed object along a straight or jagged line. Corel DESIGNER lets you choose between splitting an object into two objects, or leaving it as one object composed of two or more subpaths. You can specify whether you want to close the paths automatically or keep them open.
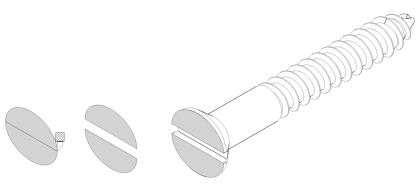
The Knife tool creates two separate objects by cutting the ellipse in half. The two objects are separated and used to form the top of the screw.
Premium membership lets you access an improved Knife tool known as Knife (Premium) tool. For more information, see Splitting objects.
Erasing portions of objects
You can erase unwanted portions of bitmaps and vector objects. Erasing automatically closes any affected paths and converts the object to curves. If you erase connecting lines, you create subpaths rather than individual objects. You can also delete portions of objects, called virtual line segments, that are between intersections. For example, you can delete loops from a curved line, or you can delete interior lines from overlapping shapes.

Objects on locked, hidden, Grid, or Guides layers cannot be cropped. Also, you cannot crop OLE and Internet objects, rollovers, or the content of PowerClip objects.
During cropping, affected linked groups, such as contours, blends, and extrusions, are automatically broken apart.

You can move, rotate, and size the cropping area interactively as you would any object. To move the cropping area, drag it to a new position. To size the cropping area, drag any of its handles  . To rotate the cropping area, click inside, and drag a rotation handle
  .
.
You can remove the cropping area by pressing Esc.
| 1 . |
Click the Deletion tools button, and click the Knife tool  . . |
|
The Knife tool snaps upright when positioned properly. |
| 4 . |
Position the Knife tool where you want to stop cutting, and click again. |
|
|
|
|
|
|
|
|
Hold down Shift, click where you want to start cutting an object, drag the control handle to where you want to position the next node, and click. Continue clicking to add more straight segments to the line.
|
|
|
Click the Keep as one object button  on the property bar.
|
|
|
|
By default, objects are split into two objects and paths are automatically closed.
When you use the Knife tool on a selected object, the object becomes a curve object.
| 2 . |
Click Object  Shaping Equal divide. Shaping Equal divide. |
| 3 . |
In the Shaping docker, specify the following: |
|
• |
Divisions — number of segments to divide the object into |
|
• |
Gap — amount of space between segments |
This feature creates a copy of the object and applies the divisions to the new object. If you do not delete the original object, you will have two objects one on top of the other, and the object will appear unchanged.
The resulting object inherits the original object’s edge and fill properties.
You can divide curves, arcs, rectangles, and polygons. To divide other objects, you must first convert them to curves. You cannot divide images.
You can select multiple objects to divide at one time. If you also enable the Group divisions check box, all the objects that you divide are grouped into a single group.
|
|
|
|
|
Click the Shape tool  . Select a node, and click the Break curve button  on the property bar.
|
|
|
Click the Shape tool . Right-click a path, and click Break apart. Select a segment, node, or group of nodes that represents the portion of the path that you want to extract, and click the Extract subpath button  on the property bar.
|
| 2 . |
Click the Deletion tools button, and click the Eraser tool  . . |
When you erase portions of objects, any affected paths are automatically closed.
You can erase in straight lines by clicking where you want to start erasing, and then clicking where you want to finish erasing. Hold down Ctrl if you want to constrain the line’s angle.
You can also erase an area of a selected object by double-clicking the area with the Eraser tool.
| 1 . |
Click the Deletion tools button, and click the Virtual segment delete tool  . . |
|
The Virtual segment delete tool snaps upright when positioned properly. |
|
|
|
|
|
|
|
|
Hold down Alt and drag to draw a curve.
|
|
|
Hold down Shift, and click the two overlapping end points. You can also hold down Alt + Shift and drag to marquee select the overlapping nodes.
|
The Virtual segment delete tool does not work on linked groups (like drop shadows), text, or images.
Copyright 2015 Corel Corporation. All rights reserved.