Quick links to procedures on this page:
• |
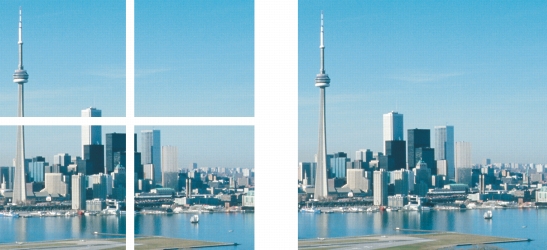
Image stitching allows you to seamlessly join 2D images. For instance, you can scan a large image in smaller, overlapping pieces and reassemble them.
You can stitch images together to create a single, large image. This image has been scanned in four sections and stitched.
In Corel PHOTO-PAINT, you can stitch multiple images interactively. You can select, move, and rotate the images, as well as change your view of them to allow more precise positioning. As you position the images, overlapping areas will turn black to signal that you have aligned the edges correctly. You can then save the stitched images as a single, flattened image, or as objects that you can continue to edit individually.
You can stitch images in all color modes except black-and-white, duotone, 16-bit grayscale, 48-bit RGB, and multichannel. If the selected images use the same color mode, except paletted color mode, the new file will use that color mode as well. If the selected files use a different color mode, or are all paletted color mode, the new file uses RGB color mode. For more information about color modes, see Changing color modes.
| To stitch images together |
1 |
Open the images you want to stitch together.
|
2 |
Click Image |
3 |
Choose a filename from the Source files list, and click Add.
|
If you want to select all open images, click Add all. |
4 |
To change the position of an image in the Selected files list, click a filename, and
click one of the following buttons:
|
• |
Up button |
• |
Down button |
5 |
Click OK.
|
6 |
In the Image stitch dialog box, click the Selection tool |
7 |
In the image stitch window, drag an image to align it with another image.
|
Repeat to align all images. |
8 |
Type a value in the Blend image list box to define the number of overlapping
pixels used to blend images together.
|
9 |
Enable one of the following options:
|
• |
Combine to background — creates a single, flattened image
|
• |
Create objects from images — creates a stitched image in which each source
image becomes a separate object. You can later adjust the brightness and contrast
of each object so they match.
|
Stitched images that are flattened have a smaller file size than stitched images
containing separate objects.
|
Use the Arrow keys with the Selection tool, the Rotate tool, and the Pan tool
to move, rotate and view images precisely in the image stitch window.
|
|
|
Copyright 2010 Corel Corporation. All rights reserved.