Quick links to procedures on this page:
• |
• |
• |
• |
• |
• |
A clip mask is a layer that floats above an object, which allows you to make changes to the object transparency without permanently modifying the object. You can create a clip mask that shows the object, so you can apply transparency to specific areas of the object. For example, if you want to reveal the image background through the object. Conversely, you can create a clip mask that hides the object, so you can apply transparency to gradually reveal only parts of the object. You can also convert an object transparency into a clip mask, so you can modify or remove the transparency effect.
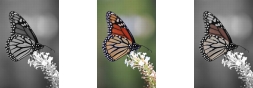
The grayscale object (left) was stacked over the colored object (center), and a clip mask was created from the grayscale object (left). With the clip mask selected, the Paint tool was used to reveal the color in the butterfly’s wings (right).
In addition, you can conditionally remove an unwanted part of an object by defining an editable to create a clip mask. For more information about editable areas, see Working with masks.
If you are satisfied with the clip mask results, you can apply the change to the object permanently by combining the clip mask with the object.
You can also disable a clip mask to reveal the object, while preserving the clip mask, or delete a clip mask.
| To modify the transparency of an object by using a clip mask |
1 |
Select an object.
|
2 |
Click Object |
• |
To show all — creates a clip mask that reveals the entire object
|
• |
To hide all — creates a clip mask that makes the object appear fully transparent
|
3 |
In the toolbox, click the Paint tool |
4 |
Click a color from the color palette.
|
Choose a lighter color, such as light grey, to apply less transparency. Choose a darker color, such as black, to apply more transparency. |
5 |
Drag in the image window.
|
You can change only the active clip mask. The active clip mask has a red border
around its thumbnail in the Objects docker.
|
You can also create a clip mask that reveals the entire object from the Objects
docker by clicking the Create clip mask button |
| To create a clip mask from an object transparency |
1 |
Select an object that has a transparency.
|
2 |
Click Object |
| To remove editable areas by using a clip mask |
1 |
Select an object.
|
2 |
In the toolbox, choose a Mask tool.
|
3 |
In the image window, define an editable area.
|
4 |
Click Object |
• |
From mask — hides the area surrounding the editable area
|
• |
From inverted mask — hides the editable area while revealing only the area
that surrounds it
|
You can also create a clip mask that reveals the entire object from the Objects
docker by clicking the Create clip mask button |
| To combine a clip mask with an object |
1 |
Select an object that has a clip mask.
|
2 |
Click Object |
| To disable a clip mask |
1 |
Select an object that has a clip mask.
|
2 |
Click Object |
| To delete a clip mask |
1 |
Select an object that has a clip mask.
|
2 |
Click Object |
|
|
Copyright 2010 Corel Corporation. All rights reserved.