
Quick links to procedures on this page:
• |
• |
• |
• |
• |
• |
There are a number of ways to define an editable area in an image without using color information from the image.
You can define rectangular or elliptical editable areas in an image.
A circular area defined with the Ellipse mask tool
You can define an editable area by using objects. When you create an editable area that has the shape of one or more objects, you have to move the objects away from the editable area before editing it.
You can define an editable area by using text. The editable area created when you type has the font and style characteristics you specify. You can also create an editable area from existing text.
You can define an editable area by pasting information from the Clipboard into the image window as an editable area. The area you create is a floating editable area, which you can edit and move without changing the underlying image pixels.
You can define an editable area by outlining the image area with the Freehand mask tool as you would with a pencil and paper, or by clicking at different points on the image to anchor straight line segments.
You can also define an editable area by painting over it with a brush.
You can define a border-shaped editable area from the edges of an existing editable area to frame parts of an image with a color, texture, or special effect. A new mask marquee is placed on either side of an existing mask marquee to define a border-shaped editable area.
You can also define the entire image as an editable area. This feature is very useful when you want to apply a special effect requiring a mask to the entire image. For information about special effects, see Applying special effects.
| To define a rectangular or elliptical editable area |
1. |
In the toolbox, click one of the following:
|
• |
Rectangle mask tool |
• |
Ellipse mask tool |
2. |
Click the Normal button |
3. |
On the property bar, choose one of the following from the Style list box:
|
• |
Normal — lets you manually define a rectangular or elliptical editable area
|
• |
Fixed size — lets you specify the width and height of a rectangular or elliptical
editable area
|
• |
Row(s) — lets you define a rectangular editable area across the width of the
image. You can specify the height of the row and a value to round the rectangle’s
corners.
|
• |
Column(s) — lets you define a rectangular editable area along the height of the
image. You can specify the width of the column and a value to round the
rectangle’s corners.
|
4. |
Drag in the image window to define the editable area manually, or click to position
an editable area of a specified size or orientation.
|
Using the Normal mask style, you can define a square or circular editable area
by holding down Ctrl after you begin to drag in the image window.
|
Using the Normal mask style, you can define an editable area from its center
by holding down Shift after you begin to drag in the image window.
|
| To define an editable area by using text, objects, or the Clipboard contents |
You can also click the Create mask button on the Mask/object toolbar to
define an editable area with one or more selected objects. If the Mask/object
toolbar is not displayed, click Window |
| To define an editable area by using the Freehand mask tool |
1. |
In the toolbox, click the Freehand mask tool |
2. |
Click the Normal button |
3. |
Click where you want to start and end each line segment in the image window.
|
4. |
Double-click to complete the outline.
|
You can also define an editable area by dragging the Freehand mask tool in
the image window and double-clicking to complete the outline.
|
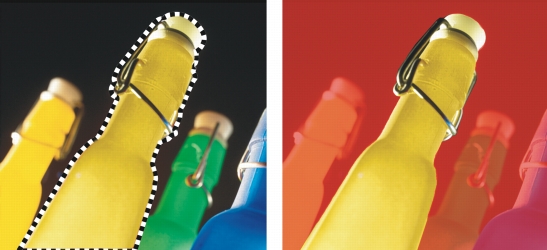
An editable area created with the Freehand mask tool
| To define an editable area by painting |
1. |
In the toolbox, click the Brush mask tool |
2. |
Specify the tool’s attributes on the property bar.
|
3. |
Click the Normal button |
4. |
Drag in the image window.
|
You can change the size of the brush nib of the Brush mask tool by holding
down Alt and dragging in the image window until the nib is the size you want.
|
You can apply a straight brushstroke with the Brush mask tool by holding
down Ctrl after you begin to drag in the image window. While still holding
down Ctrl, you can press and release Shift to switch between horizontal and
vertical brushstrokes.
|
| To define a border-shaped editable area |
1. |
In the toolbox, click a mask tool.
|
2. |
Define an editable area.
|
3. |
Click Mask |
4. |
Type a value in the Width box.
|
5. |
Choose an edge type from the Edges list box.
|
A soft edge produces a more gradual blend with the background image than a
hard edge does.
|
| To define the entire image as an editable area |
• |
Click Mask |
|
|
Copyright 2012 Corel Corporation. All rights reserved.