Quick links to procedures on this page:
• |
• |
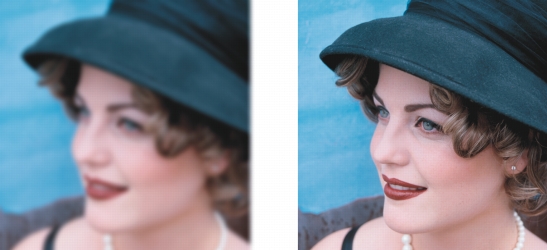
You can sharpen images to increase contrast, enhance image edges, or reduce shading. To sharpen an image, or an editable area of an image, you can use filters or brushstrokes. Filters can also be applied using a lens. For more information about lenses, see Working with lenses. Sharpening is usually done after adjusting the color and tone of an image and after resampling or resizing.
You can reveal more image detail by sharpening an image.
| To sharpen an image by applying a filter |
1. |
Click Image |
2. |
Move the Percentage slider to set the amount of sharpening that is applied each
time you click a thumbnail button.
|
3. |
Click any of the following thumbnail buttons:
|
• |
Unsharp mask — lets you accentuate edge detail and focus blurred areas in the
image without removing low-frequency areas.
|
• |
Adaptive unsharp — lets you accentuate edge detail by analyzing the values of
neighboring pixels. This filter preserves most image detail, but its effect is most
apparent in high-resolution images.
|
• |
Sharpen — lets you accentuate the edges of the image by focusing blurred areas
and increasing the contrast between neighboring pixels. Move the Background
slider to set the threshold for the effect. Lower values increase the number of
pixels changed by the sharpening effect.
|
• |
Directional sharpen — lets you enhance the edges of an image without
creating a grainy effect.
|
The Unsharp mask filter provides best results for most photographs.
|
Most sharpen filters support all color modes except 48-bit RGB, 16-bit
grayscale, paletted, and black-and-white. The Sharpen filter supports all color
modes except paletted and black-and-white.
|
You can access each of the sharpen filters individually by clicking Effects |
You can use this procedure to sharpen an editable area of an image.
|
| To sharpen selected areas by applying brushstrokes |
1. |
In the toolbox, click the Effect tool |
2. |
On the property bar, open the Effect tool picker, and click the Sharpen tool |
3. |
Choose a brush from the Brush type list box.
|
4. |
Choose a nib from the Nib shape picker.
|
5. |
Type a value in the Size box to specify the nib size.
|
6. |
Drag across an image area.
|
You can quickly choose a square or round brush shape by clicking the Round
nib button |
|
|
Copyright 2012 Corel Corporation. All rights reserved.