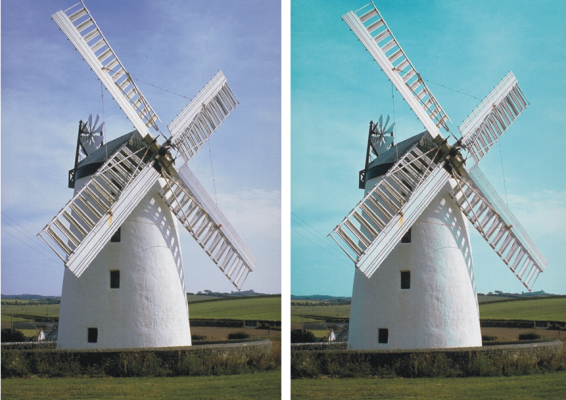
The Adjust Selected Colors effect is similar to the Adjust Colors effect, but it works only on a specified range of colors within an image. You choose a color in an image and adjust colors within a range of that color. You could, for example, change yellow peppers to red peppers. You can adjust colors that are exactly the same as the color you select, or you can choose colors within a range, based on proximity (on the color wheel or the color space) to the selected color.
Selective color adjustments change only certain colors in the image.
The Range sliders determine the extent of the HSV color space around the selected center color.
The Feather sliders affect the softness at the edge of the selected colors. These sliders can help you create smoother transitions between the replaced color and the original.
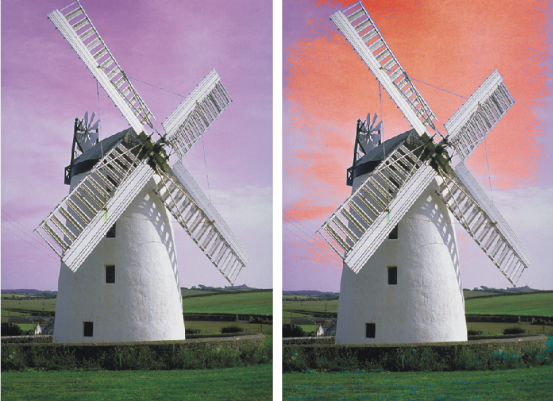
A replaced color with and without feathering
You can choose from any of the following adjustment methods:
| • | Uniform Color — adjusts all pixels equally |
| • | Paper — uses the selected paper grain to control the color adjustment |
| • | Image Luminance — uses the luminance of the image as the model for color adjustment. Areas of greater luminance are adjusted more. |
| • | Original Luminance — uses the luminance of the clone source as the model for color adjustment. If you have not set up a clone source, the current pattern is used. |
| To adjust a selected color |
|
| 1 . | Choose Effects |
| The Adjust Selected Colors dialog box appears. |
| 2 . | Move the cursor over the image in the document window (the cursor becomes a dropper), and click the color you want to adjust. |
| The Color panel displays the selected color as the main color. |
| 3 . | Choose Uniform Color from the Using list box. |
| 4 . | Adjust any of the Adjust Selected Colors controls. For information, see Adjust Selected Colors controls. |
| To adjust selected colors by using paper luminance |
|
| 1 . | Do one of the following: |
| • | On the Brush tool |
| • | Choose Window |
| 2 . | Click a paper texture swatch in the Paper Textures area. |
| 3 . | To apply the effect to: |
| • | The canvas — Click the Canvas in the Layers panel. |
| • | A selection — Click a selection tool from the toolbox, and drag in the document window to select an area. |
| • | A layer — Click a layer in the Layers panel. |
| 4 . | Choose Effects |
| 5 . | Choose Paper from the Using list box. |
| 6 . | Adjust any of the Adjust Selected Colors controls. For information, see Adjust Selected Colors controls. |
| To adjust colors by using image luminance |
|
| 1 . | To apply the effect to: |
| • | The canvas — Click the Canvas in the Layers panel. |
| • | A selection — Click a selection tool from the toolbox, and drag in the document window to select an area. |
| • | A layer — Click a layer in the Layers panel. |
| 2 . | Choose Effects |
| 3 . | Choose Image Luminance from the Using list box. |
| 4 . | Adjust any of the Adjust Selected Colors controls. For information, see Adjust Selected Colors controls. |
| To adjust colors by using clone, texture, or pattern luminance |
|
| 1 . | In the Clone Source panel (Window |
|
Choose Embedded Image from the Source list box.
In the Embed Source Image dialog box, do one of the following:
Click OK.
|
||||||||||
|
Choose Texture from the Source list box, and click a texture swatch in the Painter Textures area.
|
||||||||||
|
Choose Current Pattern from the Source list box, and click a pattern swatch in the Painter Patterns area.
|
| 2 . | To apply the effect to: |
| • | The canvas — Click the Canvas in the Layers panel. |
| • | A selection — Click a selection tool from the toolbox, and drag in the document window to select an area. |
| • | A layer — Click a layer in the Layers panel. |
| 3 . | Choose Effects |
| 4 . | Choose Paper from the Using list box. |
| 5 . | Adjust any of the Adjust Selected Colors controls. For information, see Adjust Selected Colors controls. |
| Adjust Selected Colors controls |
|
The following controls in the Select area let you refine the color selection.
Hue controls
| • | Range — controls the number of hues adjusted. Only hues within the specified percentage of hues on the color wheel are adjusted. |
| • | Feather — controls the softness at the edge of the selected hues |
Saturation controls
| • | Range — controls the range of saturation adjusted. Only saturations within this range are adjusted. |
| • | Feather — controls the softness at the edge of the range of saturated colors |
Value controls
| • | Range — controls the range of values adjusted |
| • | Feather — controls the softness at the edge of the selected values |
| Moving the Range sliders to the right increases the amount of color space affected and creates smoother transitions between the replaced color and the original. |
The following controls in the Replace area let you refine the adjusted colors.
| • | Hue — adjusts the colors of the pixels by changing their hue. Moving the slider to the right increases the hue. |
| • | Saturation — adjusts the amount of pure hue in the color. Moving the slider all the way to the left creates a grayscale image. |
| • | Value — adjusts color brightness. Moving the slider to the left darkens colors. |
The following controls can help you preview and reset adjustments.
| • | Preview — enable this check box to preview the adjustments in the document window |
| • | Reset — resets the sliders to their default settings |