Applying the Liquid Metal dynamic plug-in
The Liquid Metal dynamic plug-in lets you paint on a layer with liquid and metal. This text uses the term "metal" to refer to the media applied — even if the settings create an effect more like water.
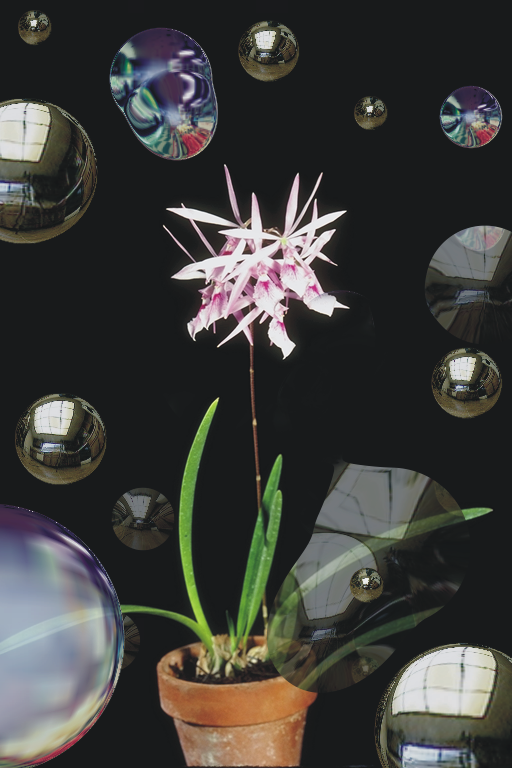
You can apply droplets of liquid that distort the underlying image through refraction. You can also create globs of shiny metal that flow together and move like mercury. The Refraction slider sets the difference between water and metal, which lets you achieve intermediate effects. Negative metal can be used to create holes in metal.
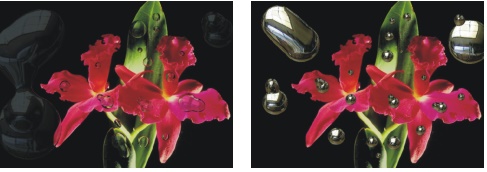
The Liquid Metal dynamic plug-in creates either liquid metal or translucent, refractive liquid.
A stroke of metal is made up of a series of discrete droplets. You can select one or several droplets and move them or change their properties.
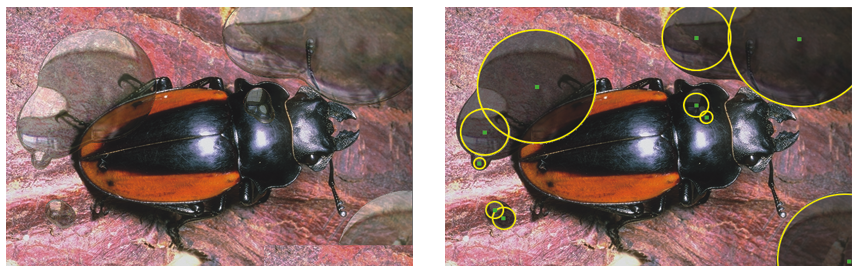
The "handles" show the droplet’s circle and center point. Showing the handles on the droplets isn’t necessary for selecting them, but it can make your work easier. The droplets applied in the last stroke are automatically selected. Each new stroke deselects the droplets of the previous one.
The Undo feature is not available when working with metal; however, you can remove selected metal, the last metal applied, or all metal on the layer.
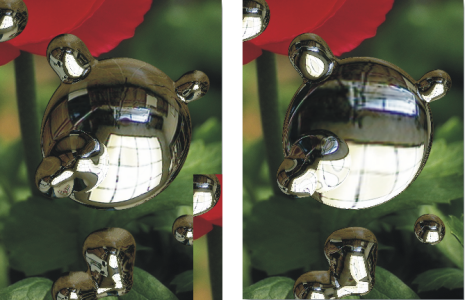
Metal is highly reflective. You can customize the look by using a clone source or a pattern as a reflection map. For more information, see Image cloning and sampling and Patterns.
Liquid metal tools
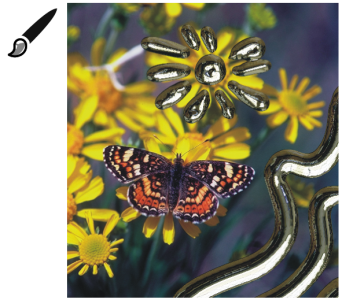
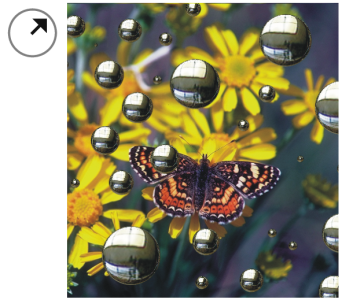
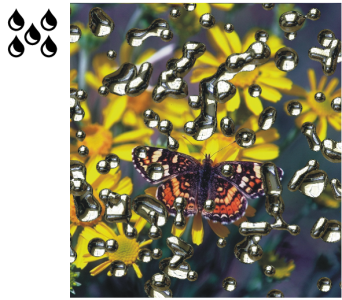
You can apply metal with the Brush tool, the Circular Drop tool, or the Rain feature. You can adjust the size of your brush or rain droplets. The Brush is the default applicator. You can use the Brush tool to paint with metal. You can use the Circular Drop tool to create circles of metal. The Rain feature lets you scatter metallic droplets on the layer.
|
|
|
You can create strokes of metal by using the Brush tool. |
|
You can create circles of metal by using the Circular Drop tool. |
|
You can create randomly falling metal raindrops by applying the Rain feature. |
|
To create a Liquid Metal dynamic layer

1
In the
Layers panel, choose the
Canvas.
2
Click the
Dynamic Plug-ins button

, and choose
Liquid Metal.
3
In the
Liquid Metal dialog box, choose one of the following tools:
•
Circular Drop tool

•
Brush tool

4
In the
Settings area, move any of the following sliders:
•
Size — changes the diameter of the selected droplets that you apply by using the Brush tool or Rain. It does not affect the Circular Drop tool.
•
Spacing — adjusts the spacing between droplets in strokes created with the Brush tool
A stroke with low spacing (left): the droplets flow together. A stroke with high spacing (right): each droplet is distinct.
•
Volume — adjusts visibility along the perimeter
Decreasing volume below 100% shrinks the visible portion of the droplet, "drying it up" (left). Increasing volume beyond 100% extends visibility beyond the droplet circle into the perimeter range (right).
•
Smooth — changes the perimeter range, which determines the droplet’s tendency to "join" its neighbors
Low settings on the Smooth slider keep droplets distinct (left); higher settings make the droplets flow together (right).
5
In the
Rendering area, choose one of the following metal types from the
Map list box:
6
Move any of the following sliders:
•
Amount — controls the emphasis of the metal effect from the
Refraction slider and applies to all droplets in the layer. To create water effects, you can set the
Amount to –0.5 so the droplets magnify the underlying images.
Reflection and Refraction are inverted when you move the Amount slider to either extreme.
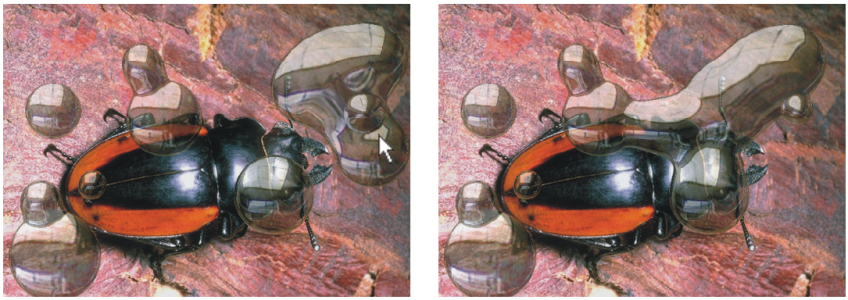
•
Refraction — controls droplet appearance. The slider represents a scale between reflection and refraction.
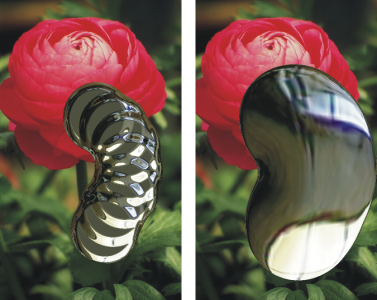
Low refraction means high reflection (left). High refraction creates translucent, refractive liquid. As Refraction nears 100%, the metal becomes transparent. The droplets look like a simple liquid — oil or water (right).
7
Drag in the document window to apply the metal.
If you want to clear the effect and start again, click
Clear.
|
|
|
Makes the droplets appear more round and three-dimensional |
Enable the Surface tension check box. |
Scatter metal droplets in the layer |
In the Liquid Metal dialog box, click Rain, then click anywhere in the image to stop the rain. If Smooth and Size settings are very high, the rain might continue for a moment after you click. |
Restore the default settings |
|

The Map type that you choose applies to the entire layer. You can change the type at any time.
To create negative metal
•
Press
Option (macOS) or
Alt (Windows), and drag with the
Circular Drop tool
or
Brush tool
over existing metal droplets.
You will create holes in your metal. As you drag through positive pools, the negative metal will divide and separate the existing metal.
To remove metal
|
|
|
Remove the last metal applied |
Press Delete (macOS) or Backspace (Windows). |
Remove the selected metal droplets |
In the Liquid Metal dialog box, click the Select Drops tool  , select the metal, and press Delete (macOS) or Backspace (Windows). |
Remove all metal on the layer |
In the Liquid Metal dialog box, click Clear. |
To show metal droplet handles
•
In the
Liquid Metal dialog box, enable the
Display handles check box.
When you enable the Display Handles check box (right), you can see the droplet circles and center points.
To select metal droplets
1
In the
Liquid Metal dialog box, choose the
Select Drops tool
.
2
Perform an action from the following table.
|
|
|
|
|
If the Display Handles check box is enabled, click the center point handle of a droplet. If handles are not displayed, click anywhere on a droplet. |
Select a group of droplets |
Drag across the droplets you want to select. |
Add droplets to a selection |
Hold down Shift, and click additional droplets to add to the selection. |
Subtract droplets from a selection |
Hold down Shift, and click droplets to subtract from the selection. |
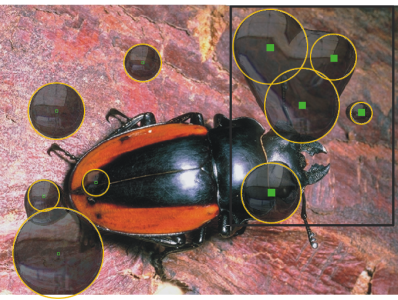
When a droplet is selected, the center point handle is displayed as a solid.
Drag over the droplets you want to select.
To move metal droplets
1
In the
Liquid Metal dialog box, choose the
Select Drops tool
, and select the droplets that you want to move.
2
Choose the
Move Drop tool, and drag the droplets to a new position.
Notice how the droplets seek to join other droplets they encounter. You can control this tendency by adjusting the
Smooth slider.
You can drag the center of one of the droplets to move the selected group.
To adjust the size of the Liquid Metal brush
1
In the
Liquid Metal dialog box, choose the
Select Drops tool
, and click outside the droplets to deselect all.
2
Move the
Size slider to the desired value.
3
Click the
Brush tool
and paint, or click
Rain.

You can also adjust the size of existing metal by selecting the droplets and moving the Size slider.
To apply a clone source or pattern to the Liquid Metal reflection
1
Do one of the following:
•
Choose a pattern by clicking the Pattern selector from the
Media Selector bar, and clicking a pattern from the list.
2
In the
Layers panel, choose the
Canvas.
3
In the
Layers panel, click the
Dynamic Plug-ins button
, and choose
Liquid Metal.
4
In the
Liquid Metal dialog box, choose
Clone Source from the
Map list box.
6
With the
Circular Drop tool
or
Brush tool
, drag in the document window to apply the metal.
If you want to clear the effect and start again, click
Clear.
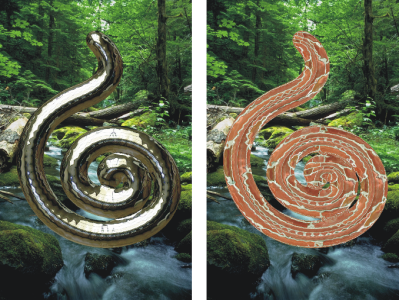
If no clone source has been specified, Corel Painter uses the current pattern as the reflection map.
The same piece of metal changes appearance when a pattern is used as the reflection map.