Corel Painter Help :
Patterns : Creating seamless patterns
Quick links to procedures on this page:
Patterns are created by repeating a rectangular image tile across an area. Ideally, the pattern tiles should seamlessly blend into one another so that the eye doesn’t distinguish the tile edges. Corel Painter allows you to generate seamless patterns by modifying the edges of a pattern tile before applying the pattern. However, you can also fix a pattern’s seams by directly modifying the pattern fill.
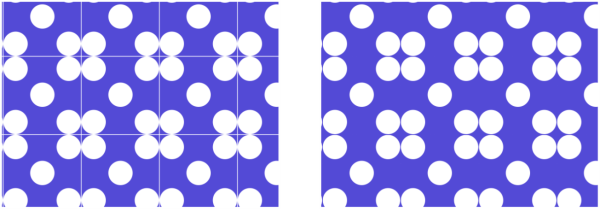
Left: The pattern tile includes a visible white edge, which delimits each tile. Right: The white edge was filled with the background color to produce a seamless pattern.
To achieve seamless tiling, Corel Painter gives documents defined as pattern tiles two special characteristics: wrap-around colors and wrap-around seams.
Left: The pattern tile before the edges were modified. Right: The same pattern tile after the edges were painted by using the Straight Cloner brush and the wrap-around colors feature.
To ensure a seamless pattern, you can also apply an effect, such as the Glass Distortion effect, the Super Soften effect (with the Wrap Around check box enabled), and most of the Tonal Control effects. Some effects, such as Apply Surface Texture, can result in a noticeable seam. For information, see Applying Glass Distortion.
| 1 . |
In the Patterns panel (Window  Media Panels Media Panels  Patterns), choose the pattern whose tile you want to fix. Patterns), choose the pattern whose tile you want to fix. |
| 5 . |
In the Capture Pattern dialog box, type a name in the Name box. |

To preserve detailed images, set the Straight Cloner brush to clone from somewhere inside the image. For more information, see Painting in the clone.
You can also copy a selection to a layer and move it over the edge. To produce clean transitions, feather the layer, and reduce opacity. Drop the layer when you’re satisfied with the result. For more information, see Layers.
| 2 . |
In the Patterns panel (Window  Media Panels Media Panels  Patterns), choose the pattern whose seams you want to modify. Patterns), choose the pattern whose seams you want to modify. |
| 3 . |
Click Canvas in the Layers panel. |
| 4 . |
Choose the Paint Bucket tool  from the toolbox, and click the canvas in the document window. from the toolbox, and click the canvas in the document window. |
| 5 . |
In the Patterns panel, click the Pattern options button  , and choose Define Pattern. , and choose Define Pattern. |
| 7 . |
Hold down the Shift key and drag the image to display the area where the tile’s horizontal and vertical edges meet. |

You can also copy a selection to a layer and move it over the edge. To produce clean transitions, feather the layer, and reduce opacity. Drop the layer when you’re satisfied with the result. For more information, see Layers.

The changes that you make to a pattern fill are not reflected in the original pattern tile.
