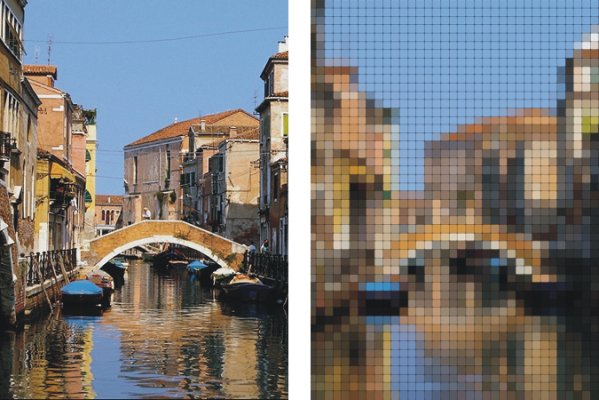
The color of each tile is determined by applying the average color of the image pixels it covers.
Before (left) and after (right) applying tiles generated from a preset pattern
Tiles generated from a paper pattern
The Custom Tile effect functions differently from the Make Mosaic and Make Tessellation effects. For more information, see Creating a mosaic.
| To apply custom tiles |
|
| 1 . | To apply the effect to: |
| • | The canvas — Click the Canvas in the Layers panel. |
| • | A selection — Click a selection tool from the toolbox, and drag in the document window to select an area. |
| • | A layer — Click a layer in the Layers panel. |
| 2 . | Choose Effects |
| 3 . | Choose one of the following patterns from the Using list box: |
| • | Brick |
| • | Hex |
| • | Square |
| • | Triangle |
| • | Cross |
| • | 12-6-4 |
| • | 12-6-4 V2 |
| 4 . | Adjust any of the Custom Tile controls. For information, see Custom tile controls. |
The original grout appearance (left) is changed by blurring (right).
| To apply custom tiles by using clone or pattern luminance |
|
| 1 . | Perform a task from the following table. |
|
In the Clone Source panel (Window
In the Embed Source Image dialog box, do one of the following:
Click OK.
|
||||||||||
| 2 . | To apply the effect to: |
| • | The canvas — Click the Canvas in the Layers panel. |
| • | A selection — Click a selection tool from the toolbox, and drag in the document window to select an area. |
| • | A layer — Click a layer in the Layers panel. |
| 3 . | Choose Effects |
| 4 . | Choose Original Luminance from the Using list box. |
| 5 . | Adjust any of the Custom Tile controls. For information, see Custom tile controls. |
| To apply custom tiles by using paper luminance |
|
| 1 . | Choose Window |
| 2 . | Choose a paper swatch in the Paper Textures area. |
| 3 . | To apply the effect to: |
| • | The canvas — Click the Canvas in the Layers panel. |
| • | A selection — Click a selection tool from the toolbox, and drag in the document window to select an area. |
| • | A layer — Click a layer in the Layers panel. |
| 4 . | Choose Effects |
| 5 . | Choose Paper from the Using list box. |
| 6 . | Adjust any of the Custom Tile controls. For information, see Custom tile controls. |
| To apply custom tiles by using layer mask or channel luminance |
|
| 1 . | Do one of the following: |
| • | To use a layer mask, choose Window |
| • | To use an alpha channel, choose Window |
| 2 . | To apply the effect to: |
| • | The canvas — Click the Canvas in the Layers panel. |
| • | A selection — Click a selection tool from the toolbox, and drag in the document window to select an area. |
| • | A layer — Click a layer in the Layers panel. |
| 3 . | Choose Effects |
| 4 . | Choose the channel or layer mask from the Using list box. |
| 5 . | Adjust any of the Custom Tile controls. For information, see Custom tile controls. |
| Custom tile controls |
|
| • | Brick Width and Brick Height — adjusts the size of bricks |
| • | Angle and Scale — adjusts the tile orientation and size of built-in tile shapes |
| • | Blur Radius — sets the sampling radius for blurring the crack or grout color. Increasing the Blur Radius adds more neighboring colors to the crack pixels in each pass. |
| • | Blur Passes — sets the number of times the crack pixels are blurred. More passes mix more tile color into the cracks. Blurring occurs only when Blur Passes is greater than zero. |
| • | Threshold — draws the line between light and dark. Everything above the Threshold value becomes tiles, and everything below becomes grout. |
| • | Use grout — adds grout between the tiles |
| • | Grout Color — sets the grout color |
| • | Grout Thickness — controls the width of the cracks between tiles or the grout lines (if grout is enabled) |