| • | To calculate the disk space required for a frame stack |
Corel Painter offers different animation workflows:
| • | Create animation frames from scratch |
| • | Edit digital video frames |
| • | Create animations by cloning |
| • | Create animations by tracing |
| • | Create animations from layers |
Customizing an animation-specific color set
Not all colors are suitable for video.
For more information, see To set the preview rate.
The Frame Stacks panel appears whenever you open or create a movie file and it must stay open while you work with a movie.
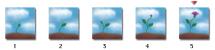
The number of frames displayed in the Frame Stacks panel is determined by the number of onion skin layers. A red triangle appears above the current frame.
You work in one frame at a time — the one appearing in the document window. The Frame Stacks panel helps you navigate the frames in the stack and choose which frame to modify.
Each frame in a frame stack can have one layer. For example, if you add an item from the image portfolio onto a frame, Corel Painter places the image on a layer. You can move the image around the layer. However, when you move between frames or close the file, Corel Painter drops all layers — the layer is deleted, and the layer’s content is flattened onto the background canvas. For more information about working with layers, see Layers.
The Frame Stacks panel displays thumbnails of several frames. The frame numbers appear under the thumbnails. The current frame is shown with a red triangle over it.
The number of thumbnails is determined by the layers of onion skin you’ve chosen. By default, QuickTime and AVI files are opened with two layers of onion skin. For more information about onion skinning, see Using onion skinning.
| To calculate the disk space required for a frame stack |
|
| 1 | Using pixels as the unit of measurement for width and height, calculate the number of bytes required to save the frame stack with the following formula: |
| (Frame Width) × (Frame Height) × (Bytes per Pixel) × (Number of Frames) |
| 2 | Divide the product of the formula in step 1 by 1,024 to convert to kilobytes. |
Bytes per pixel are determined by the storage type. For example, 24-bit color with an 8-bit alpha channel uses 4 bytes per pixel. For more information about storage types, see Creating frame-by-frame animation.
When you save a movie as QuickTime or AVI, the file size can be reduced by compression. For more information about compression, see Exporting movies as QuickTime and Exporting movies as AVI.
Copyright 2014 Corel Corporation. All rights reserved.