Quick links to procedures on this page:
• |
• |
When you draw with traditional media, the amount of pressure that you use with a tool determines the density and width of your strokes. Using a pressure-sensitive stylus with Corel Painter gives you the same kind of control. Because each artist uses a different strength or pressure level in a stroke, you can adjust Corel Painter to match your stroke strength for all brushes by using the Brush Tracking preferences, or for a specific brush, by using the Brush Calibration controls.
Brush Tracking is particularly useful for artists with a light touch. If a light stroke leaves no color on the canvas, you can use Brush Tracking to increase sensitivity for all brushes. Corel Painter saves Brush Tracking between sessions, so whatever tracking sensitivity you set will be the default the next time you open the application.
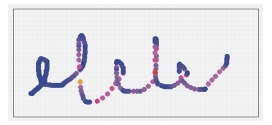
The most common way of adjusting brush tracking is to apply a typical brush stroke, such as a wavy stroke, to the scratch pad. Corel Painter then uses your stroke to calculate the appropriate pressure and velocity settings for all brush variants.

Use the scratch pad in the Brush Tracking dialog box to customize how Corel Painter responds to your stroke pressure and speed.
The Brush Calibration controls are very useful for adjusting individual brush variants. You can modify the pressure of your stroke on the scratch pad to achieve different results. For example, you could use a light touch when sketching with a pencil brush variant, but set more pressure when using an oil paint brush variant. Corel Painter saves Brush Calibration control settings with the brush variant, so whatever sensitivity you set will be the default the next time you choose the brush variant. If you set Brush Calibration for a specific brush in addition to general Brush Tracking preferences, the Brush Calibration settings override the Brush Tracking preferences.
When you use the scratch pad to set brush tracking and calibration, Corel Painter calculates the pressure and velocity settings for you. However, you can manually adjust these settings. For example, you can adjust the stroke pressure to achieve a full pressure range (Pressure Scale slider) using a softer or harder touch (Pressure Power slider). You can also adjust the stroke velocity to achieve a full velocity range (Velocity Scale slider) with a slower or faster stroke (Velocity Power slider).
To ensure that a brush control is using the pressure or velocity settings, you need to set the brush control Expression setting to Pressure or Velocity. For more information, see Expression Settings.
| To set brush tracking |
1 |
Do one of the following:
|
• |
(Mac OS) Choose Corel Painter 12 |
• |
(Windows) Choose Edit |
2 |
Drag in the scratch pad by using a “normal” stroke.
|
Use the pressure and speed you prefer when drawing or painting. This allows the Brush Tracker to calculate the appropriate speed and pressure settings for the brush. |
To adjust the settings manually, perform a task from the following table: |
| To set brush calibration |
1 |
In the toolbox, click the Brush tool |
2 |
Click the Brush Selector on the Brush Selector bar.
|
3 |
In the Brush Library panel, click a brush category, and click a brush variant.
|
4 |
Choose Window |
5 |
Enable the Enable Brush Calibration check box.
|
6 |
Click the Set Brush Calibration Settings button |
7 |
Drag in the scratch pad by using a “normal” stroke.
|
Use the pressure and speed you prefer when drawing or painting. This allows the Brush Tracker to calculate the appropriate speed and pressure settings for the brush. |
To adjust the settings manually, perform a task from the following table: |
|
|
Copyright 2012 Corel Corporation. All rights reserved.