Quick links to procedures on this page:
• |
• |
• |
• |
• |
You can create channels, generate them based on lightness and darkness of one of several sources, or import channels them other applications.
You can create a channel from a selection or create a new, blank channel. You can also create a new channel by copying an existing channel.
| To save a selection to a channel |
1 |
Click a selection tool in the toolbox and make a selection.
|
2 |
Choose Window |
3 |
In the Channels panel, click the Save Selection As Channel button |
4 |
Type a name in the Name box.
|
You can also open the Channels panel by pressing Command + 5 (Mac) or
Ctrl + 5 (Windows).
|
For more information, see Loading and Combining Selections.
|
| To create a new, blank channel |
• |
In the Channels panel, do one of the following :
|
• |
Click the Channel Options button |
• |
Click the New Channel button |
| To copy a channel |
1 |
In the Channels panel, choose a channel from the list.
|
2 |
Click the Channel Options button |
3 |
In the Duplicate Channel dialog box, choose New from the Destination list box.
|
You can also copy a channel to an existing channel, so that the existing
channel is replaced. To do this, choose the existing channel from the
Destination list box.
|
Corel Painter lets you generate a channel based on the light and dark areas of a number of sources, including paper, pattern, and clone source. You can also create a channel based on a range of colors.
| To generate a channel based on luminance |
1 |
In the Channels panel, do one of the following:
|
• |
To generate a new channel, choose the RGB channel from the list.
|
• |
To replace a channel, choose it from the list.
|
2 |
Click the Channel Options button |
3 |
In the New From dialog box, choose one of the following options from the list box:
|
• |
Paper — uses the current paper texture to create the channel
|
• |
3D Brush Strokes — creates a channel based on the difference between the
current image and the clone source. If no clone source is selected, Corel Painter
uses the current pattern. For information about clones, refer to Alpha Channels.
|
• |
Original Selection — imports the selection from the clone source document.
You can use this feature to transfer a selection from another document. For best
results, the dimensions of the source and working document should match. You
must establish a clone source file, and create a selection in this file, for this
option to be available. For information about clones, refer to Image Cloning and
Sampling.
|
• |
Image Luminance — creates a channel based on the current image’s light and
dark areas. For Image Luminance to be effective, the image must have high
contrast. Images with low contrast produce a semisolid channel, without clear
delineation between the selected and protected areas.
|
• |
Original Luminance — produces a channel based on the clone source’s light and
dark areas. This option lets you import an image to the channel. If no clone
source is selected, Corel Painter uses the current pattern.
|
• |
Current Color — creates a channel based on pixels of the current main color.
Areas of the current color are protected; the rest of the image is selected. You
might want to use the Dropper tool to pick a color from the image before using
the Current Color option.
|
If you want to invert the channel, click the Invert Channel button |
Like a grayscale image, a channel can have 256 values in it. Inverting a
channel is equivalent to creating the negative of a grayscale image. For
example, a pixel with 80% luminance will have 20% luminance when
inverted. A pixel with 30% luminance will have 70% luminance when
inverted.
|
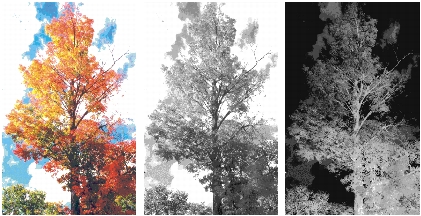
An image (left), the channels created using image luminance (middle), and inverted image luminance (right).
| To generate a color-based channel |
1 |
In the Channels panel, do one of the following:
|
• |
To generate a new channel, choose the RGB channel from the list.
|
• |
To replace a channel, choose it from the list.
|
2 |
Click the Channel Options button |
3 |
With the Color dialog box open, click in the document window to pick a color.
|
The color you select is the middle of the range of colors used to create the channel. |
4 |
In the Color dialog box, adjust the H Extents (hue), S Extents (saturation), and V
Extents (value) sliders.
|
These sliders control the selected range. You can drag the limits of the range in either direction. |
5 |
Adjust the H Feather (hue), S Feather (saturation), and V Feather (value) sliders to
control the feathering at the edges of the color space extents.
|
This helps soften the edges of the channel. |
If you want to invert the channel, click the Invert Channel button |
The Preview window in the Color dialog box shows the channel as a red
overlay on the image. You can drag in the Preview window to see other parts
of the image.
|
When RGB files that were created in Photoshop are opened in Corel Painter, anything in the alpha channels (#4 and above) will appear as a channel in Corel Painter. Conversely, when you save your Corel Painter file in Photoshop format, all channels are placed into channels #4 and above.
|
|
Copyright 2012 Corel Corporation. All rights reserved.