Quick links to procedures on this page:
• |
• |
• |
Equalizing an image involves increasing the contrast by resetting the darkest and lightest points and then evenly distributing the values across those two points.
The Curve feature lets you produce an equalizing effect by adjusting the black and white points in your image. You can set the black and white points for your image automatically or manually.
| To automatically set black and white points |
1 |
Choose Effects |
2 |
In the Color Correction dialog box, choose Curve from the list box.
|
3 |
Click Auto Set.
|
| To manually set black or white points |
1 |
Choose the Dropper tool |
2 |
In the document window, click the color you want to assign as the darkest or
lightest point.
|
3 |
Choose Effects |
4 |
In the Color Correction dialog box, choose Curve from the list box.
|
5 |
Click one of the following:
|
• |
Black Point — assigns all colors equal to or darker than the current main color
to black
|
• |
White Point — assigns all colors equal to or lighter than the current main color
to white
|
The Equalize effect improves contrast, adjusting black and white points, and distributing the brightness levels throughout the entire range of available levels. Corel Painter lets you equalize an image by creating a histogram showing the number of pixels for each brightness level value and then allowing you to adjust those values. The Equalize effect also allows gamma adjustment, which lightens or darkens an image without changing highlights or shadows.
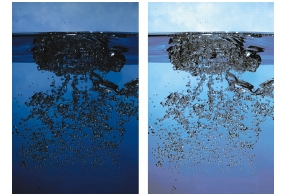
Before (left) and after (right) applying the Equalize effect.
| To equalize colors |
1 |
Select a layer or area of the canvas.
|
If you want to apply the effect to the entire image, do not make a selection. |
2 |
From the menu bar, choose Effects |
Corel Painter automatically adjusts the image or selection so that the lightest color is white and the darkest color is black. |
3 |
In the Equalize dialog box, adjust contrast by dragging the black and white
markers under the histogram.
|
Any values in the image located to the right of the white marker become white; any values to the left of the black marker become black. |
4 |
Move the Brightness slider to adjust the gamma.
|
Moving the slider to the right darkens the image; moving the slider to the left lightens the image. |
Changing the gamma adjusts only the midtones of an image and leaves the black and white areas untouched. |
5 |
Click OK to apply changes.
|
A preview of the changes is applied to the original image, but the changes are not final until you click OK. If you want to revert to the original image, click Cancel. |
If you made a selection and you want to equalize the entire image, enable the
Apply to Entire Image check box in the Equalize dialog box.
|
|
|
Copyright 2012 Corel Corporation. All rights reserved.