Quick links to procedures on this page:
• |
• |
• |
• |
• |
• |
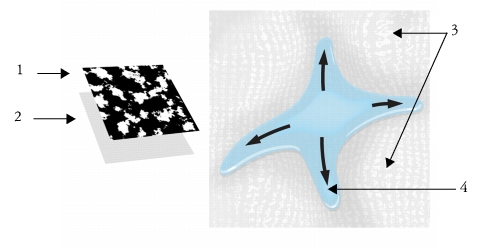
Flow maps are designed to maximize the creative potential of the Real Watercolor brushes that were introduced in Painter 12. Flow maps create textured surfaces that help direct the flow of paint. Flow maps are similar to paper textures; however, the surfaces that they create have higher peeks and deeper valleys that allow for greater water displacement. The flow map relief encourages the paint to flow and settle in unique and irregular patterns. You can use flow maps in combination with paper texture to retain the paper grain.
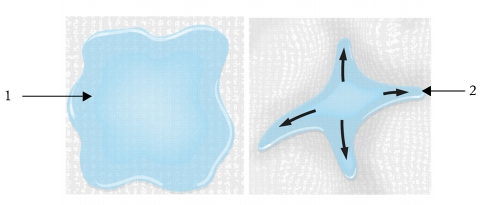
A flow map (1) works with paper texture (2) to add relief to the image and encourage water displacement. The elevated areas (3) in the flow map help direct the flow of water (4).
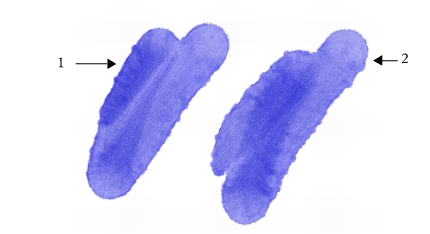
The Wet Flowmap Fringe brush variant is used with paper texture (1). The same brushstroke is used in combination with paper texture and the Gravel flow map (2).
Although flow maps are intended for Real Watercolor brushes, you can also use them with Real Wet Oil brushes.
To quickly get started with flow maps, you can choose one of the flow map brush variants. They are available under the Real Watercolor brush category. These brush variants have a flow map by default. You can experiment and choose a different flow map to produce the effect you like.
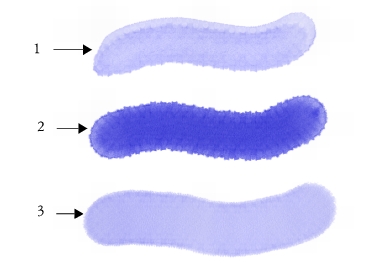
Brushstrokes using the Melted Flowmap (1), Noisy Flowmap Fringe (2), and Wet Flowmap Fringe (3) brush variants with the Fine Dots flow map selected.
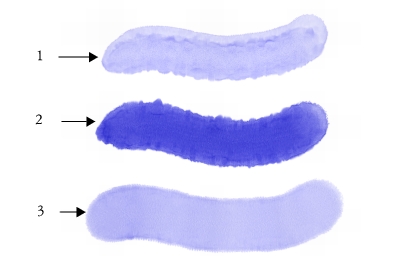
Brushstrokes using the Melted Flowmap (1), Noisy Flowmap Fringe (2), and Wet Flowmap Fringe (3) brush variants with the Gravel flow map selected.
| To choose a flow map brush variant |
1 |
From the Brush Library panel, choose the Real Watercolor brush category.
|
2 |
Choose one of the following brush variants:
|
• |
Noisy Flowmap Fringe
|
• |
Wet Flowmap Fringe
|
• |
Melted Flowmap Fun
|
| To choose a flow map |
1 |
Choose Window |
2 |
Click a flow map swatch.
|
You can choose an existing Real Watercolor brush variant and then manually enable flow maps. You can also adjust the flow resistance of a brush to enhance the flow map interaction. Flow resistance lets you control the degree to which the flow map surface, or the paper texture, affects the direction of the water flow.
When the flow resistance is set low, the water flows freely across the canvas (1), when the resistance is set high, the flow is obstructed (2).
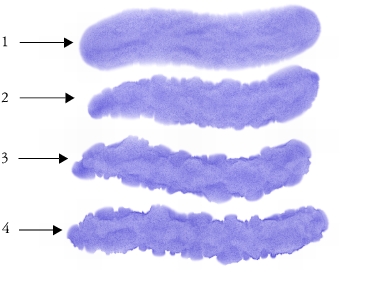
Brushstrokes using the Noisy Flowmap Fringe brush variant set at a flow resistance of 0 (1), 33 (2), 66 (3), and 100% (4) with the Clouds flow map selected.
| To enable flow maps and control flow resistance |
1 |
In the Brush Library panel, choose a Real Watercolor brush variant.
|
2 |
Choose Window |
3 |
In the Flow area, enable the Flow Map option to set the Source.
|
4 |
Move the Flow Resistance slider to adjust the resistance.
|
Moving the slider to the right increases the effect. |
To maximize the effect of flow maps, you need to ensure that the Wetness
control is set high and the Evaporation Rate control is set low.
|
You can also adjust the flow resistance of the Real Wet Oil brush variants by
choosing Window |
You can choose a different the flow map by clicking the Toggle Flow Map
Control Panel button |
You can create a custom flow map from scratch or modify an existing flow map. You can create a flow map by using an existing paper texture or by capturing an area of an image. You can modify the scale, contrast, and several other settings of a flow map the same way that you would paper texture. For more information, see Paper Texture and Grain. It is important to note that flow maps benefit from increased scale and contrast; therefore, if you create a flow map from a paper texture or image, you should increase the scale and contrast.
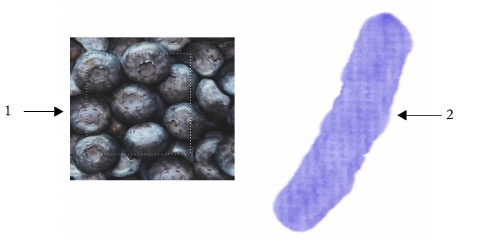
An area of an image was selected (1) to create a flow map (2).
| To create a flow map from a paper texture |
1 |
Choose Window |
2 |
Click a paper texture swatch.
|
3 |
Choose Window |
4 |
In the Flow Maps panel, click the Flow Maps Options button |
If you want to rename the flow map, right-click the swatch in the Flow Map Libraries panel, and choose Rename Flow Map. |
| To capture a flow map from an image |
1 |
Open or create an image.
|
2 |
Choose the Rectangular Selection tool |
3 |
Drag in the document window to select the area of the image.
|
4 |
In the Flow Maps panel, click the Flow Maps Options button |
If you want to blend the distinction between tile borders, in the Capture Flow Map dialog box, and drag the Crossfade slider to the right. |
5 |
Type a name in the Save As text box.
|
The flow map is added to the currently selected library. |
![]()
You can also capture a flow map from the Flow Map Libraries panel by
clicking the Capture Flow Map button |
| To customize a flow map |
1 |
Choose Window |
2 |
In the Flow Maps panel, perform one or more actions from the following table.
|
|
|
Copyright 2012 Corel Corporation. All rights reserved.