Quick links to procedures on this page:
• |
• |
• |
• |
• |
• |
• |
A script is similar to a video. You can record, edit, and play it back at any time from the Scripts panel. The ability to edit scripts step-by-step also gives you control over recorded action sequences. You can record anything in a script — from a single edit command to an entire work session.
There are a number of ways to take advantage of scripting:
• |
Scripts offer the ultimate in Undo. If you record your work, you can revert to any
stage in the project by playing the script and stopping it at the stage you want.
|
• |
You can use scripts to create macros. If you have a repetitive task or an operation
you use frequently, you can record that series of commands. Whenever you want to
perform the task, play the script.
|
• |
You can play back a script at a different resolution. You can record at a low
resolution, then automatically produce the same results at a higher resolution.
|
• |
You can record a script that plays back using the current art materials. For
example, you can record a script of a pencil drawing, then open a new document,
choose a different paper texture, color, and brush, and play back the script. Then,
you can watch Corel Painter repeat your drawing with the selected art materials.
|
• |
Scripts are a great educational tool. Playing the script of an art project lets you see
the step-by-step process used to make the image. It’s like looking over the artist’s
shoulder.
|
• |
Scripts are particularly useful for working with movies. When you have an
operation you want to apply to each frame in a movie, record the set of commands
in a script. You can then apply the script to the entire movie as one command.
|
• |
When you play a script, you can output it to a movie. Every action you take
becomes a frame in the movie. This is a great way to create special effects for your
QuickTime or Video for Windows (VFW) movies.
|
• |
You can enable the automatic saving of the background script, which allows you to
repeat the last actions you performed. The background script automatically records
all of the operations that you perform when you creating an image.
|
The Script recorder saves each instruction you give Corel Painter, including what values, locations, colors, and textures are used. By repeating the instructions, you can reproduce the artwork “from scratch.”
Because Corel Painter saves instructions, scripts are efficient and flexible. For example, you can play a script one instruction at a time. You can also edit scripts, taking a few instructions from one script and inserting them into another one.
The Scripts panel supplies the basic tools for recording, playing, and storing scripts.
| To show the Scripts panel |
• |
Choose Window |
| To hide the Scripts panel |
• |
Choose Window |
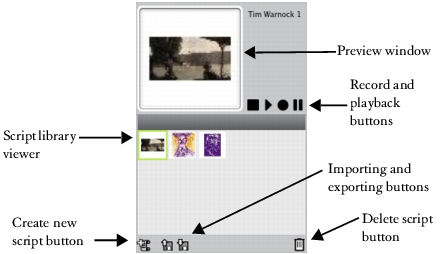
The Scripts panel
The Script Options button |
The Script buttons on the bottom of the panel make it easy to stop, play, record, pause, and step forward when you’re working with scripts.
Script buttons, from left to right: Stop, Play, Record, and Pause.
When you record a script, first you set up your Script Options. Record Initial State records the tools and art materials you use during the session, including brushes, colors, and paper textures. Corel Painter plays the session using the materials you recorded.
When Record Initial State is disabled, Corel Painter uses the tools and art materials selected at the time you play back the script. So, by disabling Record Initial State, you can use a different brush, color, and paper texture each time you play the script.
Save Frames on Playback and the frame rate option are for playback. For more information on these options, refer to Converting a Scripted Session into a Movie.
After you have set the Script Options, you begin the recording and perform the actions you want scripted.
Corel Painter saves new scripts to the current library, however, you can move scripts between libraries. For more information, see Libraries.
Because Corel Painter always saves your script data, this data can build up in your Corel Painter Script Data file. You can control the number of days these scripts persist in the file by entering a number of days into the Auto Save box in the General Preferences dialog. For more information, refer to Setting Preferences.
| To record a script |
1 |
In the Scripts panel, click the Script Options button |
2 |
In the Script Options dialog box, set your options.
|
If you want to record a script where you can change art materials on playback, disable the Record Initial State option. |
3 |
In the Scripts panel, click the Record button |
The Record button appears red while recording. |
4 |
Draw, paint, or use any features and effects you want to record.
|
5 |
When you’re finished, click the Stop button |
6 |
In the Script Name dialog box, type a name.
|
Corel Painter automatically adds an icon for the script in the Script library viewer. |
If brushes, papers, patterns, or other materials required by the script are
stored in alternate libraries, these libraries must be available during playback.
|
When you create an image, Corel Painter records all the operations you perform. This recording is known as a background script and is saved in the Scripts panel. The Auto-Save Scripts preference controls how long Corel Painter saves background scripts before deleting them.
| To enable the Auto-Save Scripts preference |
1 |
Do one of the following:
|
• |
(Mac OS) Choose Corel Painter 12 menu |
• |
(Windows) Choose Edit |
2 |
Enable the Auto-record Script check box.
|
3 |
Specify the number of days for which you want Corel Painter to save background
scripts in the Auto-Save Scripts For box.
|
When you play your recorded script, you can sit back and watch the operations unfold. In Corel Painter, replaying a script of a painting is like watching the artist at work.
| To play a script |
1 |
In the Scripts panel, choose a script from the Script library viewer.
|
To load another script library, click the Script Options button |
2 |
In the Script library, click the script that you want to play.
|
3 |
Click the Play button |
The button appears green during playback. |
4 |
Use the Stop |
You can also use Command + . (Mac OS) or Ctrl + . (Windows) to stop a
script from playing.
|
Replaying a script at a higher resolution is a good way of creating a high-resolution image without working on a high-resolution image. When you’re creating the image, you can get smoother, more responsive performance by working at low resolution. Then, when you play back the script at a higher resolution, you get the benefit of a higher quality image.
The record-to-playback scaling ratio is limited. A factor of 4 is probably too much. For best results, experiment.
| To record for resolution-independent playback |
1 |
Before you start recording, open a new document at the resolution in which you
want to work.
|
2 |
Before painting or drawing, choose Select |
This action creates a reference rectangle that is part of the recording. The rectangle must be recorded to play a session back into a higher resolution file later. |
3 |
In the Scripts panel, click the Record button |
4 |
Deselect the reference rectangle by doing one of the following:
|
• |
Choose Select |
• |
Draw inside the selected area.
|
• |
Press Command + D (Mac OS) or Ctrl + D (Windows).
|
5 |
Proceed with your script recording as usual.
|
| To play back at a different resolution |
1 |
Create a new document with the resolution at which you want to play the script.
|
If you want the resulting image to be a higher resolution than the original, create a document with proportionally larger dimensions. For example, if the original document is 500 X 500 pixels, make the new document 1000 X 1000 pixels to double the size. |
If the destination document has a different aspect ratio from the original, the image created by the script will be proportionally distorted. |
2 |
In the Scripts panel, click the resolution-independent script you recorded in the
Script library viewer.
|
3 |
Before playing back the script, choose Select |
4 |
Click Play.
|
The original script replays into the new document. All brushes, paper textures, and related functions are appropriately scaled for the new resolution. |
|
|
Copyright 2012 Corel Corporation. All rights reserved.