Quick links to procedures on this page:
• |
• |
• |
• |
• |
• |
• |
• |
• |
Liquid Ink controls work with Liquid Ink layers. You can use the Liquid Ink controls to specify qualities such as type, smoothness, and volume of a brushstroke. You can adjust the Liquid Ink controls when you select a Liquid Ink brush. Some Liquid Ink controls work in conjunction with Expression settings. For more information, see Expression Settings.
Liquid Ink is divided into two basic properties: Ink and Color. The Ink component provides the form of the brushstroke, while the Color component applies color to the Ink form. The Ink and Color components can be used together or controlled separately.
The following describes the available Ink types.
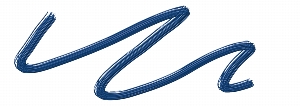
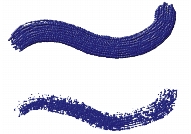
Smoothness controls the “tack” of the brushstrokes. Lower values result in coarser brushstrokes. Higher values cause brushstrokes to appear smoother.

Brushstrokes with Smoothness set to 0% (top) and 100% (bottom)
Volume controls the height of the brushstroke, or the amount of medium applied to the image. Higher values result in thicker strokes.
The Wheel option in the Expression list box allows you to control the amount of spray from the Liquid Ink airbrush by adjusting the wheel on the airbrush stylus (especially the Intuos Airbrush Stylus). The wheel on the stylus acts like a needle control on a real airbrush.
You can use the Depth controls to give Liquid Ink brushstrokes the appearance of height. For more information about Depth controls, see Impasto Controls.
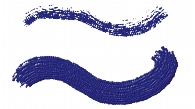
Brushstrokes with Volume set to 100% (top) and 500% (bottom)
Min Volume controls the maximum variation in volume. A value of 100%, for example, produces no variation in volume during the brushstroke.
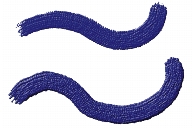
Brushstrokes with Min Volume set to 100% (top) and 0% (bottom)
Rand Vol controls the randomness in volume within the brushstroke. A value of zero results in a perfectly smooth brushstroke.
Brushstrokes with Rand Vol set to 0% (top) and 100% (bottom)
Rand Size controls the randomness in size within a brushstroke. A value of zero results in a perfectly smooth brushstroke.

Brushstrokes with Rand Size set to 0% (top) and 100% (bottom)
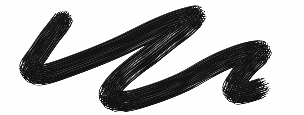
The bristle fraction (Bristle Frac slider) controls the thickness of the bristles. Higher values cause the bristles to stick together and result in a smoother brushstroke. Lower values cause the individual brushstrokes to become visible.

Brushstrokes with Bristle Frac set to 3% (top) and 20% (bottom)
Rand Br Vol controls the variation in bristle height. A value of zero signifies that all the bristles are of equal height.

Brushstrokes with Rand Br Vol set to 0% (top) and 75% (bottom)
Rand Br Size controls the variation in bristle width. A value of zero signifies that all the bristles are of equal width.

Brushstrokes with Rand Br Size set to 0% (top) and 100% (bottom)
| To choose an ink type |
1 |
Choose Window |
2 |
Choose a liquid ink type from the Ink Type list box.
|
| To set smoothness |
1 |
Choose Window |
2 |
Adjust the Smoothness slider.
|
Lower values result in coarse brushstrokes. Higher values cause brushstrokes to blend into one another and appear smoother. |
| To set ink volume |
1 |
Choose Window |
2 |
Adjust the Volume slider.
|
Higher values result in thicker strokes. |
| To set maximum variation in volume |
1 |
Choose Window |
2 |
Adjust the Min Volume slider.
|
If you want volume to respond to stylus pressure, choose Pressure from the Expression list box. |
| To set random volume |
1 |
Choose Window |
2 |
Adjust the Rand Vol slider.
|
Lower values result in more uniform brushstrokes. |
| To set random size |
1 |
Choose Window |
2 |
Adjust the Rand Size slider.
|
Lower values result in more uniformly sized brushstrokes. |
| To set bristle fraction |
1 |
Choose Window |
2 |
Adjust the Bristle Frac slider.
|
Higher values result in strokes in which individual bristles are less visible. |
| To set random bristle volume |
1 |
Choose Window |
2 |
Adjust the Rand Br Vol slider.
|
Higher values result in a greater variation in the length of brush bristles. |
| To set random bristle size |
1 |
Choose Window |
2 |
Adjust the Rand Br Size slider.
|
Higher values result in a greater variation in the length of brush bristles. |
|
|
Copyright 2012 Corel Corporation. All rights reserved.