Quick links to procedures on this page:
• |
• |
You can work with a preset RealBristle brush variant or customize a preset brush and save it as a new brush variant. The RealBristle panel gives you easy access to settings that let you modify a brush variant.
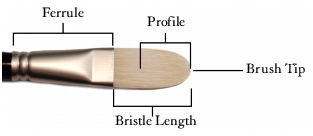
The following diagram outlines some key terminology used to describe RealBristle brushes and their settings.

The RealBristle panel contains the following settings:
Roundness — lets you control the rounding along the width of the brush and overall shape of the brush. With a round brush, lower values flatten the brush to create an elliptical shape (can be flattened to a minimum thickness of 10% of the diameter). With a flat brush, lower values create a brush with more angular corners (90 degree edges as opposed to rounded edges).
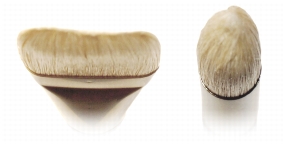
The brush on the left approximates the rounded edges created by a flat brush with a Roundness setting of 100%; the brush on the right approximates a round brush with a Roundness setting of 100%.
Bristle Length — lets you control the length of the bristles, from the end of the ferrule to the tip of the brush. The Bristle Length is calculated by multiplying the Brush Size value by the Bristle Length value you choose. For example, if your Brush Size setting is 20, and your Bristle Length setting is 2, the length of the bristles is 40.
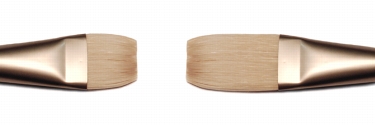
The brush on the left approximates a brush with a Bristle Length setting of 1; the brush on the right approximates a brush with a setting of 2.
Profile Length — lets you control the length of the profile as a percentage of the overall length of the bristles.
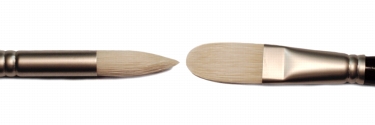
Although quite different in shape, both brushes have a Profile Length of approximately 50%.
Bristle Rigidity — lets you control the flexibility of the bristles. Lower values create a more flexible brush, similar to a sable hair brush; higher values create a more rigid brush, similar to a hog hair brush.
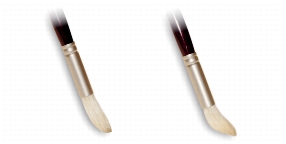
The brush on the left approximates a Bristle Rigidity setting of approximately 90%; the brush on the right approximates a setting of approximately 30%.
Fanning — lets you control how the bristles spread out from the ferrule. Lower values keep the bristles closer together, creating a more pointed tip; higher values spread the bristles out.
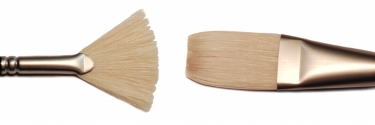
The brush on the left represents a Fanning setting of 100%; the brush on the right represents a setting of 0%.
Friction — lets you control how smoothly the bristles move across the canvas. This setting works in conjunction with the Rigidity setting. Lower values produce smoother strokes; higher values produce more textured, splayed brushstrokes.
Height — lets you control the minimum distance between the ferrule and the canvas. Higher values let you paint with the tip of the brush only; lower values let you compress the bristles against the canvas, causing the bristles to splay in different directions.
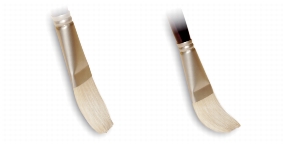
The brush on the left represents a Height setting of 100%; the brush on the right represents a height setting of 50%.
| To open the RealBristle panel |
• |
Choose Window |
| To customize a RealBristle brush variant |
1 |
Click the Brush Selector on the Brush Selector bar.
|
2 |
In the Brush Library panel, click a brush category that contains a RealBristle
variant, such as Acrylics, Oils, and Watercolor, then click a RealBristle brush
variant.
|
3 |
Choose Window |
If the selected brush variant is a true RealBristle brush, the controls in the RealBristle panel are available. |
4 |
In the RealBristle panel, enable the Enable RealBristle check box.
|
5 |
Choose Window |
6 |
In the Dab Profile panel, click the brush tip profile that you want to use.
|
7 |
In the RealBristle panel, adjust any of the Brush sliders.
|
8 |
In the RealBristle panel, adjust any of the Surface sliders.
|
By enabling the Enable RealBristle check box, you can create RealBristle
brushes from the any brush variant that uses the following Dab types: Camel
Hair, Flat, Palette Knife, or Bristle Spray.
|
|
|
Copyright 2012 Corel Corporation. All rights reserved.