Quick links to procedures on this page:


Real Watercolor Controls

The Corel Painter Real Watercolor brush controls help you achieve very realistic watercolor brushstrokes. The controls simulate working with a watercolor brush, watercolor paper, pigments, and a glass of water. You can adjust pigment levels and water consistency to achieve natural flow and pigment settling effects. The following section describes the Real Watercolor brush controls in more detail.

Brush controls

The Real Watercolor brush-related controls let you set the amount of water and pigment that the brush deposits on the paper.

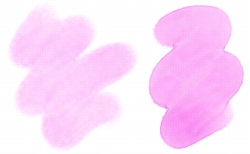
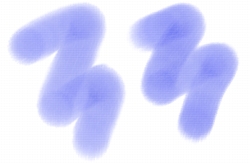
Brushstrokes set at a lower Wetness setting (left) and higher Wetness setting (right)

Water controls

The Real Watercolor water-related controls let you adjust the water viscosity, or thickness, in order to control the way it flows and spreads on the surface of the paper. For example, if the water viscosity is high, it will produce a runny effect and the water will flow and spread easily. If the water viscosity is low and thick, it will have a tendency to pool, instead of flow. You can also adjust the speed at which the water dries, which influences how and where the pigment settles on the paper.

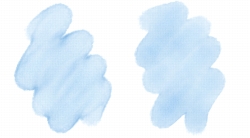
Brushstrokes set at a lower Viscosity setting (left) and higher Viscosity setting (right)

Pigment controls

The pigment controls let you adjust how much pigment is deposited on the paper after the water evaporates and how quickly the pigment settles on the paper. You can also specify the degree to which water is able to lift dry pigment from the paper.

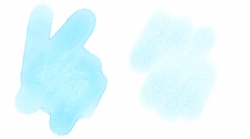
Brushstrokes set at a lower Settling Rate (left) and higher Settling Rate (right)

Paper controls

With the paper controls, you can adjust how the Real Watercolor brushes interact with paper texture and grain. You can adjust the paper roughness, which affects all other paper settings.

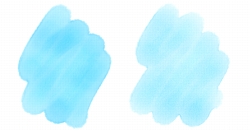
Brushstrokes set at a lower Roughness setting (left) and higher Roughness setting (right)

You can also adjust the flow resistance to control the effect the paper grain has on the direction of the water flow. In addition, you can set the rate at which the paper grain can absorb water and control the amount of pigment that settles into the valleys of the paper grain when it dries.

Brushstrokes set at a lower Flow Resistance setting (left) and higher Flow Resistance setting (right)

Wind controls

The wind controls let you control the angle at which water flows on the paper. You can also specify the amount of wind force exerted on the water.

Brushstrokes set at a lower Angle and Force settings (left) and higher Angle and Force settings (right)

Diffusion controls

The diffusion controls allow you to manage how and when the pigment is diffused on the paper. You can specify that diffusion be precisely applied to ensure accurate water flow. You can also delay diffusion so the effect is applied only after you complete a brushstroke. In addition, you can choose to suspend diffusion temporarily. This lets you apply multiple brushstrokes to the paper before applying the diffusion, to apply the effect to all brushstrokes at once. You can also specify the number of flow steps to be completed during animation. This controls the rate at which the visual flow of the pigment refreshes onscreen. For example, you can specify a lower number of steps for smaller brushes and a higher number of steps for bigger brushes.

To adjust the Real Watercolor controls Back to Top
1
 
Choose Window Brush Control Panels Real Watercolor.
2
 
Perform an action from the following table.

To
Do the following
Set the amount of water the brush deposits on the paper
In the Brush area, move the Wetness slider to the left to decrease the amount of water or to the right to increase the amount of water.
Set the amount of pigment the brush deposits on the paper
In the Brush area, move the Concentration slider to the left to decrease the amount of pigment or to the right to increase the amount of pigment.
Adjust the water thickness to control the way it flows and spreads on the surface of the paper
In the Water area, move the Viscosity slider to the left to decrease the thickness or to the right to increase the thickness.
Adjust the speed at which the water dries
In the Water area, move the Evaporation Rate slider to the left to decrease the water evaporation effect or to the right to increase the effect.
Adjust the amount of pigment deposited on the paper after the water evaporates
In the Pigment area, move the Settling Rate slider to the left to decrease the amount of pigment or to the right to increase the amount of pigment.
Control how quickly the pigment settles on the paper
In the Pigment area, move the Weight slider to the left to achieve a lighter pigment or to the right to achieve a heavier pigment. A lighter weight pigment flows with the water longer, whereas a heavier pigment settles onto the paper very quickly.
Specify the degree to which water is able to lift dry pigment from the paper

In the Pigment area, move the Pickup slider to the left to decrease the amount of pigment pickup or to the right to increase the amount of pigment pickup.

Adjust the paper roughness
In the Paper area, move the Roughness slider to the left to decrease the paper roughness or to the right to increase the paper roughness. This impacts flow resistance, dry rate, and pigment granulation.
Control the effect paper grain has on the direction of the water flow
In the Paper area, move the Flow Resistance slider to the left to decrease the resistance or to the right to increase the resistance.
Adjust the rate at which the paper grain can absorb water
In the Paper area, move the Dry Rate slider to the left to decrease the speed of absorption or to the right to increase the speed of absorption.
Control the amount of pigment that settles into the valleys of the paper grain when it dries
In the Paper area, move the Granulation slider to the left to decrease the effect or to the right to increase the effect.
Control the angle at which water flows on the paper
In the Wind area, move the Angle slider to the left to decrease the angle or to the right to increase the angle.
Specify the amount of wind force exerted on water, which affects the way it flows on the paper
In the Wind area, move the Force slider to the left to decrease the force or to the right to increase the force.

You can optimize the performance of Real Watercolor and Real Wet Oil brushes by temporarily disabling High Quality Display. Click the Magnifier tool in the toolbox, and click the High Quality Display button on the property bar.
To control Real Watercolor diffusion Back to Top
1
 
Choose Window Brush Control Panels Real Watercolor.
2
 
Perform an action from the following table.

To
Do the following
Apply diffusion precisely to ensure accurate water flow
Enable the Accurate Diffusion check box.
Delay diffusion until the brushstroke is complete
Enable the Delay Diffusion check box.
Suspend diffusion temporarily
Enable the Pause Diffusion check box or click the Pause Diffusion button on the property bar to suspend the diffusion. You need to disable the check box to perform the diffusion.
Specify the speed at which the pigment is revealed onscreen
Move the Animation Step slider to the left to lower the speed of the animation or to the right to increase the speed.
Specifying a lower Animation Step, such as 0, produces a smoother effect.


Feedback
Was this page helpful? Send feedback.

Copyright 2012 Corel Corporation. All rights reserved.