
Quick links to procedures on this page:
• |
• |
• |
• |
• |
The Size brush feature determines how Corel Painter varies the width of the brushstroke. Some Size controls work in conjunction with Expression settings. For more information, see Expression Settings.
Size lets you control the width of the brush and the brushstroke. As size changes, you may need to adjust the spacing controls for brushes that use nonrendered or dab-based dab types to prevent gaps from appearing in the stroke.
Size controls the width of the brush.
When working with traditional media, you expect the pressure that you exert on a brush or drawing tool to affect the width of the resulting brushstroke. The Min Size control allows you to create a brushstroke that is amazingly realistic. You can set up a brush that responds to subtle hand movements. As stylus pressure eases, brushstrokes taper. As pressure increases, brushstrokes widen, just as they would with a real brush.
Min Size represents the smallest stroke size for the selected brush and is expressed as a percentage of the Size setting. Knowing that Size sets the largest stroke size and that Min Size sets the smallest stroke size (in relationship to the Size setting), you can easily control the overall variation in stroke size.
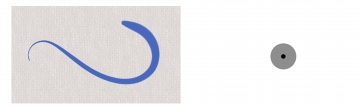
The minimum and maximum sizes of a stroke can be linked to stylus settings, such as pressure or velocity. The small black circle shows the minimum stroke size, and the gray circle shows the maximum stroke size.
Size Step controls the transition between narrow and wide sections of a stroke.

Brushstrokes with Size Step set to 1% (top) and 100% (bottom)
Feature determines the size of the dabs of paint applied by brushes that use rendered dab types.
You can also specify that brushstroke features scale relative to the size of the brush. This ensures that the feature, such as an Airbrush spray, is distributed proportionally to match the size of the brush.
| To set brush size |
1 |
Choose Window |
2 |
Move the Size slider to the right to make the brush larger, which makes the
transition appear more abrupt. Move the slider to the left to make the brush
smaller, which produces a smoother transition.
|
You can also set the brush size dynamically onscreen. For more information,
see To set brush attributes onscreen.
|
![]()
You can also change the brush size from the property bar by adjusting the Size
slider |
You can also press the square brackets, ( [ or ] ), to decrease and increase the
brush size according to the value specified in General Preferences. For more
information, see General Preferences.
|
| To set minimum stroke size |
1 |
Choose Window |
2 |
Move the Min Size slider to the right to increase the minimum brush size. Move it
to the left to decrease the minimum brush size.
|
| To set stroke transition |
1 |
Choose Window |
2 |
Move the Size Step slider to the right to increase the transition between brush sizes.
Move it to the left to make the transitions smaller.
|
| To switch the brush size preview mode |
1 |
Choose Window |
2 |
Click the Preview Size and Shape button |
| To scale a brushstroke’s features with the brush size |
1 |
Choose Window |
2 |
Enable the Scale Feature With Brush Size check box.
|
You can also scale a brushstroke’s features with the brush size by clicking the
Scale Feature With Brush Size button |
You can also disable the scaling option in all areas by choosing
Corel Painter 12 menu |
|
|
Copyright 2012 Corel Corporation. All rights reserved.