Quick links to procedures on this page:
• |
• |
• |
• |
• |
• |
When a brushstroke uses a dab-based dab type, Corel Painter creates the stroke with a series of dabs. By adjusting the spacing between those dabs, you can control the continuity of the brushstroke.
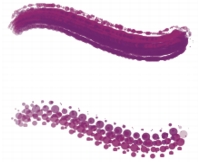
Spacing controls the distance between brush dabs in a stroke. The Min Spacing slider specifies the minimum number of pixels between dabs. If you don’t want a continuous stroke, you can adjust the Min Spacing to create a dotted or dashed line. Each dot or dash represents one brush dab.
Brushstrokes with Min Spacing set to 2.0 (top) and 10.5 (bottom)
Damping smooths otherwise jagged brushstrokes for brushes that use rendered dab types. Higher values make the stroke smoother. (Damping suspends a stroke in a mathematical spring area by using calculations to even out edges and reduce jaggedness.)
High values of Damping round out corners of a stroke. A value of 50% works best. Higher values might be necessary for jittery input devices such as a mouse.
Continuous Time Deposition controls whether you must move a brush before a medium is applied. With Continuous Time Deposition enabled, the medium begins flowing at the first touch.
Brushes that use rendered dab types take full advantage of this setting, which causes the medium to pool realistically when the stroke is slowed or paused. Brushes that use dab-based dab types require a full pause in the stroke before the medium begins to pool. You use Continuous Time Deposition mostly with airbrush tools.
With Continuous Time Deposition disabled, you must move a brush before the medium flows.
Cubic Interpolation smooths jagged brushstrokes by adding points to dab paths, primarily for brushes that use dab-based dab types. Unlike Damping, which uses mathematical calculations to smooth jagged edges, Cubic Interpolation inserts additional points into dab paths, which are used to replot brushstrokes.
Cubic Interpolation is best for dab-based dab types, while Damping is best for rendered dab types.
Boost allows you to optimize the performance of brushstrokes. However, a high-boost level may produce a less accurate brushstroke that appears a bit jagged. This setting applies only to specific brush dab types, such as Flat and Camel hair.
| To set spacing between brush dabs |
1 |
Choose Window |
2 |
Perform a task from the following table.
|
| To set minimum dab spacing |
1 |
Choose Window |
2 |
Move the Min Spacing slider to the right to increase the minimum spacing between
dabs. Move it to the left to decrease the minimum spacing between dabs.
|
| To set smooth rendered dab strokes |
1 |
Choose Window |
2 |
Move the Damping slider to the right to even out jagged strokes. Move it to the
left to allow for more ragged transitions between points on the stroke.
|
| To set continuous time deposition |
1 |
Choose Window |
2 |
Enable the Continuous Time Deposition check box.
|
| To set smooth strokes by adding path points |
1 |
Choose Window |
2 |
Move the Points slider to the right to add points and even out jagged strokes. Move
it to the left to decrease the number of additional points.
|
| To boost brushstrokes |
1 |
Choose Window |
2 |
Move the Boost slider to the right to increase brush performance. Move it to the
left to decrease brush performance.
|
|
|
Copyright 2012 Corel Corporation. All rights reserved.