Quick links to procedures on this page:
• |
• |
• |
• |
The Apply Lighting effect lets you shine one or more light sources on an image. Using this effect is like hanging your artwork in a gallery and adjusting colored spotlights to illuminate it. You can choose different lighting effects from the Corel Painter library, or you can create your own effects by defining brightness, distance, color, and other characteristics.
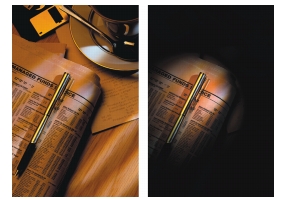
Before (left) and after (right) Apply Lighting.
The Lighting library contains several preset lighting environments. You can use these directly or as a starting point for customized lighting.
| To apply preset lighting effects |
1 |
Select a layer or area of the canvas.
|
If you want to apply the effect to the entire image, do not make a selection. |
2 |
Choose Effects |
3 |
In the Apply Lighting dialog box, click a preset thumbnail.
|
The lighting effect is displayed in the Preview window. |
You can use the controls in the Apply Lighting dialog box to add, delete, and position light sources. You can also set light properties to create unique lighting effects.
The Preview window shows the current position of each light source and the angle of its projection.
The four steps to creating custom lighting are
• |
Adding or deleting light sources
|
• |
Positioning lights
|
• |
Setting light properties
|
• |
Saving light settings
|
The lighting effect is created by applying light from different sources to the image. You can add or delete as many light sources as you wish. Your only limit is your system’s memory.
When you add a light source, a new indicator appears in the preview window. The small part of the light indicator is the origin (the point from which the light is shining). The large part of the indicator is the point toward which the light is shining.
The type of lighting effect you create is determined by the position of light on the image. You can use the light indicators to move and direct light sources.
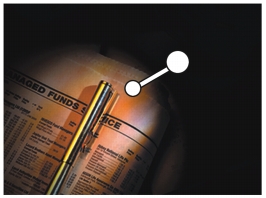
Light source indicator.
| To add, delete, or reposition a light source |
1 |
Choose Effects |
2 |
Perform a task from the following table:
|
You can set light properties such as brightness, distance, elevation, and color. Light properties have a cumulative effect. For example, if you turn up a light’s brightness, you might need to adjust exposure.
| To change a light’s properties |
1 |
Choose Effects |
2 |
In the Preview window, click an indicator to select it.
|
3 |
Adjust any of the following sliders:
|
• |
Brightness — is like a dimmer knob. Moving it to the left turns down the light
source; moving it to the right increases brightness.
|
• |
Distance — controls how far the light is from the image. If you move the light
source closer, you can compensate for the increased light by adjusting the
Exposure slider to compensate.
|
• |
Elevation — sets the light’s angle in relation to the canvas. At 90°, the light is
shining straight down, and at 1°, it’s nearly horizontal.
|
• |
Spread — sets the angle of the light cone
|
• |
Exposure — controls the image’s brightness, as in photography. Moving the
slider to the left decreases exposure and darkens the image; moving it to the
right increases exposure and lightens the image.
|
• |
Ambient — controls the surrounding light in an image. If you have no
individual lights in your image, the ambient lighting governs the overall
lightness of the image. Moving the slider to the left darkens the overall lighting;
moving it to the right increases the light.
|
| To change light color |
1 |
Choose Effects |
2 |
In the Preview window, click an indicator.
|
3 |
Click the Light Color chip, choose a color from the Color dialog box, and click OK.
|
4 |
Click the Ambient Light Color chip, choose a color from the Color dialog box, and
click OK.
|
|
|
Copyright 2012 Corel Corporation. All rights reserved.