Quick links to procedures on this page:
• |
• |
With Corel Painter, you can produce realistic brushstrokes that fade in and out; change width, tilt, and angle; and penetrate based on the stylus or mouse input. Overall, the stylus provides more control and interactivity because it gives you the most responsive digital painting experience by allowing your hand and brush to work fluidly as one. However, if you don’t have a stylus, you can adjust the mouse so it simulates stylus pressure, tilt, bearing, and fingerwheel settings. For more information, see Mouse Controls.
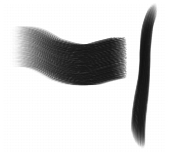
When you reach for a wide, flat brush, the stroke you make is affected by how you hold the brush. A stroke made with the face of the brush comes out wide. A stroke made with the edge is narrow.
Paint with the face of a flat brush for a wide stroke; use the edge for a narrow stroke.
Some brush variants, such as the Smeary Flat variant in the Oils category, react to stylus tilt (how close to vertical the stylus is held) and bearing (the compass direction in which the stylus is pointing).
Tilt can significantly affect brushstrokes. If you get unexpected results, especially with bristle-type brushes or airbrushes, you can try reducing the tilt of your stylus. Extreme tilt angles are usually undesirable. For information about adjusting tilt, see Expression Settings.
Many Corel Painter brushes respond to stylus pressure (how hard you press with the stylus). Depending on the variant settings, greater stylus pressure can increase the width of a brushstroke, the penetration of color, or the degree of other effects. The Corel Painter airbrushes also respond to the fingerwheel on the Wacom Intuos airbrush, simulating a needle control that adjusts how much ink is sprayed.
You can link brush settings (such as size, opacity, and angle) to stylus input data (such as velocity, direction, pressure, airbrush fingerwheel, tilt, and bearing). Refer to Expression Settings for more information about linking brush settings to stylus input controls.
In theory, a mouse has no pressure information because a mouse button is either “on” (button down) or “off” (button up). However, with Corel Painter you can simulate stylus pressure.
If you are using a mouse with Corel Painter, you can compensate for the lack of pressure information by adjusting size, opacity, and grain on the property bar. For example, reducing opacity or grain can produce the same results as pressing more lightly with a stylus.
| To adjust pressure, tilt, and bearing when using a mouse |
1 |
Choose Window |
2 |
Move the Pressure slider.
|
A 100% setting uses maximum pressure. |
3 |
Move the Tilt slider.
|
A 90° setting simulates a stylus that is perpendicular to the tablet. |
4 |
Move the Bearing slider.
|
A setting of zero indicates that if a stylus were in use, it would be pointing left. |
5 |
Move the Rotation slider.
|
A 360° setting simulates a stylus that complete a 360°-barrel rotation. |
To see the effect of the tilt setting, apply a stroke to the drawing window
using the Fine Spray variant of the Airbrush category.
|
| To adjust fingerwheel settings when using a mouse |
1 |
Choose Window |
2 |
Choose Wheel from the Expression list box.
|
3 |
Choose Mouse.
|
4 |
Move the Wheel slider.
|
A 90% setting indicates that if a stylus were in use, it would be perpendicular to the tablet. |
|
|
Copyright 2012 Corel Corporation. All rights reserved.