
Quick links to procedures on this page:
• |
• |
• |
A tessellation is a type of mosaic that uses nonrectangular tiles. Tessellation tiles are subject to the same rules as the rectangular mosaic tiles.
The Make Tessellation feature works by dividing the canvas into polygonal shapes, which become the mosaic tiles. The polygons themselves are sets of points, connected by line segments. You can control the number of points and their distribution. You can also specify how the points are connected.
A tessellation mosaic uses nonrectangular tiles.
After choosing the Make Tessellation feature, the polygons appear as mosaic tiles, are given the main color, and are surrounded by the grout lines described in the Make Mosaic dialog box.
You can use the tools in the Make Mosaic dialog box to remove tiles and change their color. However, you can’t reapply tiles.
| To create a tessellation |
1 |
Open a new document.
|
2 |
Choose Effects |
3 |
In the Make Mosaic dialog box, choose Dimensions from the Settings list box.
|
4 |
Adjust the Grout slider to describe the thickness you want for the grout lines, and
select a grout color.
|
5 |
Click Done to exit the Make Mosaic dialog box.
|
6 |
Choose Effects |
7 |
Do one of the following:
|
• |
Click or drag in the document to create points. Repeat to add more points.
Corel Painter connects the points to form the polygons.
|
• |
In the Make Tessellation dialog box, choose one of the commands from the
Options list box. You can add 500 points randomly, evenly spaced, or based on a
clone source document.
|
8 |
Choose a tessellation tile shape from the Display list box. Corel Painter forms
polygons by connecting the points according to the Display type.
|
You can choose from one of three display options: |
• |
Triangles
|
• |
Cracks
|
• |
Pieces
|
If you want to clear all points, choose Reset from the Options list box. |
Corel Painter converts the polygons to mosaic tiles, then renders the mosaic image to the canvas. |
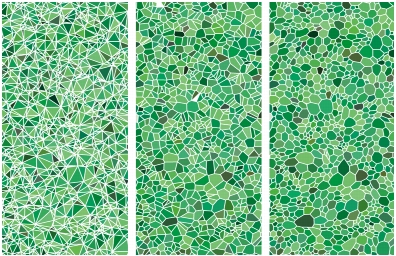
You can base your Tessellation on Triangles, Cracks or Pieces.
![]()
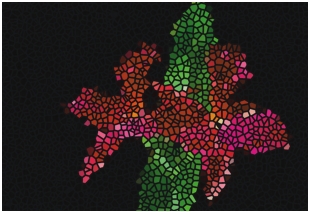
Adding points based on a clone source is a powerful option. The 500 points
are distributed according to the luminance of the clone source. Lighter regions
receive a greater density of points, so the polygons are smaller.
|
The number of points appears in the corner of the Make Tessellation dialog
box.
|
![]()
Repeat a command from the Options menu to create more points. You can
alternate between dragging and using an add-points command. The points
accumulate.
|
You might want to convert a regular image to a tessellation. If so, set up the
image as the clone source. Enable the Clone Color button |
A finished tessellation resembles stained glass.
| To add points using strokes |
1 |
Open a new document.
|
2 |
Choose Effects |
3 |
In the Make Mosaic dialog box, choose Dimensions from the Settings list box.
|
4 |
Adjust the Grout slider to describe the thickness you want for the grout lines, and
select a grout color.
|
5 |
Click Done to exit the Make Mosaic dialog box.
|
6 |
Choose Effects |
7 |
In the Make Tessellation dialog box, choose Add 500 Evenly Spaced Points from
the Options list box.
|
8 |
Create a shape by making strokes in the document.
|
The points along the stroke will have increased density. |
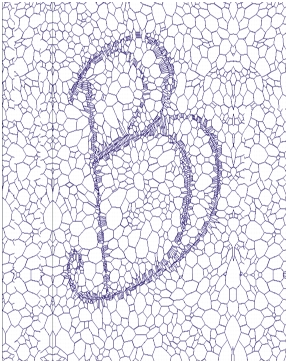
Adding points in the shape of a letter by stroking. The letters appear as a swath of smaller polygons.
![]()
You can continue stroking to add higher concentrations of polygons in very
specific areas. This way, you can create specific patterns or shapes.
|
It is possible to create a huge number of points. More points mean more
polygons, which increase the time it takes to convert to a mosaic. Keep this in
mind to avoid overwhelming your system.
|
After the tessellation appears as a mosaic, you can open the Make Mosaic dialog box and modify the tile colors using the Change Tile Color tool. When you create a tessellation with the current color and the grout color set to black, and choose Make Mosaic, the image appears totally black. Don’t worry — your image is not lost.
| To color tessellations |
1 |
In the Make Mosaic dialog box, select the Change Tile Color tool |
2 |
From the list box below the Change Tile Color tool, choose Color.
|
3 |
In the Colors panel, choose a bright main color.
|
4 |
Drag to create a stroke in the document, or click individual tiles.
|
Colored, tessellated tiles appear beneath your stroke. |
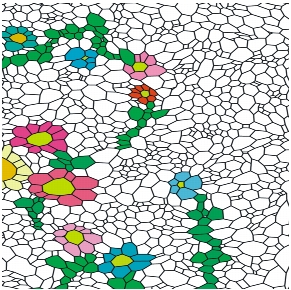
After you have a tessellation, you can use Make Mosaic to paint on the tiles.
You can also base the color on the color in a clone source if you enable
Clone Color in the Colors panel.
|
The following commands for tessellations are available from the Options list box in the Make Mosaic dialog box:
• |
The Reset Mosaic command removes all tiles from the document, leaving only the
grout color.
|
• |
The Re-render Mosaic command re-creates the mosaic from the grout color and the
tile object information.
|
• |
The Render Tiles Into Mask command places the tile shapes in a new channel.
|
The other mosaic commands are for creating tiles and do not apply to tessellations.
|
|
Copyright 2012 Corel Corporation. All rights reserved.