Creating selections
You can create a selection when you want to isolate part of an image. For example, you can use a selection to adjust or retouch one area of a photo, or to copy a portion of a photo and paste it into another photo. The way you make a selection depends on whether you are working on a raster layer or a vector layer.
The following selection tools can be used to create raster selections:
• |
Selection tool |
• |
Freehand Selection tool |
• |
Edge Seeker — finds the edges between two areas with color
differences when you click on the edges of irregularly shaped
areas
|
• |
Freehand — lets you quickly select an area by dragging
|
• |
Point to Point — lets you draw straight lines between points to
create a selection with straight edges
|
• |
Smart Edge — automatically finds the edges of irregularly
shaped areas when you click along the edges
|
• |
Magic Wand tool |
The selection tools can also be used on vector layers to create selections from vector objects. For example, if you copy a selection and paste it as a new image, it is copied to a raster layer as individual pixels rather than as a vector object.
For information about vector text, see Applying text.
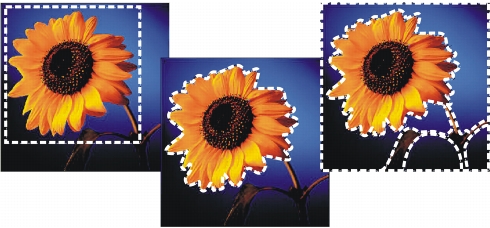
You can create a selection by using a Selection tool shape (left), by creating a freehand selection (center), or by using the Magic Wand tool to select specific areas of color or opacity (right).
You can make a selection with one tool and then switch to another tool to add to or subtract from the selection. For more information, see Modifying selections.
You can also use the Paint tool to create a selection. For more information, see Working with brushes.
You can use text selections to apply effects to text; for example, when you create a text selection on a solid-color layer and then delete the selection, the letters appear transparent and outlined with the layer’s solid color.
By creating a raster selection on a vector object, you can use raster-only tools and commands to edit the vector object.
You can create a selection from a mask, which lets you omit the masked (black) areas and select the non-masked (non-black) areas. The selection is clipped to the canvas. For more information, see Working with masks.
| To create a selection by using the Selection tool |
Edit workspace
1 |
On the Tools toolbar, choose the Selection tool |
2 |
Check the settings of the following controls on the Tool Options
palette, and modify them if necessary:
|
• |
Selection Type — specifies the shape of the selection area
|
• |
Mode — specifies whether to replace, add, or remove an
existing selection. Replace is the default setting.
|
• |
Feather — softens the edges of a selection by specifying a fade
width (0 to 200 pixels)
|
• |
Anti-alias — applies a smooth edge to a selection by making the
pixels along its edges semitransparent
|
3 |
Drag to make the selection.
|
As you drag, a border indicates the selection. When you finish dragging, the selection’s border becomes a selection marquee. |
After you create a selection, changes to the settings on the Tool
Options palette apply to the next action, not to the current
selection. You can modify the options for the current selection
by choosing Selections |
| To create a selection by using the Freehand Selection tool |
Edit workspace
1 |
On the Tools toolbar, choose the Freehand Selection tool |
2 |
On the Tool Options palette, choose one of the following from the
Selection Type drop-list:
|
• |
Edge Seeker
|
• |
Freehand
|
• |
Point to Point
|
• |
Smart Edge
|
3 |
Check the settings of the following controls on the Tool Options
palette, and modify them if necessary:
|
• |
Feather — softens the edges of a selection by specifying a fade
width (0 to 200 pixels)
|
• |
Smoothing — specifies the amount of smoothing to apply to
the selection border
|
• |
Anti-alias — applies a smooth edge to a selection by making
pixels semitransparent
|
• |
Use all layers — searches for an edge in all layers of the selected
area. This option is available when you use the Edge Seeker or
the Smart Edge selection type on multilayer images.
|
4 |
Depending on the selection type you chose, perform a task from
the following table.
|
When making an Edge Seeker selection, you can set the
distance used to search for an edge by typing a value in the
Range control on the Tool Options palette.
|
You can increase the accuracy of Edge Seeker and Smart Edge
selections by clicking more frequently along the edge you are
following.
|
You can delete a previous point by pressing Delete.
|
| To create a selection by using the Magic Wand tool |
Edit workspace
1 |
On the Tools toolbar, choose the Magic Wand tool |
2 |
On the Tool Options palette, choose a Match mode option:
|
• |
None — selects all pixels
|
• |
RGB Value — selects pixels that match the red, green, and blue
values of the pixel you click
|
• |
Color — selects pixels that match the shading variations of the
pixel you click
|
• |
Brightness — selects pixels that match the perceptual lightness
value of the pixel you click
|
• |
Perceptual — selects pixels that match the perceptual shading
variation and lightness of the pixel you click
|
• |
Traditional — selects pixels that match red, green, and blue
values, with a bias toward lightness variations. This match mode
is therefore more discriminating than the RGB Value match
mode.
|
• |
All Opaque — selects all pixels that are not completely invisible
(that is, having an opacity value of 1 or greater). Choosing this
option disables the Tolerance control.
|
• |
Opacity — selects pixels that match the opacity value of the
pixel you click.
|
3 |
Check the settings of the following controls on the Tool Options
palette, and modify them if necessary:
|
• |
Tolerance — controls how closely the selected pixels match the
pixel you click in the image. At low settings, only similar pixels
are chosen; at high settings, a wider range of pixels is selected.
|
• |
Feather — softens the edges of a selection by specifying a fade
width (0 to 200 pixels)
|
• |
Use all layers — searches for matching pixels across all layers in
the image
|
• |
Contiguous — selects only pixels that connect to the pixel you
click
|
• |
Anti-alias — produces a smooth-edged selection by partially
filling in pixels along the edge, making them semitransparent.
You can use this option inside or outside the selection marquee.
|
4 |
Click the image area that contains the pixels you want to match.
|
The selection marquee surrounds all matching pixels. |
You can change the number of pixels you select by undoing the
selection, adjusting the Tolerance setting, and making a new
selection.
|
| To create a selection by using a Painting tool |
Edit workspace
1 |
Choose Selections |
A selection layer is added to the Layers palette. |
2 |
Select a painting tool from the Tools toolbar.
|
3 |
Choose settings for the painting tool on the Tool Options palette
and the Brush Variance palette.
|
4 |
Paint on the image.
|
A ruby-colored overlay displays the brush strokes. The selection changes according to the following: |
• |
Painting with white adds to the selection.
|
• |
Painting with black subtracts from the selection.
|
• |
Painting with shades of gray adds to or subtracts from the
selection, depending on the level of gray.
|
5 |
Choose Selections |
The selection marquee surrounds the selected area. |
You can also click the Edit Selection button |
| To create a selection by using the Text tool |
Edit workspace
1 |
On the Tools toolbar, choose the Text tool |
2 |
On the Tool Options palette, choose Selection from the Create as
drop-list to create a selection shaped like the text.
|
3 |
Click where you want to start the text selection.
|
4 |
Set the text formatting controls, and type the text.
|
5 |
Click the Apply changes button |
| To create a raster selection from a vector object |
Edit workspace
1 |
On the Tools toolbar, choose the Pick tool |
2 |
Choose Selections |
A selection marquee surrounds each vector object. |
After you create a raster selection from a vector object, you can
copy and paste the selection as needed. The original vector
objects remain unchanged.
|
| To select all pixels in a layer or an image |
Edit workspace
• |
Choose Selections |
A selection marquee appears around the layer on the canvas. |
You can also select all pixels in a layer or an image by pressing
Ctrl + A.
|
| To select all non-masked areas |
Edit workspace
1 |
On the Layers palette, select the mask layer.
|
2 |
Choose Selections |
The selection marquee surrounds the non-masked areas. |
If you saved a mask to an alpha channel, you can load it as a
selection by choosing Selections |