Making basic photo corrections automatically
If you are not sure what adjustments to make to a photo, you can apply either the One Step Photo Fix command or the Smart Photo Fix command and see if you like the results. The One Step Photo Fix command automatically applies a predetermined set of color balancing and sharpening corrections to your photo — all you need to do is select the command. If you want the option of fine-tuning the same corrections before applying them, you can use the Smart Photo Fix command.
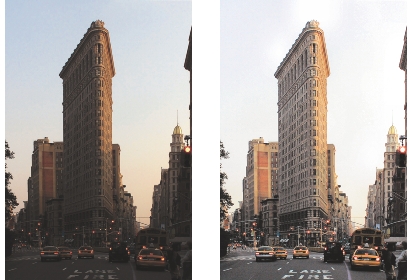
You can use the One Step Photo Fix command to improve the exposure and color balance of images quickly and easily.
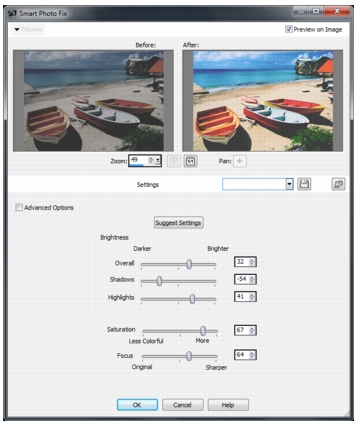
The Smart Photo Fix feature gives you control over the amount and type of corrections applied to an image.
The advanced options of the Smart Photo Fix feature let you adjust color balance by identifying the neutral areas in the photo (black, gray, and white), which are used as sampling points. The advanced options also let you modify the darkest and lightest pixels of the photo without affecting the photo’s color balance.
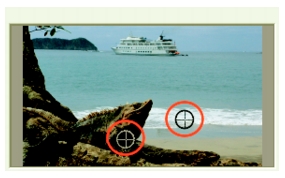
Neutral sampling points identified by using the advanced options of the Smart Photo Fix command
| To apply basic corrections with One Step Photo Fix |
Edit workspace
• |
Choose Adjust |
After a brief pause, several basic corrections are applied to your photo. |
The corrections applied are identical to what would be applied
by accepting the suggested settings of the Smart Photo Fix
feature.
|
If you are not satisfied with the changes made to your
photo, choose Edit |
| To fine-tune basic corrections with Smart Photo Fix |
Edit workspace
1 |
Choose Adjust |
The Smart Photo Fix dialog box appears. In the upper portion of the dialog box, the Before pane shows the original photo. The After pane shows how the photo would appear after applying the suggested set of basic adjustments. |
2 |
Perform one or more tasks from the following table, and click OK.
|
You can reset all settings to their initial values by clicking
Suggest Settings, or to null settings by clicking the Reset to
Default button |
To use advanced settings of the Smart Photo Fix feature, mark
the Advanced Options check box.
|
| To use the advanced options of Smart Photo Fix |
Edit workspace
1 |
In the Smart Photo Fix feature dialog box, mark the Advanced
Options check box.
|
Additional controls appear in the dialog box. |
2 |
Perform one or more tasks from the following table, and click OK.
|
To avoid introducing errors in color balance when you add
sampling points, do not click any color other than black, white,
or gray (for example, do not click a region that you know is
blue). Click only the points that you know should be black,
white, or gray.
|
Sampling points cannot be dragged or moved.
|
The histogram is for display only — you cannot drag or adjust
any part it. The gray portion represents the original (Before)
photo, and the red overlay portion reflects the adjustments. The
black triangle moves in tandem with the Black slider, and the
white triangle moves in tandem with the White slider. For more
information about the Histogram, see Adjusting brightness,
contrast, and clarity.
|