Using feathering with selections
Feathering softens the area between a selection and the rest of the image by gradually increasing the transparency of the pixels along the edge of the selection. You can specify the width of the feathered area.
When you copy or move a selection, feathering helps blend the selection into the surrounding area so that the image appears more natural. The higher the feathering value is, the softer the edges are. A feathering value of 0 creates a selection with distinct edges.
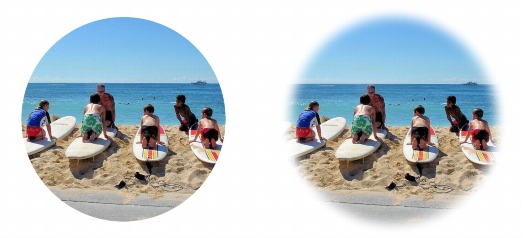
An unfeathered selection (left) and a feathered selection (right)
You can apply feathering as you make a selection, or you can apply it after the selection is created. The level of feathering and its position around the selection marquee can be adjusted after the selection is created. For more information about creating selections, see Creating selections.
| To change the amount of feathering in a selection |
Edit workspace
1 |
Choose Selections |
2 |
Type a value in the Number of pixels control.
|
The feathering is applied both inside and outside the selection. |
3 |
Click OK.
|
| To adjust the position of feathering |
Edit workspace
1 |
Choose Selections |
2 |
Mark one of the following options to set the position of the
feathering:
|
• |
Inside
|
• |
Outside
|
• |
Both
|
3 |
Type a value in the Feather amount control to set the feathering
width (in pixels).
|
4 |
Click OK.
|
You can click the Toggle Selection button |
| To unfeather a selection |
Edit workspace
1 |
Choose Selections |
2 |
Type a value in the Threshold control to specify the amount of
feathering you want to remove.
|
3 |
Click OK.
|