Warping images
You can distort image areas by using the warp brushes on image pixels to produce a warping effect. You can twirl areas of images, contract or expand parts of images, and create many interesting effects. The effect of the Warp Brush is often time-dependent, which means that the longer you hold the brush over an area, the more the brush produces the effect.
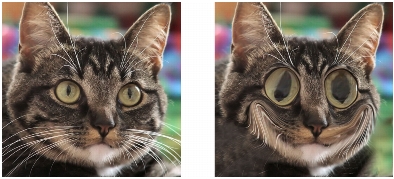
The Warp Brush tool can be used to create caricatures.
You can also warp images by using a grid. When you use the Mesh Warp tool, a grid or mesh is placed on the image. The grid intersections have mesh points, or nodes, that you drag to create deformations.
For more information about warping by using a grid, see To warp image areas by using a grid.
| To warp image areas by using a brush |
Edit workspace
1 |
On the Tools toolbar, choose the Warp Brush tool |
2 |
On the Tool Options palette, choose the type of warp in the Warp
Modes group box:
|
• |
Push |
• |
Expand |
• |
Contract |
• |
Right Twirl |
• |
Left Twirl |
• |
Noise |
• |
Iron Out |
• |
Unwarp |
3 |
Specify the brush options, such as size and hardness.
|
Unlike other brushes, the size of the Warp Brush tool can be adjusted only by using the control on the Tool Options palette, not by using the keyboard. |
4 |
Type or set a value in the Strength control to determine the
strength of the warping effect.
|
Full strength is 100%; minimum strength is 1%. |
5 |
Choose settings for the Edge mode, Draft quality, and Final apply
controls.
|
6 |
Drag in the image.
|
For more information about setting brush options, see
Choosing brush options.
|
For the time-dependent warp modes, you can also place the
pointer at one position (instead of dragging) and hold down
the mouse button to repeat the effect in one area.
|
To unwarp an area, click the Iron Out button or Unwarp button
on the Tools Options palette, and click over the area that you
want to restore.
|
| To warp image areas by using a grid |
Edit workspace
1 |
On the Tools toolbar, select the Mesh Warp Tool |
2 |
Drag the nodes in one of the following ways to deform the image:
|
• |
Drag a node to move it.
|
• |
Press Shift while dragging a node to move the entire row or
column.
|
• |
Press Ctrl while dragging a node to deform the row or column
into a smooth curve.
|
3 |
Choose settings from the Tool Options palette:
|
• |
Mesh horizontal and Mesh vertical — specifies the number of
mesh lines within the frame. The border lines are not counted.
You can change the grid size as you work. Entering new Mesh
values reconfigures the grid and returns it to the original
position. The image retains any deformations you have made.
|
• |
Symmetric — creates a grid that evenly covers the image. If your
image is not square, there will be different values for Mesh
horizontal and Mesh vertical. Unmark this check box to adjust
the Mesh horizontal and Mesh vertical settings independently.
|
• |
Show mesh — hides and shows the mesh warp grid.
|
• |
Draft Quality — specifies the quality of the preview that appears
while you edit the mesh nodes. Increasing the quality can slow
the warping process in large images.
|
• |
Final Apply — determines the quality of the applied effect.
Unmark the Best Quality check box to create a finished mesh
warp at the lower quality of the mesh preview.
|
4 |
Click Apply on the Tool Options palette.
|
You can save the position of the mesh nodes (the deformation
map) to apply the deformation to other images. For
information about saving and loading deformation maps, see
Working with deformation maps.
|
You can also double-click the image to apply the effect.
|
Choose Edit |